How To Install and Setup Postfix as a Send-Only SMTP Server

Postfix is a mail transfer agent (MTA), an application used to send and receive email. In this post, you will install and configure Postfix so that it can be used to send emails by local applications only — that is, those installed on the same server as Postfix.
Crissy Jarvis©
- Prerequisites
- Step 1: Installing Postfix
- Step 2: Configuring Postfix
- Step 3: Testing the SMTP Server
- Step 4: Forwarding System Mail
Prerequisites
You will need:
- One Debian 10 server, and a sudo non-root user
- A valid domain name, like
example.com, pointing to your server.
That your server’s hostname should match your domain or subdomain. You can verify the server’s hostname by typing hostname at the command prompt. The output should match the name you gave the server when it was being created.
Step 1: Installing Postfix
In this step, you’ll learn how to install Postfix. You will need two packages: ailutils-common, which includes programs necessary for Postfix to function, and postfix itself.
First, update the package database:
sudo apt update
Next, install mailutils-common:
sudo apt install mailutils-common
Finally, install postfix & mailutils:
sudo apt install postfix mailutils
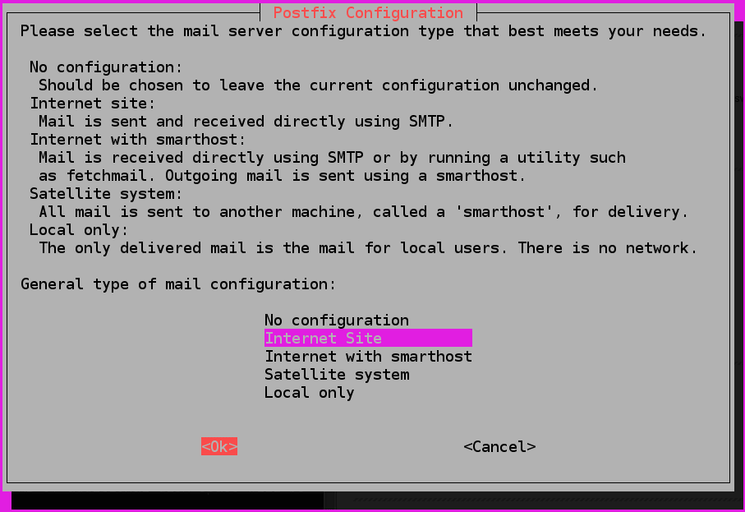
Near the end of the installation process, you will be presented with a window that looks like the one in the image below. The default option is Internet Site. That’s the recommended option for this tutorial, so press TAB, then ENTER.
After that, you’ll get another window just like the one in the next image. The System mail name should be the same as the name you assigned to the server when you were creating it. If it shows a subdomain like subdomain.example.com, change it to just example.com. When you’ve finished, press TAB, then ENTER.

You now have Postfix installed and are ready to modify its configuration settings.
Step 2: Configuring Postfix
In this step, you’ll configure Postfix to process requests to send emails only from the server on which it is running, i.e. from localhost.
For that to happen, Postfix needs to be configured to listen only on the loopback interface, the virtual network interface that the server uses to communicate internally. To make the change, open the main Postfix configuration file using your favorite text editor:
sudo vi /etc/postfix/main.cf
With the file open, scroll down until you see the following section:
And Change the line that reads inet_interfaces = all to inet_interfaces = loopback-only:
mynetworks = 127.0.0.0/8 [::ffff:127.0.0.0]/104 [::1]/128
mailbox_size_limit = 0
recipient_delimiter = +
inet_interfaces = loopback-only
inet_protocols = all
Another directive you’ll need to modify is mydestination, which is used to specify the list of domains that are delivered via the local_transport mail delivery transport. By default, the values are similar to these:
The recommended defaults for this directive are given in the code block below, so modify yours to match:
mydomain = example.com
mydestination = $myhostname, localhost.$mydomain, $mydomain
Save and close the file.
Finally, restart Postfix.
sudo systemctl restart postfix
Step 3: Testing the SMTP Server
In this step, you’ll test whether Postfix can send emails to an external email account using the mail command, which is part of the mailutils package you installed in Step 1.
To send a test email, type:
echo "This is the body of the email" | mail -s "This is the subject line" <your_email_address>
In performing your own test(s), you may use the body and subject line text as-is, or change them to your liking. However, in place of <your_email_address>, use a valid email address.
Now check the email address where you sent the test message. You should see the message in your Inbox. If not, check your Spam folder
Step 4: Forwarding System Mail
The last thing we want to set up is forwarding, so you’ll get emails sent to root on the system at your personal, external email address.
To configure Postfix so that system-generated emails will be sent to your email address, you need to edit the /etc/aliases file:
sudo vi /etc/aliases
The full contents of the file on a default installation of Debian are as follows:
mailer-daemon: postmaster
postmaster: root
nobody: root
hostmaster: root
news: root
www-data: root
mail: root
git: root
nas: root
mysql: root
redis: root
postfix: root
ntp: root
The postmaster: root setting ensures that system-generated emails are sent to the root user. You want to edit these settings so these emails are rerouted to your email address. To accomplish that, edit the file so that it reads:
mailer-daemon: postmaster
postmaster:    root
root:          <your_email_address>
Replace <your_email_address> with your personal email address. When finished, save and close the file. For the change to take effect, run the following command:
sudo newaliases
You can test that it works by sending an email to the root account using:
echo "This is the body of the email" | mail -s "This is the subject line" root