Hardening SSH Server Setup

Commonly used for remote administration, transferring files, forwarding and encapsulating sensitive flows, OpenSSH has become a key element of a large number of IT systems.
Therefore, it is critical to control its configuration, harden its installation and apply strict hygiene rules for its operation. The recommendations presented in this note cover all these different aspects.
Paulius Dragunas©
SSH, or Secure SHell, is an application layer protocol (layer 7 of the OSI model), which aims at correcting known deficiencies in FTP, RSH, RCP and TELNET protocols, through 3 sub-protocols:
- SSH-USERAUTH, a client-side authentication protocol – RFC 4252;
- SSH-TRANS, a secure transfer protocol that allows server authentication and establishment of a secure communication channel (confidentiality and integrity) – RFC 4253;
- SSH-CONNECT, a connection protocol that allows communication channels multiplexing (data and commands) – RFC 4254.
- Presentation of OpenSSH
- Use cases
- Best practices for using OpenSSH
Presentation of OpenSSH
OpenSSH is developed and maintained by the OpenBSD project. It is, to date, the reference implementation of the SSH protocol found on a large number of systems, including servers (Unix, GNU/Linux, Windows), client machines and network devices. This software suite includes many tools:
- the server, sshd.
- several clients, depending of the purpose:
- remote shell connections: ssh;
- file transfers and downloads:
scp,sftp;
- a key generation tool,
ssh-keygen; - a keyring service,
ssh-agentandssh-add; - a utility for gathering the public SSH host keys of a number of hosts,
ssh-keyscan.
Use cases
Remote shell administration
- SSH shall be used instead of historical protocols (
TELNET,RSH,RLOGIN) for remote shell access. TELNET,RSHandRLOGINremote access servers shall be uninstalled from the system.SCPorSFTPshall be used instead of historical protocols (RCP,FTP) for file transfers.- The implementation of
SSH tunnelsshall only be applied to protocols that do not provide robust security mechanisms and that can benefit from it (for example:X11,VNC, … ). This recommendation does not exempt from using additional low level security protocols, such as IPsec.
Best practices for using OpenSSH
SSH Protocol
SSH is standardized by a set of RFC (4250-4254) specifying its communication protocols and the cryptographic mechanisms the protocol must support. SSH now exists in 2 versions: SSHv1 and SSHv2. SSHv1 has structural vulnerabilities that have been corrected in the next version. Version 1 of the protocol is now obsolete.
Only version 2 of the SSH protocol shall be authorized.
SSH is mainly a communication protocol. It is neither a Unix shell, nor a terminal, nor a command interpreter. OpenSSH is the most commonly encountered implementation of the SSH protocol. More than a protocol, it is a toolbox offering a large number of features.
Under OpenSSH, mandatory use of version 2 of the protocol is enforced by the following directive in /etc/ssh/ssh_config:
sudo sed -i -e 's/Protocol.*/Protocol 2/' '/etc/ssh/ssh_config'
sudo /etc/init.d/ssh reload
Disable root access
The root identifier is the first target of attacks. It is good practice to disable SSH login to the root account. Access to this account remains available via the su and sudo commands.
Created an unprivileged user account
Before blocking SSH access to the root account, make sure you have an alternative user account coupled with a sufficiently complex password. If you do not have a normal user account, your machine will no longer be accessible by SSH.
install a password generation tool
sudo apt install apg
Generate a complex password
sudo apg -q -m 12 -a 0 -n 1 -M NCLS
create a standard user account without privilege
sudo adduser <STD_USER>
Create a .ssh folder for this user
sudo mkdir --parents /home/<STD_USER>/.ssh
sudo chown <STD_USER>:<STD_USER> /home/<STD_USER>/.ssh
Disable root access
root is an example of a generic account existing on all Unix/Linux systems, and used as an administrative account. The root account shall not be remotely accessible:
Configure the SSH server to not accept connections with root user
sudo sed -i -e 's/PermitRootLogin.*/PermitRootLogin no/' '/etc/ssh/sshd_config'
sudo /etc/init.d/ssh reload
PrintLastLog directive of sshd_config displays last connection details upon every user connection.
sudo sed -i -e 's/PrintLastLog.*/PrintLastLog yes/' '/etc/ssh/sshd_config'
sudo /etc/init.d/ssh reload
Filter users with SSH access
In order to limit the number of accounts accessible directly via SSH, it is possible to filter the users who can connect according to their group of membership.
Create the ssh-acces group containing the users who can connect using SSH
if [ -z "$(command grep "^ssh-acces" '/etc/group')" ]; then
  sudo addgroup --system "ssh-acces"
fi
Adding group 'ssh-acces' (GID 120) ...
Done.
Add the users authorized to use SSH access to the ssh-acces group
sudo adduser <STD_USER> ssh-acces
Adding user <STD_USER> to group 'ssh-acces' ...
Adding user <STD_USER> to group ssh-acces
Done.
Configure the SSH server to refuse the connection of users who do not belong to this group
echo '
# Limit access to users of group ssh-acces
AllowGroups ssh-acces' >> /etc/ssh/sshd_config
So now reload the configuration
sudo /etc/init.d/ssh reload
Protocol and network access
ListenAddress and Ports
Administrative operations are commonly performed through SSH. As such, the SSH server should only be reachable from the administration network, which should ideally be separated physically from the operational network.
AllowTCPForwarding
OpenSSH allows a user to forward flows through the server, both from the local network and the remote network. This feature can be used in rebound attacks to contact protected services (behind filtering gateways, listening on a different network. . . ). In addition, forwarding local flows may result in exposure of the internal network to uncontrolled flows.
Except for duly justified needs, any flow forwarding feature shall be turned off, in the SSH server configuration and in the local firewall by blocking connections.
Under OpenSSH, server side forwarding can be disabled using the AllowTcpForwarding directive of sshd_config:
sudo sed -i -e 's/AllowTcpForwarding.*/AllowTcpForwarding no/' '/etc/ssh/sshd_config'
sudo /etc/init.d/ssh reload
X11Forwarding
Many Linux and BSD distros also ship with default configuration allowing X11 display forwarding. However, X11 is notoriously insecure by design, and rarely used over WAN connections.
X11Forwarding shall be deactivated by default. Exceptions to this recommendation should be carefully considered and security implications deeply analysed. As a general rule, installing an X server on a console-only host should be avoided, due to several security issues in the X Window System.
X11 forwarding shall be disabled on the server.
Disabling X11 forwarding can be done using the X11Forwarding directive of sshd_config:
sudo sed -i -e 's/X11Forwarding.*/X11Forwarding no/' '/etc/ssh/sshd_config'
sudo /etc/init.d/ssh reload
When X11 forwarding is active (remote execution of an X11 client), compromise of the remote host can lead to uncontrolled information leakage:
- user keystrokes capture;
- display forwarding …
When X11 redirection is required due to operational constraints, remote X11 clients should be treated with suspicion and their privileges shall be strictly limited.
An ssh client should use the -X option and disable the ForwardX11Trusted option from its ssh_config configuration file: ForwardX11Trusted no
Agent Forwarding
SSH agent forwarding is also still allowed by many SSH server configurations, and is still frequently used by SSH clients. However, this is insecure, as it allows anyone with root access on the server to intercept and manipulate all forwarded SSH connections.
The best practice is to disallow SSH agent forwarding with the following /etc/ssh/sshd_config setting:
AllowAgentForwarding no
sudo sed -i -e 's/AllowAgentForwarding.*/AllowAgentForwarding no/' '/etc/ssh/sshd_config'
sudo /etc/init.d/ssh reload
Instead of using SSH agent forwarding, use the ProxyJump configuration directive in your SSH client configuration (or the -J flag on the SSH command line). Bogdan Popa has a succinct writeup about The Problem With SSH Agent Forwarding, and what to do instead.
There’s no equivalent to agent forwarding (or SSH proxying) with WireGuard. The safe alternative with WireGuard is to tunnel SSH traffic from client to jumphost through WireGuard, and allow the jumphost to forward SSH traffic to the destination SSH server.
Cryptography
Authentication
SSH heavily relies on asymmetric cryptography for authentication. Failure to ensure the server authentication may result in numerous security impacts:
- risk of data theft through server impersonation (impossibility to verify the identity of the server);
- exposure to “man in the middle” attacks allowing to retrieve all data exchanged (keystrokes, displayed elements, logins, passwords, viewed or edited files. . . ).
The server authenticity shall always be checked prior to access. This is achieved through preliminary machine authentication by checking the server public key fingerprint, or by verifying the server certificate.
With OpenSSH, this control can be achieved by the client in different ways:
- ensure the SSH public key fingerprint of the server is the correct one (previously obtained by using
ssh-keygen -l); - add the SSH public key of the server in the known_hosts file manually;
- verify the signature the SSH certificate presented by the server with a trusted Certification Authority.
Explicit validation of the host key by the user can be specified using the StrictHostKeyChecking attribute in /etc/ssh/ssh_config:
sudo sed -i -e 's/StrictHostKeyChecking.*/StrictHostKeyChecking ask/' '/etc/ssh/ssh_config'
sudo /etc/init.d/ssh reload
OpenSSH applies, by default, a Trust On First Use (TOFU) security model: during the first connection, if the client cannot authenticate the remote host, ssh requests the user to verify the server key fingerprint. If the user validates the fingerprint, ssh registers the key into the known_hosts file to allow automatic validation for the following connections.
Key Generation - sizes and algorithms
SSH can handle several cryptographic algorithms and key sizes. Some of them do not meet the security requirements. In practice, the SSH “host” keys (used to authenticate an SSH server) are rarely renewed. It is, therefore, important to choose a key long enough from the beginning. The DSA implementation in OpenSSH supp;orts key up to 1024 bits long. Such keys are now considered insecure and their use is strongly discouraged. You can also choose to disable support for RSA keys The Elliptic curve algorithms must be chose as cryptographic algorithms. Ed25519 algorithm, which is considered state of the art. Elliptic curve algorithms in general are sleek and efficient and unlike the other well known elliptic curve algorithm ECDSA, this Ed25519 does not depend on any suspicious NIST defined constants
ECDSA keys should be favoured over RSA keys when supported by SSH clients and servers.
Key quality is an important robustness factor, directly linked to the RNG (Random Number Generator) used during the genera- tion process. Providing a proper RNG is thus essential. Several equipments and computers, including basic embedded components or virtual machines lack such a proper generator. Keys should be generated in a context where the RNG is reliable, or at least in an environment where enough entropy has been accumulated. This recommendation is all the more important since it is common to generate the sshd host keys by script upon first service startup. A mechanism aimed at changing the generated keys shall be proposed and initial keys shall be replaced.
- So, in your server, in
/etc/ssh/sshd_configfile comment or delet HostKeyDSA&RSAentry:
// file: "/etc/ssh/sshd_config"
#HostKey /etc/ssh/ssh_host_dsa_key
#HostKey /etc/ssh/ssh_host_rsa_key
- Always in
/etc/ssh/sshd_configadd HostKey attribute for ED25519
// file: "/etc/ssh/sshd_config"
HostKey /etc/ssh/ssh_host_ed25519_key
- And delete
DSA&RSAkey in/etc/ssh/folder
sudo rm -v /etc/ssh/ssh_host_dsa_key*
sudo rm -v /etc/ssh/ssh_host_rsa_key*
- Generate an
ed25519using ssh-keygen.
sudo ssh-keygen -t ed25519 -f /etc/ssh/ssh_host_ed25519_key
Generating public/private ed25519 key pair.
Enter passphrase (empty for no passphrase):
Enter same passphrase again:
Your identification has been saved in /Users/<user id>/.ssh/id_ed25519.
Your public key has been saved in /Users/<user id>/.ssh/id_ed25519.pub.
The key fingerprint is:
SHA256:H6/ZSrfIs42k0QjA2RMUZlfldBHrneC3q+QZjjiO+bU <user id>@<host>.local
The key's randomart image is:
+--[ED25519 256]--+
|     .*.....o +o |
|   . = o   o . . |
|    + o     ...  |
|     . .    .....|
|      . S .  ..o.|
|       . + o  . .|
|        o *.oo . |
|        oBoO*.o .|
|       o+=@Eo=.. |
+----[SHA256]-----+
- You do not need to enter a passphrase, but it’s highly recommended as it protects your private key if compromised. If so, someone would still need your passphrase in order to unlock it. The exception to this is if you’re running an automated process such as as cron job. You should then leave the password out. From ssh.com: “Generally all keys used for interactive access should have a passphrase. Keys without a passphrase are useful for fully automated processes.”
- ED25519 keys should be favoured over ECDSA keys when supported by SSH clients and servers. The Ed25519 algorithm, which is considered state of the art. Elliptic curve algorithms in general are sleek and efficient and unlike the other well known elliptic curve algorithm ECDSA.
- An host authentication private key shall only be readable by the
sshdservice. Under Unix/Linux, only root is granted such a privilege :
sudo chmod 600 /etc/ssh/ssh_host_ed25519_key
- Restart
sshddeamon
sudo systemctl restart sshd
Some rules can ensure that the entropy pool is properly filled:
- keys must be generated on a physical equipment;
- system must have several independent sources of entropy;
- key generation shall occur only after a long period of activity (several minutes or even hours)
Choosing Symmetric algorithms
Once the peers are mutually authenticated, the communication channel is protected in confidentiality and in integrity.
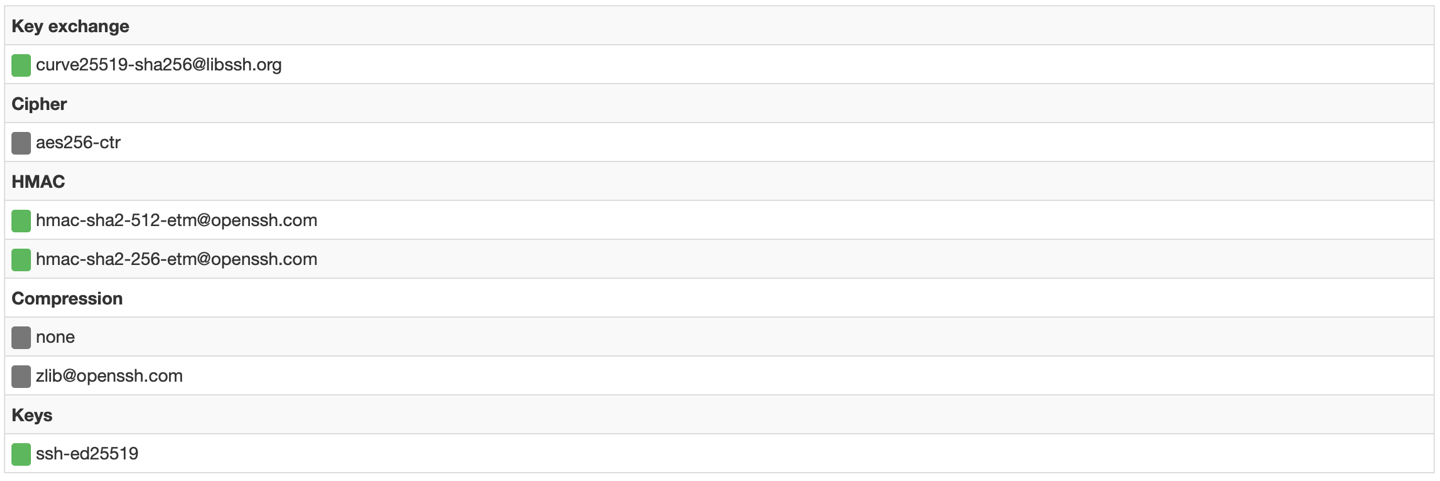
The encryption algorithm shall either be AES192-CTR or AES256-CTR. And the integrity mechanism shall rely on HMAC-SHA256 or HMAC-SHA512.
The cryptographic algorithms are negociated between the client and the server, so the list of available algorithms must be set on both sides. Weak algorithms shall be removed from the negotiated cryptographic suites.
CBC mode implemented in OpenSSH has known vulnerabilities, CTR mode is thus recommended. Integrity algorithms HMAC-SHA256 and HMAC-SHA512are recommended, are sup-ported since OpenSSH version 5.9.
Under OpenSSH, the following directives shall be added in /etc/ssh/sshd_config and /etc/ssh/ssh_config configuration files:
KexAlgorithms curve25519-sha256@libssh.org
Ciphers aes256-ctr,aes192-ctr
MACs hmac-sha2-512-etm@openssh.com,hmac-sha2-256-etm@openssh.com
Regenerate Moduli
The /etc/ssh/moduli file contains prime numbers and generators used by the SSH server for the Diffie-Hellman key exchange. Your default /etc/ssh/moduli is probably not unique. Generating a new file may harden your server.
cd /tmp/
sudo ssh-keygen -G moduli-2048.candidates -b 2048
sudo ssh-keygen -T moduli-2048 -f moduli-2048.candidates
sudo cp /tmp/moduli-2048 /etc/ssh/moduli
sudo rm /tmp/moduli-2048
Generating these file might take awhile.
Protect against DDOS and brute force attacks with fail2ban
Fail2ban scans log files (e.g. /var/log/auth.log and bans IPs that show the malicious signs – too many password failures, seeking for exploits, etc. Generally Fail2Ban is then used to update firewall rules to reject the IP addresses for a specified amount of time, although any arbitrary other action (e.g. sending an email) could also be configured. Out of the box Fail2Ban comes with filters for various services (apache, courier, ssh, etc).
Installing fail2ban
For Ubuntu/Debian users, fail2ban can be installed using apt:
sudo apt install fail2ban
Requirements Python version 2.6 or higher
Configuring fail2ban
The config file is /etc/fail2ban/jail.conf The Default section contains the general information about the bans.
Starting fail2ban
Once you have installed and configured fail2ban the way you want, you just need to start it:
sudo systemctl restart fail2ban
or
sudo systemctl stop fail2ban; sudo systemctl start fail2ban
Get the status
sudo fail2ban-client status
and see the /var/log/fail2ban.log log file
tail -f /var/log/fail2ban.log
Activate fail2ban rules for SSH connection on Debian stretch
if [ ! -e '/etc/fail2ban/jail.d/defaults-debian.conf' ]; then
    sudo touch '/etc/fail2ban/jail.d/defaults-debian.conf'
fi
if [ -z "$(command grep "\[DEFAULT]" '/etc/fail2ban/jail.d/defaults-debian.conf')" ]; then
    sudo echo "[DEFAULT]
    destemail = root
    sender = fail2ban
    # Ignore localhost & private IP
    ignoreip = 127.0.0.0/8 10.0.0.0/8 172.16.0.0/12 192.168.0.0/16
    " >> '/etc/fail2ban/jail.d/defaults-debian.conf'
fi
if [ -z "$(command grep "\[sshd]" '/etc/fail2ban/jail.d/defaults-debian.conf')" ]; then
    sudo echo "[sshd]
    enabled = true
    maxretry = 3
    findtime = 120
    bantime = 1200
    " >> '/etc/fail2ban/jail.d/defaults-debian.conf'
fi
And now reload the config with :
sudo systemctl restart fail2ban
maxretryv: Number of matches (i.e. value of the counter) which triggers ban action on the IP.findtime: The counter is set to zero if no match is found within “findtime” seconds.bantime: Duration (in seconds) for IP to be banned for. Negative number for “permanent” ban.ignoreip: can be an IP address, a CIDR mask or a DNS host. Fail2ban will not ban a host which matches an address in this list. Several addresses can be defined using space separator.
Test your SSH acces secuity
- with sshcheck
- with CryptCheck
with SSHScan (Requirement Python version 2.6 or higher)
 cd /tmp/
 wget https://raw.githubusercontent.com/arthepsy/ssh-audit/master/ssh-audit.py
 chmod +x /tmp/ssh-audit.py
 ./ssh-audit.py localhost
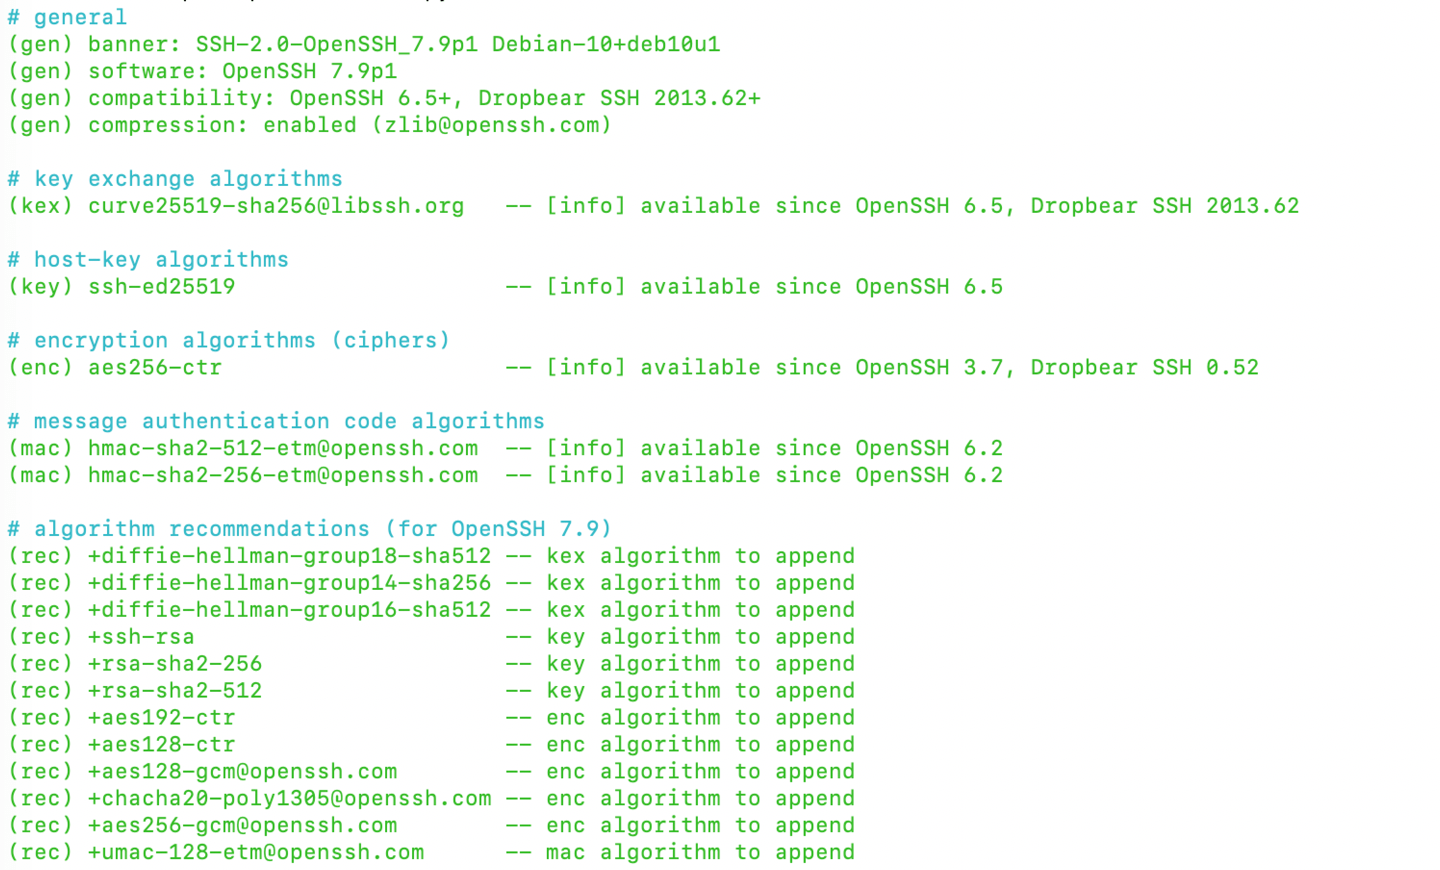
All GREEN, so everthing is good !