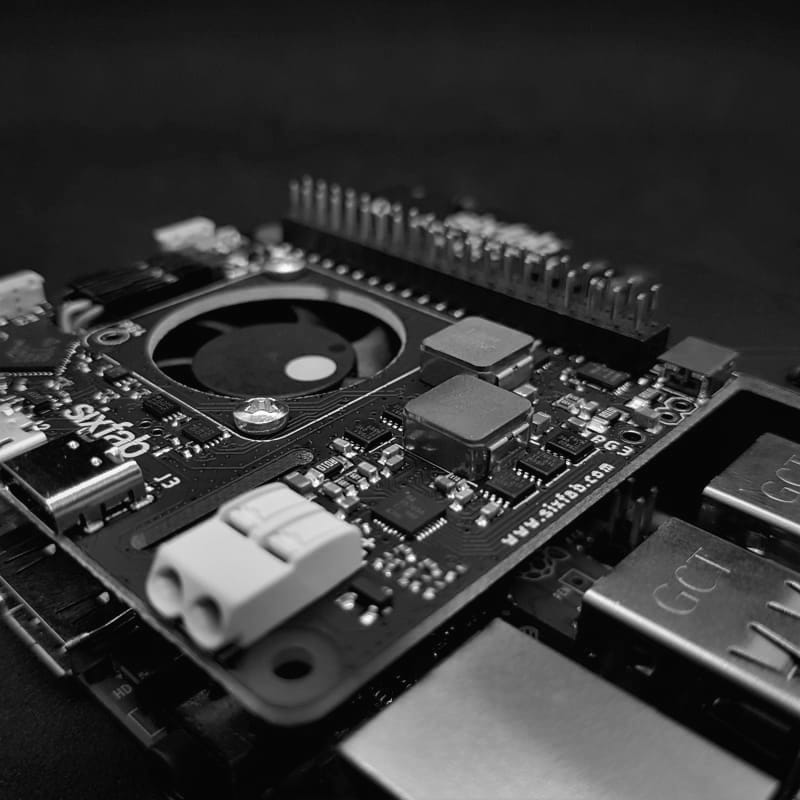
Raspberry Pi - Sixfab Power Management & UPS HAT
This HAT is designed to solve the problem the majority of IoT projects faced, the reliable power supply. Make your device always powered, this uninterruptable HAT will manage sources between batteries and adapters intelligently. Without letting your Pi hang up or reset switches seamlessly. RTC featured integrated MCU to let you schedule and full control over the power on/off tasks remotely, timely, securely. Extensive input range and options – solar included – will provide flexibility to choose the best power options to fit your device needs.
Sixfab®
Sunday 13 December 2020
Description
The Raspberry Pi needs to be powered up on edge, always. The HAT will make you sure your device will be powered. You will have full control over the power of it! The true uninterruptable power supply for Raspberry Pi automatically switches between different power sources without causing a reset or failure on your board. A real-time clock(RTC) featured an onboard ARM® Cortex®-M0+ microcontroller lets you schedule power cycles and wake-up or soft shut down Raspberry Pi remotely. At power-sensitive applications, the device can be entered deep sleep modes and save battery. Dynamic power management means will share the load between the main source and battery, will protect the circuit.
Hardware Features
- True Uninterruptible Power Supply (UPS) battery rechargeable solution without Failing the
Raspberry Pi. - Compatible with Raspberry Pi A+, B+, 2B, 3B, 3B+, and 4 as well as Raspberry Pi Zero v1.3 and Raspberry Pi Zero Wireless.
- 3.9V to 21V Input Operating Voltage Range Supports Solar Panels.
18650 Li-onSeparable Battery Holder.- 1-cell 3.7V External Battery Input.
- Compatible with
Raspberry PiUniversal Power Supplies. - Onboard Microcontroller manages scheduled power tasks, calendar events with Real-time Clock (RTC), gently shutdown or wake-up, sleep mode controls.
- Parallel Charging up to 3 Amps while powering the system.
- Watchdog Timer keeps the system alive when the Raspberry Pi freezes up.*
- Input, System, and Battery current monitor.
- Control over current limits of batteries and sources with 50mA resolution.
- Battery protection circuit enhanced with integrated temperature sensors.
- Thermal Shutdown and Input, System, Battery Overvoltage Protection.
- Dynamic power management boosts the system output from the battery if the needed power is more than the input supply provides.
- Onboard ARM® Cortex®-M0+ MCU manages scheduled power tasks with Real-time Clock (RTC), gently shutdown, or wake-up.
- Supports external
GPIOinterrupts to wake up or enter deep-sleep modes. - Only I2C pins of Raspberry Pi used by HAT.
- Onboard STEMMA
QT/Qwiic/JSTSH connector. - Programmable user buttons and RGB LEDs.
- Smart Cooling FAN with Pulse Signal Feedback.
- Battery level indicator LEDs with charging/discharging status.
- Slot for
Raspberry PiCamera Cable. - Optional Pogo Spring Pins for hardware shutdown or wake up.
- Easy-to-use GUI to control features.*
Package Includes
| Piece | Product |
|---|---|
| 1x | Sixfab Power Management and UPS HAT |
| 1x | Cooling Fan |
| 1x | Aluminum Heatsink with Thermal Tape for Raspberry Pi |
| 1x | Battery Cable JST-SFH – 150mm |
| 1x | Qwiic Cable – 200mm |
| 1x | Female GPIO Stackable Header 2×20 |
| 1x | Pogo Pin |
| 1x | Mini Flat Head Screwdriver |
| 6x | Mounting screws (2 for Fan & 4 for HAT mounting) |
| 2x | Hex nut for Fan mount |
| 2x | Threaded Standoffs – 16mm |
Power Software
One of the biggest problems of remote projects is keeping the devices all-time-powered on the edge and knowledge of the power status. While stacking the UPS HAT with a battery solves the problem as standalone. The user can manage the UPS HAT via the Sixfab Power Management Platform remotely. The detailed diagnostics about the battery and main power source available here and ease the maintenance. An ultra-lightweight service agent works on the Raspberry Pi and communicates with the platform if you have an Internet connection via ethernet, Wi-Fi, or Cellular.
It is free to use up to 10 devices.
Power Software Features
Diagnostics
- Charging status, Battery Percentage, and Health
- Main Power Source Plugged or Unplugged
- Input/Output Voltage Level and Current Consumption
- Temperatures of Raspberry Pi, HAT, and Battery Holder Board
- Cooling Fan Working Status and RPM
- Custom Time Graphs on the Dashboard
Configurables
- Firmware of the microcontroller on the HAT and the service agent on the Raspberry Pi can be updated remotely
- Scheduling wake-up/shutdown time or routines
- Creating e-mail alarms when a parameter exceeds certain thresholds
- Battery capacity can be updated for a precise percentage calculation (2500mAh by default)
- Safe autonomous soft shutdown and maximum charging percentage limits of the battery can be changed (20%-80% by default)
- Temperature limit that starts the cooling fan can be updated (40°C / 104°F by default)
- LED color and animation of L1 RGB can be updated (red-heartbeat by default)
- The timezone of UPS HAT can be selected for calendar events
- Watchdog timer if the Raspberry Pi freeze and does not respond, a hard reset can be initiated* Will be available with future firmware updates soon.
Logs
The message exchanges between Raspberry Pi service agent, platform and microcontroller will be shown here for detailed troubleshooting.
Getting Started
Keeping this pocket-sized computer Raspberry Pi alive all the time is mandatory for most of the projects. Having them on the edge need to always self-powered and recovery ability when things went wrong with the electricity. Sixfab Power Software and UPS HAT are designed to prevent any data loss when the power is gone. If you just need an uninterruptible power supply(UPS) for your Raspberry Pi built, you just need to insert a battery to HAT and you are clear to go right out of the box. The UPS HAT will not let your operating system freeze or resets while switching the source between the battery and main supply.
This section explains how you can get your HAT up ready working with your Raspberry Pi. In order to get a device connected please follow the following steps.
Assembling Hardware
Follow the steps from the Video to prepare your hardware.
Video to prepare your hardware
Setting Up a Device on Power Software
Technical Details
Hardware specifications
- Microchip
ATSAMD21G18 ARM® Cortex®-M0+Microcontroller Texas Instruments bq25703AMulti-Chemistry Battery Buck-Boost Charge Controller With System Power Monitor and Processor Hot MonitorTexas Instruments bq27441-G1System-Side Impedance Track™ Fuel GaugeTexas Instruments INA219 Zerø-Drift, Bidirectional Current/Power Monitor
Pinout
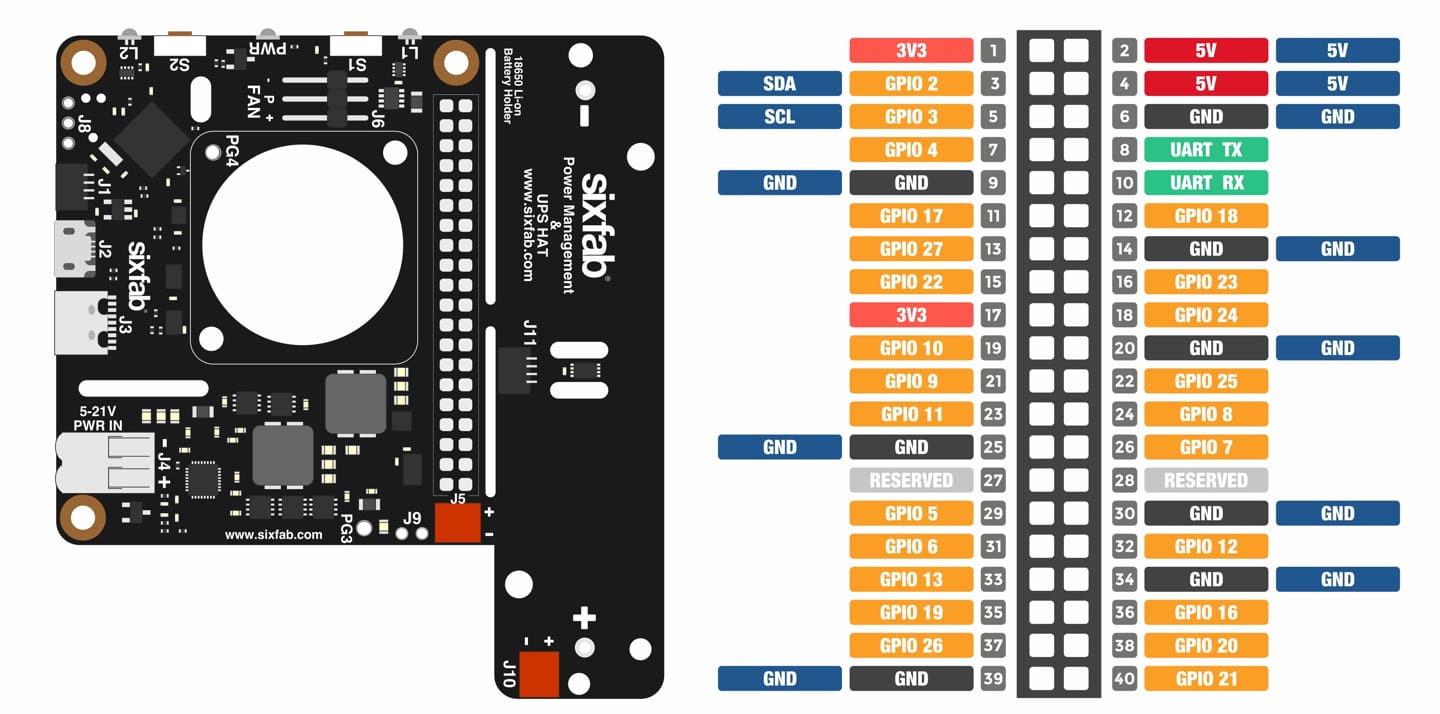
Power management and ups hat Pinout
Layout
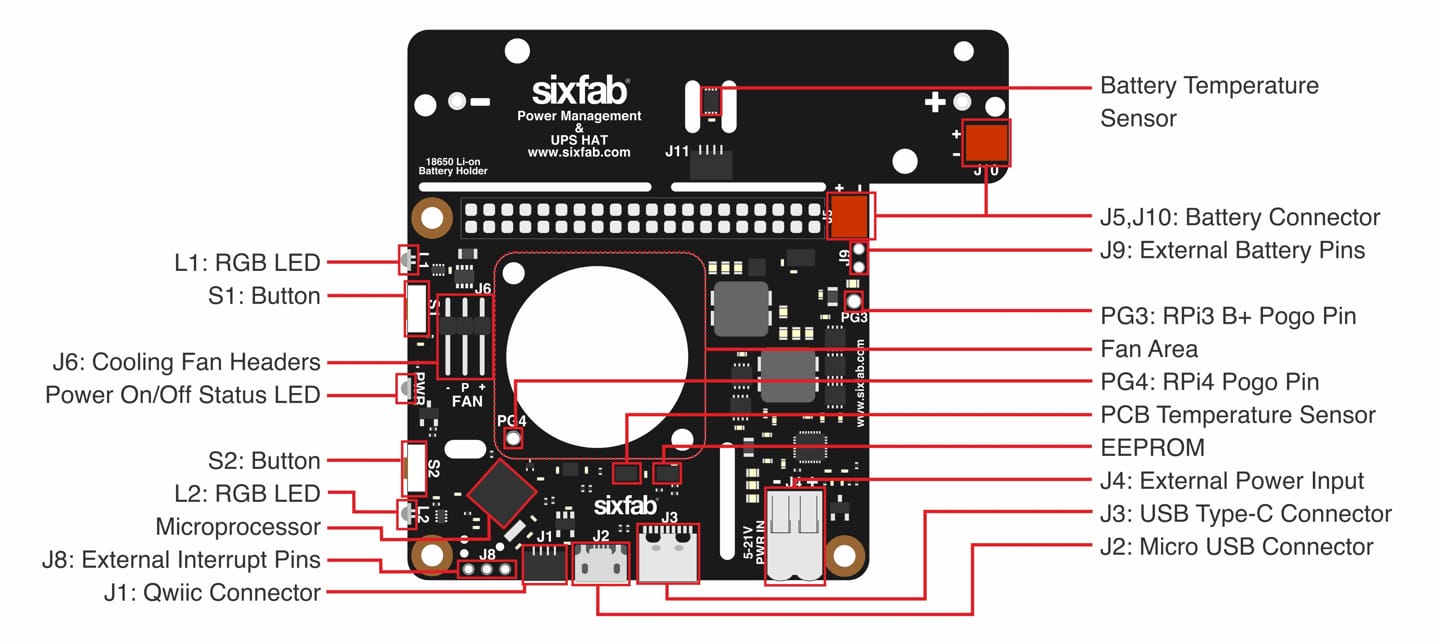
Top Layout
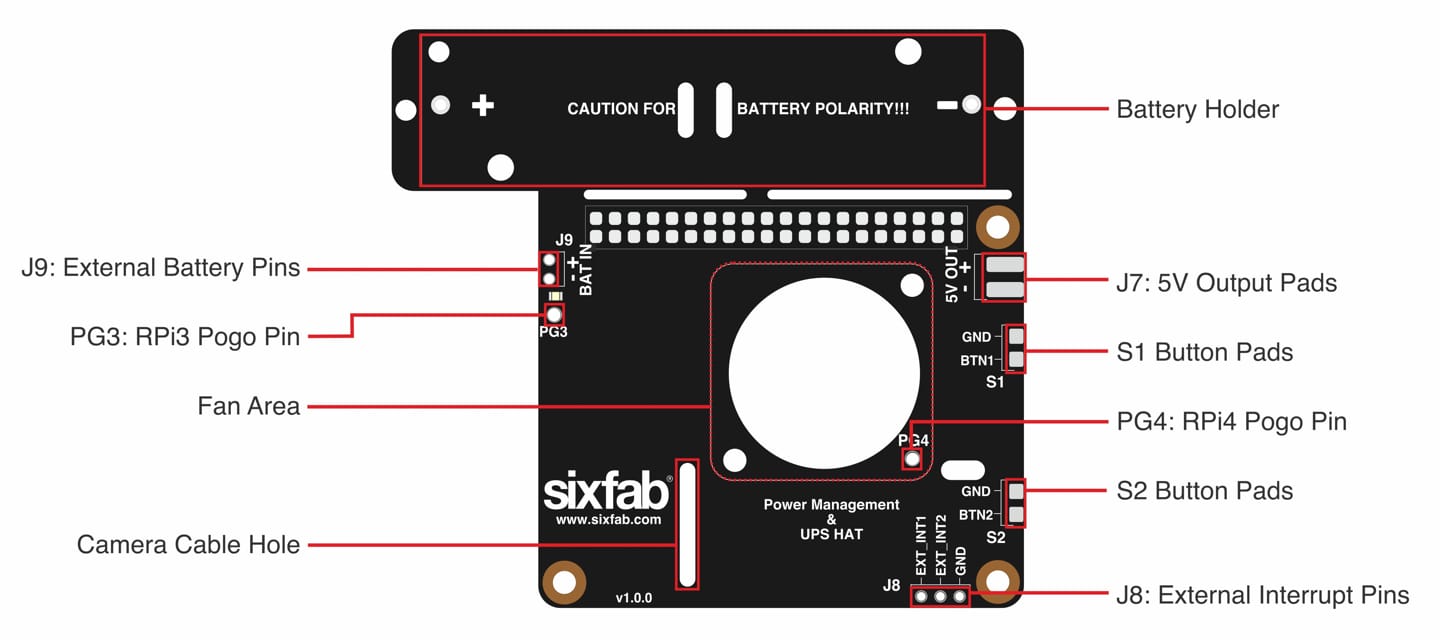
Bottom Layout
Dimension
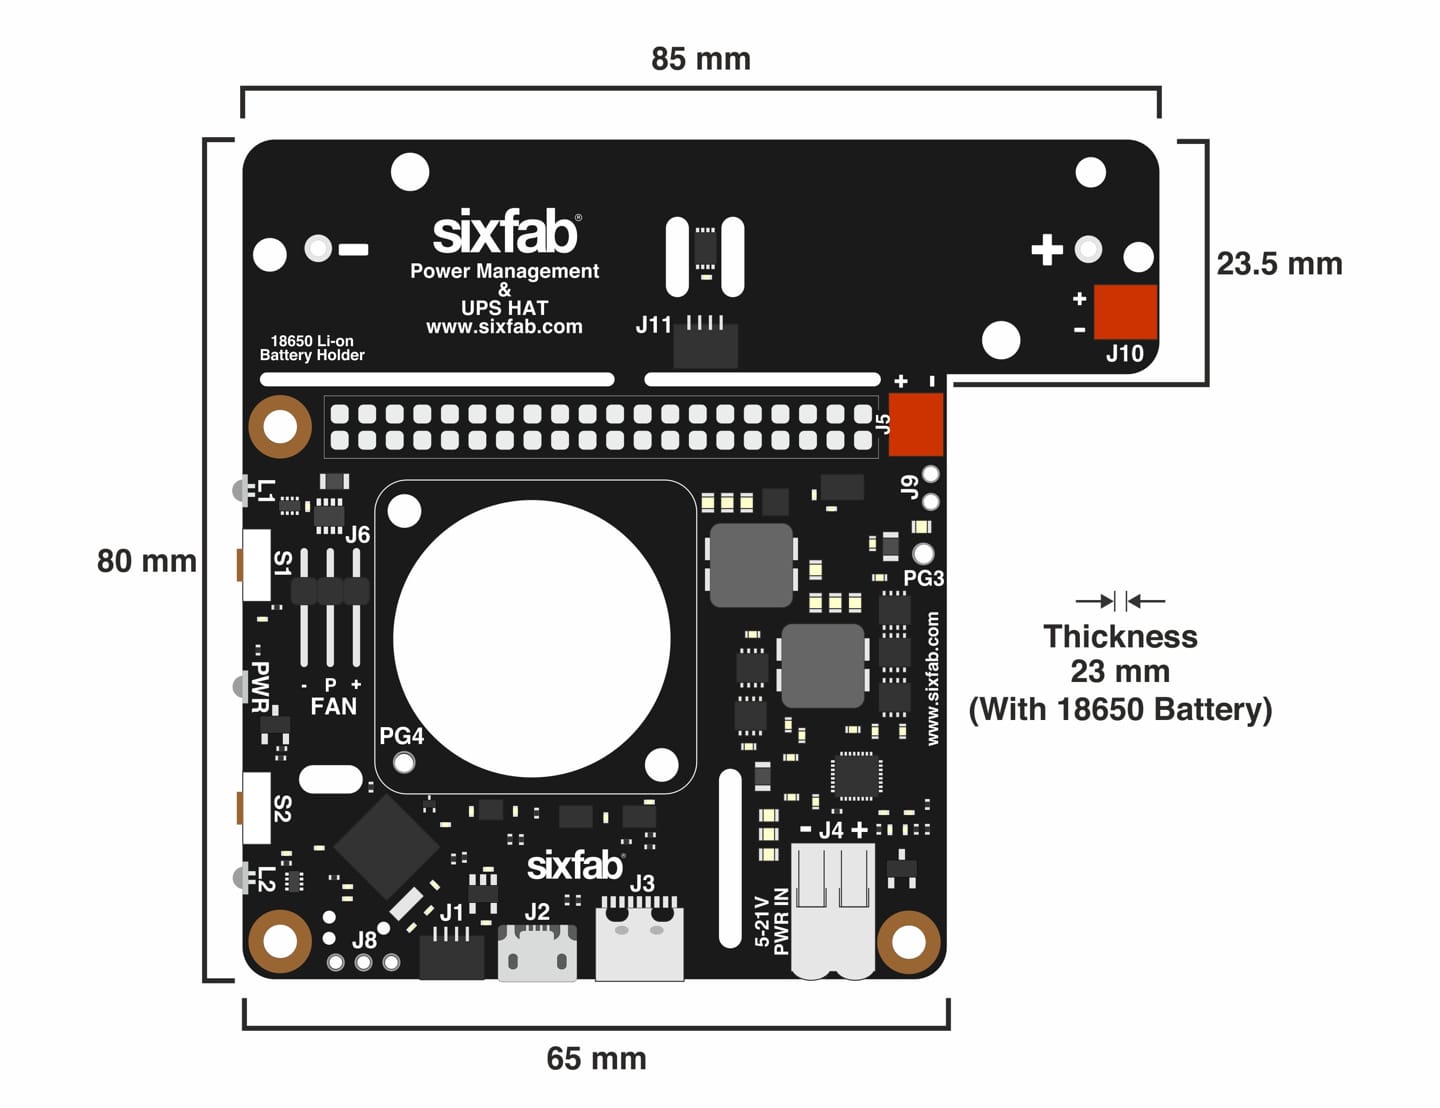
PMS hat dimension
Power Inputs/Outputs
| Inputs/Outputs | Description |
|---|---|
| J2 | Micro USB 5V 2.5A max. |
| J3 | USB Type-C 5V 3A max. |
| J4 | SMD Terminal Block 3.9V to 21V. |
| J7 | 5V rated 2.6A max output, solderable pads on the bottom side. |
The recommended input voltage is 5V and the input current is 2A minimum. For the 12V input voltage, the minimum is 1.5A.
- You can connect an external device to
J7for 5V output(underneath the HAT) and always check the polarity when you source via J7.
Use Single Input : Use only one of these three inputs(J2, J3, J4) at a time, i,e. Do not plug a USB(J2, J3) adapter while the power source is inserted through the terminal blo (J4) or the other way.
Battery
The HAT comes with an integrated 18650 Flat Top Li-on battery holder without a battery. It can be breakable if needed to use it in a different placement. Then you need to use the battery cable included in the package to connect the battery to the mainboard via JST- SFH connectors(J5 and J10)
You can plug an external single-cell 3.7V Li-on or Li-po rechargeable batteries when bigger capacities or special dimensions needed. Use JST-SFH connector(J5) with a suitable battery cable with it or you can solder cables to battery header(J9) by paying attention to the polarity.
Use One Battery : The UPS HAT has several Battery input options such as J5, J9. Do not use multiple Batteries at a time.
Buttons
There are two right-angle programmable push buttons(S1,S2) at the edge of the HAT. The default behaviors of the buttons are as follows.
| Behavior | Status |
|---|---|
| S1(Long Press) | Hard shutdown by cutting power of Raspberry Pi |
| S1(Short Press) | Hard boot-up by powering Raspberry Pi |
| S2(Long Press) | Soft shutdown via I2C then power off |
| S2(Short Press) | Power on if power conditions are alright (The pogo pin needs to be soldered *) |
LEDs
There are three LEDs on the HAT as two of them are programmable RGB.
| LED | Status |
|---|---|
| PWR | This red LED is ON when the Raspberry Pi is powered |
| L1 | Can be programmed as shows temperature level or heartbeat for the system |
| L2 | Used for battery charging level and status by default. Blinks if charging the battery, steady if the system powered by battery or fully charged |
Blinks if charging the battery, steady if the system powered by battery or fully charged.
The color shows the percentage of the battery.
- RED when the lower than 30%.
- YELLOW between 30% and 60%.
- GREEN when the battery is charged more than 60%.
Qwiic Connector
The Qwiic cable and the qwiic connectors(J1-J11) on board are used to read the temperature of the battery holder card when battery holder broke off from UPS HAT. This feature is under development.
I2C Address :The UPS HAT uses 0x41 I2C address.
UPS HAT Pogo Pin
- Soldering the Pogo Pin is necessary if the Raspberry Pi is using soft shutdown.
- The pogo pin is only compatible with Raspberry Pi 3B+ and Raspberry Pi 4.
- If soft shutdown is done(POWER LED of the RPI remain on in this case), the Raspberry Pi still consumes some energy compared to hard shutdown(where the 5V cuts out). The current consumption is this case is around 120mA for Raspberry Pi 3B+, 250mA for Raspberry Pi 4.
If your project does not have the soft shutdown scenario, you may avoid soldering the pogo pin.
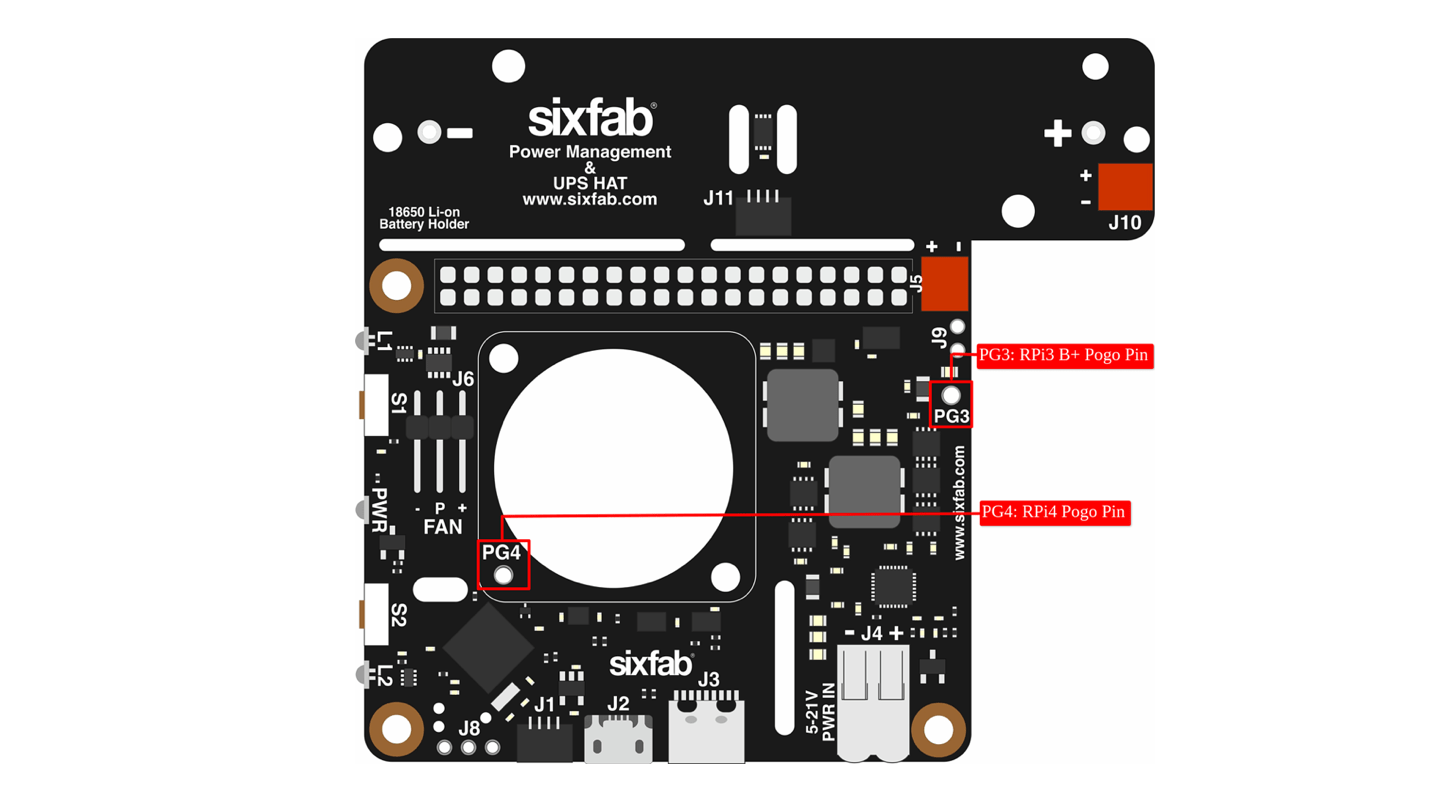
UPS HAT Pogo Pin
How soldered the pogo pin
- Put the hat in place. Place the pogo pin in place.
- Make sure it is touching the correct spot on the RPi. Should be exactly vertical.
- Then, solder the pin to the hat.
- Next…it needs to be placed in a position where the spring exerts some effort, so, with some pressure on the top of the pin, touch the soldering iron to the solder hole…the solder will melt and the pin will then move down / compress / etc., and while holding it in the (slightly) compressed state real still, remove the soldering iron and let the solder cool.
Sixfab git repository
Sixfab git repository server is accessible here. Three sections are available:
PMS Python API
Use the Python APIs to integrate into your code
Installation PMS API
For a better experience, it recommended to stop the power agent if connected to the power software. Run the following command to stop the service.
sudo systemctl stop power_agent.service
sudo systemctl stop power_request.service
In order to use the Python API, you will definitely need to install the python library.
pip3 install sixfab-power-python-api
upgrade PMS API
pip3 install sixfab-power-python-api --upgrade
Methods
All the methods can be accessed from the API doc.
Samples
Some example of Python scripts are available here
- pms_create_event.py
- pms_get_all_metrics.py
- pms_init.py
- pms_read_sensors.py
- pms_reboot.py
- pms_reset.py
- pms_reset_boot_mode.py
- pms_rtc_time.py
- pms_softhard_shutdown.py
- pms_upgrade_api.sh
- pms_upgrade_firmware.py
To execute correctly this script it’s important to stop sixfab power_agent.service
Uninstallation PMS API
The installed library can be uninstalled by
pip3 uninstall sixfab-power-python-api
Default Settings
The default behavior of the UPS HAT is defined as follows:
| Properties | Value |
|---|---|
| FAN_SPEED | 1 RPM |
| WATCHDOG_STATUS | WATCHDOG_ACTIVE |
| RGB_ANIM_TYPE | RGB_DISABLED |
| RGB_ANIM_COLOR | RED |
| RGB_ANIM_SPEED | RGB_FAST |
| FAN_AUTOMATION_SLOW_TRESHOLD | 40 |
| FAN_AUTOMATION_FAST_TRESHOLD | 100 |
| BATTERY_MAX_CHARGE_LEVEL | 100 |
| BATTERY_SAFE_SHUTDOWN_LEVEL | 5 |
| BATTERY_SAFE_SHUTDOWN_STATUS | SAFE_SHUTDOWN_PASSIVE |
| BATTERY_WAKEUP_LEVEL | 25 |
| WORKING_MODE | BATTERY_POWERED |
| BATTERY_DESIGN_CAP | 2500 |
| BATTERY_WAKEUP_STATUS | WAKEUP_PASSIVE |
| POWER_STATUS | RPI_POWER_ON |
| LOW_POWER_MODE | LPM_DISABLED |
| EASY_DEPLOYMENT_MODE | EDM_DISABLED |
| FAN_MODE | FAN_AUTO_MODE |
| WATCHDOG_INTERVAL | 2 minutes |
| BATTERY_SEPARATION_STATUS | NOT_SEPARATED |
| DEVICE_CURRENT_THRESHOLD | 250 mA |
| BUTTON1_STATUS | BUTTON_RELEASED |
| BUTTON2_STATUS | BUTTON_RELEASED |
| SOFT_POWEROFF | SOFT_ACTION_NO_EXIST |
| SOFT_REBOOT | SOFT_ACTION_NO_EXIST |
| SOFT_POWERON | SOFT_ACTION_NO_EXIST |
| BATTERY_CUT_OFF_TEMP | 65 |
| WAKE_UP_TOLERANCE | 5% |
| MAX_CHARGE_TOLERANCE | 2% |
| RUNTIME_ON_POWER_OUTAGE | 20 minutes |
| SLEEPTIME_ON_POWER_OUTAGE | 20 minutes |
Tips
UPS HAT Manual Firmware Update Instructions
For firmware update, UPS HAT must work in the bootloader mode.
- Remove the battery and disconnect the power source.
- Press and hold both S1 and S2 buttons simultaneously and then plug in the power cable to UPS HAT.
- Release the buttons when the L1 lit magenta. This indicates that UPS HAT is working in bootloader mode.
- The
update_firmwaremethod from Python API can only be called during the bootloader mode. - Download the latest firmware version here.
curl https://git.sixfab.com/sixfab-power/firmwares/raw/branch/master/sixfab_pms_firmware_<latest version>.bin --output /tmp/sixfab_pms_firmware_<latest version>.bin - If the
power_agentservice is running, stop it.sudo systemctl stop power_agent.service - Change the firmware_path (filename of the downloaded file in
step 5)pms_upgrade_firmware.pyscript and execute it to update the firmware on the UPS HAT. - L1 flashes green and purple when updating.
- When the update is complete, please wait until the system starts.
Raspberry Pi Power Management & UPS HAT Manual Firmware Update
Make sure your app is updated to use the latest API version as well
If you get an error message, run the pms_upgrade_firmware.py script on the command line a few times.


