Docker on Raspberry Pi

Docker is a tool for creating, deploying, and running applications in containers. The software is popular among developers as it speeds up the development process and does not use a lot of resources. Docker containers are lightweight, especially compared to virtual machines. This feature is especially valuable if you are a Raspberry Pi user.
Elias©
Sunday 07 Juin 2020
- Docker vs Virtual Machine
- How to Install Docker on Raspberry Pi
- Raspberry Pi Docker Images
- Useful Docker Commands
- How to Upgrade Docker on Raspberry Pi?
- How to Uninstall Docker on Your Raspberry Pi?
- Install Docker Compose
- TIPS #1 : Change Docker root directory
/var/lib/dockerto another location - Example - Homebridge & Docker on a Raspberry Pi
- Conclusion
Docker vs Virtual Machine
Docker is an open source application deployment container that evolved from the LinuX Containers (LXCs) used for the past decade. LXCs allow different applications to share operating system (OS) kernel, CPU, and RAM.
Docker allow us to run an application and its dependencies in resource-isolated processes.
The VM model blends an application, a full guest OS, and disk emulation. In contrast, the container model uses just the application’s dependencies and runs them directly on a host OS. Containers do not launch a separate OS for each application, but share the host kernel while maintaining the isolation of resources and processes where required.
The fact that a container does not run its own OS instance reduces dramatically the overhead associated with starting and running instances. Startup time can typically be reduced from 30 seconds (or more) to one-tenth of a second. The number of containers running on a typical server can reach dozens or even hundreds. The same server, in contrast, might support 10 to 15 VMs.
In Docker, applications and their dependencies, such as binaries and libraries, all become part of a base working image.
The isolation from OS kernel provided by containers is less robust than that of real virtual machines, which have independent kernels and run on top of a hypervisor. However, sharing the kernel allows containers to run faster and offers management features which are not easy with VMs.
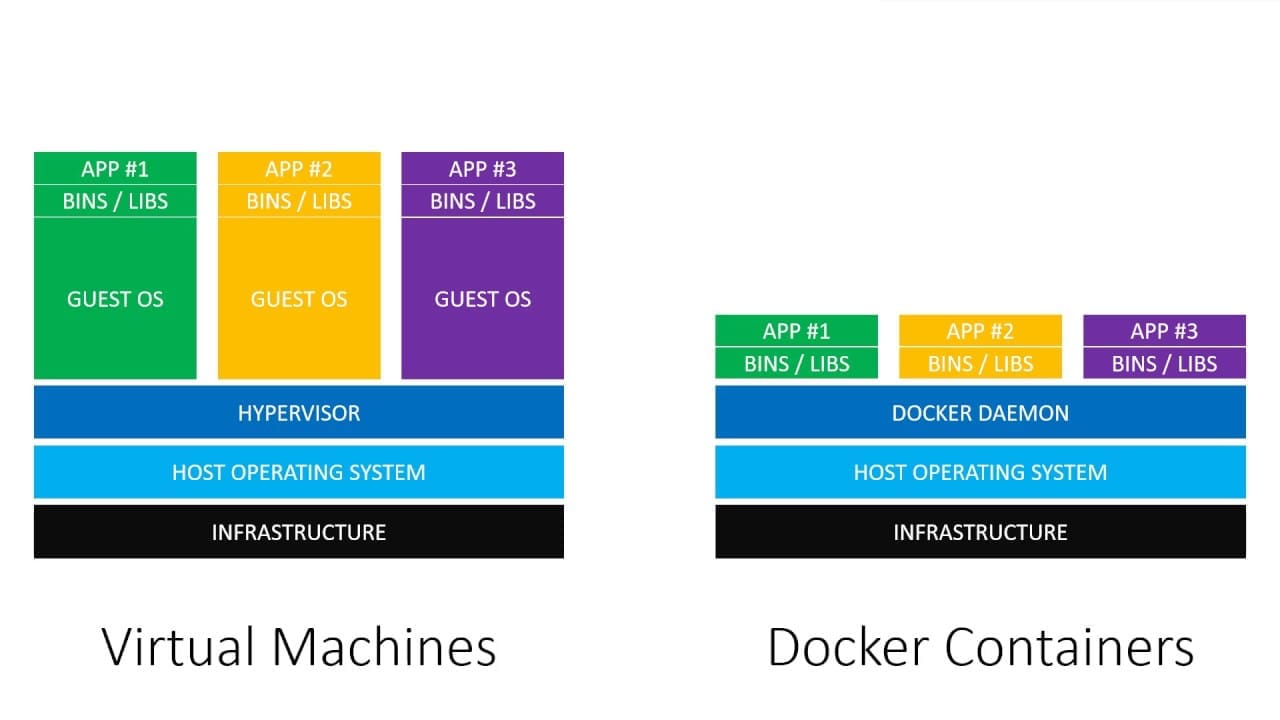
Docker vs Virtual Machine design
How to Install Docker on Raspberry Pi
To install Docker on your Raspberry Pi, you need to go through the following steps:
- Update and upgrade your system.
- Download the installation script and install the package.
- Allow a non-root user to execute Docker commands.
- Verify installation by checking the Docker version.
- Remove some warnings
- Verify the default docker bridge is created
- Test the set up by running a “hello-world” container.
Step 1: Update and Upgrade
Start by updating and upgrading the system. This ensures you install the latest version of the software. Open a terminal window and run the command:
sudo apt-get update && sudo apt-get upgrade
Step 2: Download the Convenience Script and Install Docker on Raspberry Pi
Move on to downloading the installation script with:
curl -fsSL https://get.docker.com -o get-docker.sh
Execute the script using the command:
sudo sh get-docker.sh
# Executing docker install script, commit: 1b02882d63b9cfc484ad6b0180171c679cfe0f3a
+ sh -c apt-get update -qq >/dev/null
+ sh -c DEBIAN_FRONTEND=noninteractive apt-get install -y -qq apt-transport-https ca-certificates curl >/dev/null
+ sh -c curl -fsSL "https://download.docker.com/linux/raspbian/gpg" | apt-key add -qq - >/dev/null
Warning: apt-key output should not be parsed (stdout is not a terminal)
+ sh -c echo "deb [arch=armhf] https://download.docker.com/linux/raspbian buster stable" > /etc/apt/sources.list.d/docker.list
+ sh -c apt-get update -qq >/dev/null
+ [ -n  ]
+ sh -c apt-get install -y -qq --no-install-recommends docker-ce >/dev/null
+ sh -c docker version
Client: Docker Engine - Community
 Version:           19.03.8
 API version:       1.40
 Go version:        go1.12.17
 Git commit:        afacb8b
 Built:             Wed Mar 11 01:35:24 2020
 OS/Arch:           linux/arm
 Experimental:      false

Server: Docker Engine - Community
 Engine:
  Version:          19.03.8
  API version:      1.40 (minimum version 1.12)
  Go version:       go1.12.17
  Git commit:       afacb8b
  Built:            Wed Mar 11 01:29:22 2020
  OS/Arch:          linux/arm
  Experimental:     false
 containerd:
  Version:          1.2.13
  GitCommit:        7ad184331fa3e55e52b890ea95e65ba581ae3429
 runc:
  Version:          1.0.0-rc10
  GitCommit:        dc9208a3303feef5b3839f4323d9beb36df0a9dd
 docker-init:
  Version:          0.18.0
  GitCommit:        fec3683
If you would like to use Docker as a non-root user, you should now consider
adding your user to the "docker" group with something like:

  sudo usermod -aG docker your-user

Remember that you will have to log out and back in for this to take effect!

WARNING: Adding a user to the "docker" group will grant the ability to run
         containers which can be used to obtain root privileges on the
         docker host.
         Refer to https://docs.docker.com/engine/security/security/#docker-daemon-attack-surface
         for more information.
Step 3: Add a Non-Root User to the Docker Group
By default, only users who have administrative privileges (root users) can run containers. If you are not logged in as the root, one option is to use the sudo prefix.
However, you could also add your non-root user to the Docker group which will allow it to execute docker commands.
The syntax for adding users to the Docker group is:
sudo usermod -aG docker [user_name]
To add the pi user (the default user in Raspbian), use the command:
sudo usermod -aG docker pi
There is no specific output if the process is successful. For the changes to take place, you need to log out and then back in.
Step 4: Check Docker Version and Info
Check the version of Docker on your Raspberry Pi by typing:
docker version
Client: Docker Engine - Community
 Version:           19.03.8
 API version:       1.40
 Go version:        go1.12.17
 Git commit:        afacb8b
 Built:             Wed Mar 11 01:35:24 2020
 OS/Arch:           linux/arm
 Experimental:      false

Server: Docker Engine - Community
 Engine:
  Version:          19.03.8
  API version:      1.40 (minimum version 1.12)
  Go version:       go1.12.17
  Git commit:       afacb8b
  Built:            Wed Mar 11 01:29:22 2020
  OS/Arch:          linux/arm
  Experimental:     false
 containerd:
  Version:          1.2.13
  GitCommit:        7ad184331fa3e55e52b890ea95e65ba581ae3429
 runc:
  Version:          1.0.0-rc10
  GitCommit:        dc9208a3303feef5b3839f4323d9beb36df0a9dd
 docker-init:
  Version:          0.18.0
  GitCommit:        fec3683
The output will display the Docker version along with some additional information. For system-wide information (including the kernel version, number of containers and images, and more extended description) run:
sudo docker info
Client:
 Debug Mode: false

Server:
 Containers: 0
  Running: 0
  Paused: 0
  Stopped: 0
 Images: 0
 Server Version: 19.03.8
 Storage Driver: overlay2
  Backing Filesystem: <unknown>
  Supports d_type: true
  Native Overlay Diff: true
 Logging Driver: json-file
 Cgroup Driver: cgroupfs
 Plugins:
  Volume: local
  Network: bridge host ipvlan macvlan null overlay
  Log: awslogs fluentd gcplogs gelf journald json-file local logentries splunk syslog
 Swarm: inactive
 Runtimes: runc
 Default Runtime: runc
 Init Binary: docker-init
 containerd version: 7ad184331fa3e55e52b890ea95e65ba581ae3429
 runc version: dc9208a3303feef5b3839f4323d9beb36df0a9dd
 init version: fec3683
 Security Options:
  seccomp
   Profile: default
 Kernel Version: 4.19.97-v7l+
 Operating System: Raspbian GNU/Linux 10 (buster)
 OSType: linux
 Architecture: armv7l
 CPUs: 4
 Total Memory: 3.814GiB
 Name: b0x
 ID: ZXIO:ROGT:JACJ:E62Y:KRKS:E673:GIRC:GK5R:VNLB:F2EF:5PKU:4ECJ
 Docker Root Dir: /var/lib/docker
 Debug Mode: false
 Registry: https://index.docker.io/v1/
 Labels:
 Experimental: false
 Insecure Registries:
  127.0.0.0/8
 Live Restore Enabled: false

WARNING: No swap limit support
WARNING: No cpu cfs quota support
WARNING: No cpu cfs period support
Step 5: Remove some warnings
We can get rid of some of these warnings.
Modify the /boot/cmdline.txt, add these two parameters : cgroup_enable=memory cgroup_memory=1 swapaccount=1 and reboot
$ cat /boot/cmdline.txt
dwc_otg.lpm_enable=0 console=serial0,115200 console=tty1 root=PARTUUID=d5e34328-02 rootfstype=ext4 elevator=deadline fsck.repair=yes cgroup_enable=memory swapaccount=1 rootwait
Step 6: Verify the default docker bridge is created
ip addr show docker0
5: docker0: <NO-CARRIER,BROADCAST,MULTICAST,UP> mtu 1500 qdisc noqueue state DOWN group default
    link/ether 02:42:63:2b:98:77 brd ff:ff:ff:ff:ff:ff
    inet 172.17.0.1/16 brd 172.17.255.255 scope global docker0
       valid_lft forever preferred_lft forever
Step 7: Run Hello World Container
The best way to test whether Docker has been set up correctly is to run the Hello World container. To do so, type in the following command:
docker run hello-world
Unable to find image 'hello-world:latest' locally
latest: Pulling from library/hello-world
4ee5c797bcd7: Pull complete
Digest: sha256:8e3114318a995a1ee497790535e7b88365222a21771ae7e53687ad76563e8e76
Status: Downloaded newer image for hello-world:latest

Hello from Docker!
This message shows that your installation appears to be working correctly.

To generate this message, Docker took the following steps:
 1. The Docker client contacted the Docker daemon.
 2. The Docker daemon pulled the "hello-world" image from the Docker Hub.
    (arm32v7)
 3. The Docker daemon created a new container from that image which runs the
    executable that produces the output you are currently reading.
 4. The Docker daemon streamed that output to the Docker client, which sent it
    to your terminal.

To try something more ambitious, you can run an Ubuntu container with:
 $ docker run -it ubuntu bash

Share images, automate workflows, and more with a free Docker ID:
 https://hub.docker.com/

For more examples and ideas, visit:
 https://docs.docker.com/get-started/
Raspberry Pi Docker Images
Opposed to most other Linux distributions, Raspberry Pi is based on ARM architecture. Hence, not all Docker images will work on your Raspberry Pi.
In fact, all Docker images that are not specifically designed for ARM devices will not work. Running docker-apps designed for x86/x64 and i386 architecture on your Raspberry Pi will return an error.
Remember that when searching for images to pull from Docker Hub. Apply the Architectures filter to search for supported apps.
For custom solutions, the best thing to do would be to run a container based on an official image and then modify it and commit the changes to a new image.
It is free to use up to 10 devices. Depending on the version of software, you may need to use an additional command to completely remove Docker: sudo apt-get purge docker-ce-cli
To delete leftover images, containers, volumes and other related data, run the following command:
sudo rm -rf /var/lib/docker
Edited configuration files must be deleted manually.
Useful Docker Commands
For more command you can see the Docker command line reference guide
List Docker Container
To list all Docker Containers, we need to type :
docker ps -a
To restart a Container, we need to type :
docker restart <container_name or container_id>
Rename Docker Container
To rename a Container, we need to type :
docker rename <container_name or container_id>
Removing Containers from Docker
To remove the Container we need to type the command :
docker rm <container_name or container_id>
Execute Docker Pull Images
To execute Docker pull images we need to run these commands :
docker exec -it image name sh
Access Docker Container
To access files inside Docker container we need to run this command :
docker exec -it <container_name or container_id> bash
Check Docker Images
To access downloaded images we need to run this command :
docker images
Remove Docker Image
To remove downloaded images we need to run this command :
docker rmi <image_name>
How to Upgrade Docker on Raspberry Pi?
There is no need to re-run the convenience script to upgrade Docker. Furthermore, running the convenience script again might cause issues if it attempts to repositories that have been added already.
Upgrade Docker using the package manager with the command:
sudo apt-get upgrade
How to Uninstall Docker on Your Raspberry Pi?
Although you used a convenience script for installation, you can simply remove docker using the package manager:
sudo apt-get purge docker-ce
Install Docker Compose
Docker Compose allows you to easily create a manifest for your Docker containers.
Compose is a tool for defining and running multi-container Docker applications. With Compose, you use a YAML file to configure your application’s services. Then, with a single command, you create and start all the services from your configuration. To learn more about all the features of Compose, see the list of features.
sudo apt-get -y install docker-compose
TIPS #1 : Change Docker root directory /var/lib/docker to another location
By default, Docker stores most of its data inside the /var/lib/docker directory on Linux systems. There may come a time when you want to move this storage space to a new location.
- Step 1 : The first thing we want to do is stop Docker from running. Making these changes while Docker is still running is certain to cause some errors. Use the following systemd command to stop Docker.
$ sudo systemctl stop docker.service
$ sudo systemctl stop docker.socket
- Step 2 : Next, we need to edit the
/lib/systemd/system/docker.servicefile. This is the systemd file that relates to Docker, and we need to enter the new location inside this file.
sudo vi /lib/systemd/system/docker.service
- Step 3 : The line we need to edit looks like this:
ExecStart=/usr/bin/dockerd -H fd://
Edit the line by putting a -g and the new desired location of your Docker directory. When you’re done making this change, you can save and exit the file.
ExecStart=/usr/bin/dockerd -g /new/path/docker -H fd://
- Step 4 : If you haven’t already, create the new directory where you plan to move your Docker files to.
sudo mkdir -p /new/path/docker
- Step 5 : Afterwards, you can copy the content from
/var/lib/dockerto the new directory. A good way to do that would be with the following rsync command.
sudo rsync -aqxP /var/lib/docker/ /new/path/docker
- Step 6 : Next, reload the systemd configuration for Docker, since we made changes earlier. Then, we can start Docker.
sudo systemctl daemon-reload
sudo systemctl start docker
- Step 7 : Just to make sure that it worked, run the ps command to make sure that the Docker service is utilizing the new directory location.
ps aux | grep -i docker | grep -v grep
root 15471 6.9 0.6 925008 56344 ? Ssl 21:28 0:00 /usr/sbin/dockerd -g /mnt/sda/docker -H fd://
Example - Homebridge & Docker on a Raspberry Pi
Homebridge
Homebridge is a lightweight NodeJS server you can run on your home network that emulates the iOS HomeKit API. It supports Plugins, which are community-contributed modules that provide a basic bridge from HomeKit to various 3rd-party APIs provided by manufacturers of “smart home” devices.
This guide will show you how to run the oznu/homebridge docker image on a Raspberry Pi
Docker Homebridge github page.
Create Docker Compose Manifest
Create a new directory to store your homebridge docker-compose manifest and config data in. In this example we will install Homebridge in the <user_name_id> user’s home directory.
Create a new directory and change into it:
mkdir /home/<user_name_id>/homebridge
cd /home/<user_name_id>/homebridge
Create a new file called docker-compose.yml using vi:
vi docker-compose.yml
The contents of this file should be:
version: '2'
services:
  homebridge:
    image: oznu/homebridge:raspberry-pi
    restart: always
    network_mode: host
    volumes:
      - ./config:/homebridge
    environment:
      - PGID=1000    #change it by <user_name_id> PGID
      - PUID=1000    #change it by <user_name_id> PUID
      - HOMEBRIDGE_CONFIG_UI=1
      - HOMEBRIDGE_CONFIG_UI_PORT=8080
- The
restart: alwaysline instructs docker to setup the container so that it that will automatically start again if the Raspberry Pi is rebooted, or if the container unexpectedly quits or crashes. - The
network_mode: hostline instructs docker to share the Raspberry Pi’s network with the container, allowing your iOS device to find the Homebridge accessory. - The
./config:/homebridgeinstructs docker to share the local folder config with the container. This will allow you to recreate or update the docker container without losing any Homekit settings or Homebridge plugins. - For an explanation of the
PGIDandPUIDenvironment variables please see User & Group Identifiers. - The
HOMEBRIDGE_CONFIG_UIandHOMEBRIDGE_CONFIG_UI_PORTenable the homebridge-config-ui-x plugin. You can remove these two options if you don’t want to use the UI.
Start Homebridge
Start the Homebridge Docker container by running:
docker-compose up -d
- It might take some time to download the initial image which is about 125 MB compressed.
- Docker will now download the latest oznu/homebridge docker image.
- The -d flag tells docker-compose to run the container as a background process.
You’ll probably want to view the Homebridge logs to check everything is working and to get the iOS pairing code:
docker-compose logs -f
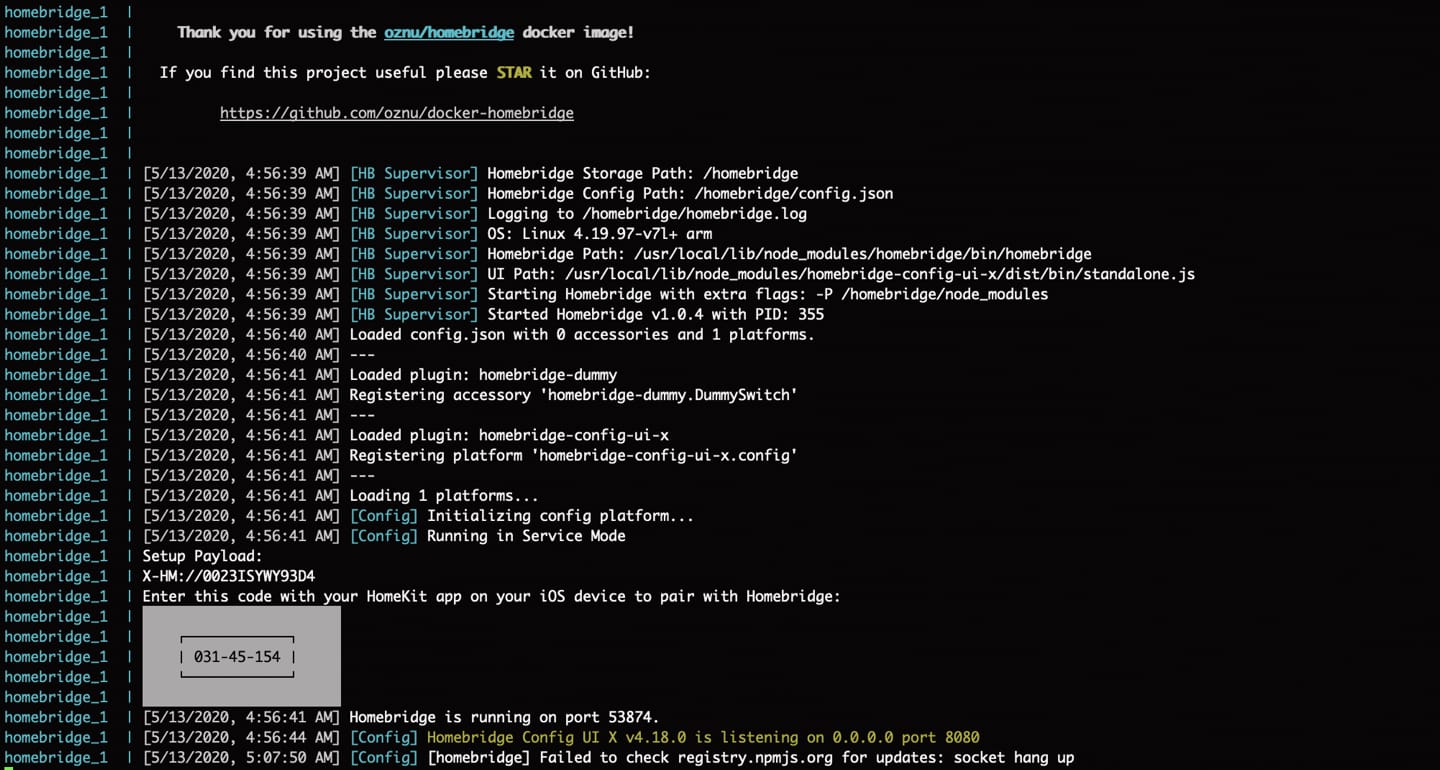
Homebridge Logs
Your Homebridge config.json, plugins and all HomeKit data will be stored in the newly created config directory.
Managing Homebridge
To manage Homebridge go to http://<ip of raspberry pi> :8080 in your browser. For example, http://192.168.1.21:8080. From here you can install, remove and update plugins, modify the Homebridge config.json and restart Homebridge.
The default username is admin with password admin. Remember you will need to restart Homebridge to apply any changes you make to the config.json.
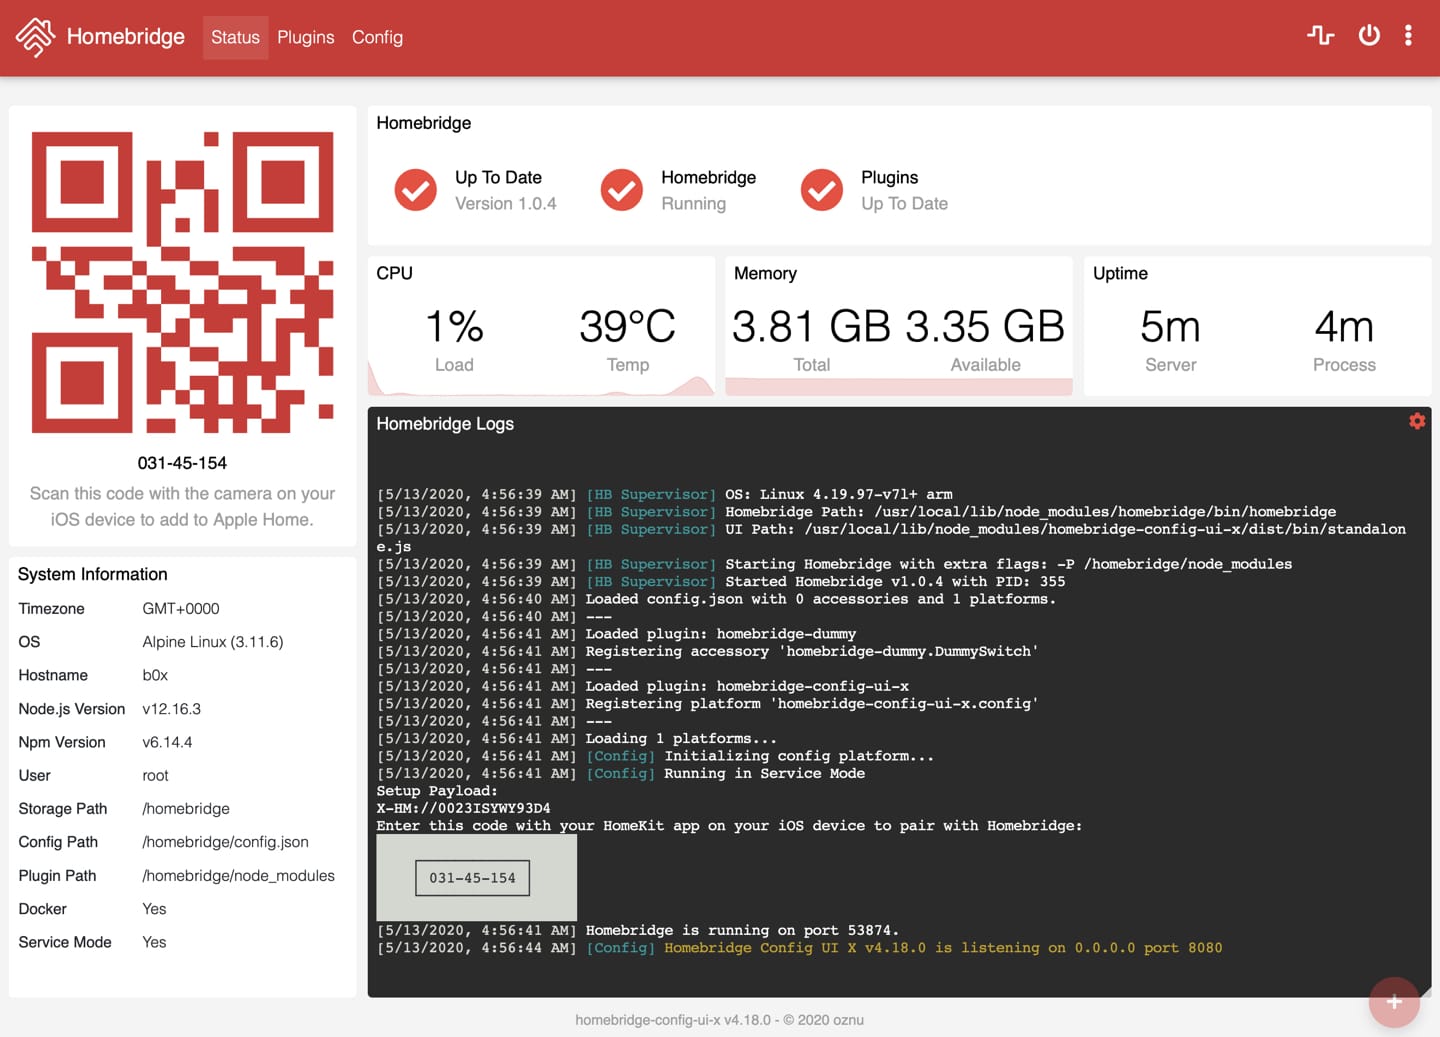
Homebridge GUI Screenshot
Conclusion
You are now set to use Docker on your Raspberry Pi and develop isolated and lightweight applications using containers.