Hardening Web Server Setup

In this post you will find all the details you need to Hardening Web Server security
Sunday 8 March 2020 : Add PART 2 : Client authentication with a self signed certificate
- PART 1 : Using Let’s Encrypt SSL Certificates
- Introduction
- Requirements & Dependencies
- Generate a new DHParams
- Install Let’s Encrypt’s Certbot Client
- Run Certbot
- Updating Certbot
- Register Your Email Address
- Create Let’s Encrypt’s Config Files
- Listing Existing Certificates
- Clean up
- Nginx Web Server Setup
- Test the Setup
- Renewing SSL Certificates
- Manual Renewal
- Automatic Renewal via Crontab
- Add Extra Domains to the Certificate
- Deleting SSL Certificates
- PART 2 : Client authentication with a self signed certificate
PART 1 : Using Let’s Encrypt SSL Certificates
Introduction
This page covers how to configure your web server to use Let’s Encrypt as the certificate authority for your server.
- For ease of handling, SSL-specific directives have been moved into a separately included file. This can help for first-time certificate issuance as well as for reusing configurations.
- The examples shown are based on Debian 10 (buster).
- Read the Certbot user guide for details of the commands. Let’s Encrypt CA issues short-lived certificates valid for 90 days. Make sure you renew the certificates at least once in this period, because expired certificates need reissuing. A certificate is due for renewal earliest 30 days before expiring. Certbot can be forced to renew via options at any time as long the certificate is valid.
Requirements & Dependencies
You require a domain name with a valid A-Record pointing back to your servers IP address. In case your server is behind a firewall, take the necessary measures to ensure that your server is accessible, worldwide, from the internet, by adding the required firewall and port forward rules.
Generate a new DHParams
To improve the security of the encrypted exchange, you can tell the web server to use another dhparam, such as the one we are going to generate. This parameter has no direct relation to the certificate, but it is important in the configuration of your web server.
You can use openssl dhparam to generate parameters. This command generates a DH parameter of 4096 bits, against 1024 basic.
sudo openssl dhparam 4096 -out /etc/ssl/certs/dh4096.pem
Do not forget to reduce the permissions of these files as much as possible,
sudo chmod 600 /etc/ssl/certs/dh4096.pem
Install Let’s Encrypt’s Certbot Client
To install Certbot via APT, run the following commands.
sudo apt-get update
sudo apt-get install certbot
Run Certbot
To run Certbot use the following command:
sudo certbot
Updating Certbot
If you need to update Certbot at a later date, run:
sudo apt-get install --only-upgrade certbot
Register Your Email Address
First Time Registration
Now that Certbot is installed, register your email address for urgent renewal and security notifications. This command also prepares Certbot’s environment if it’s not already installed. To do this, run the following command:
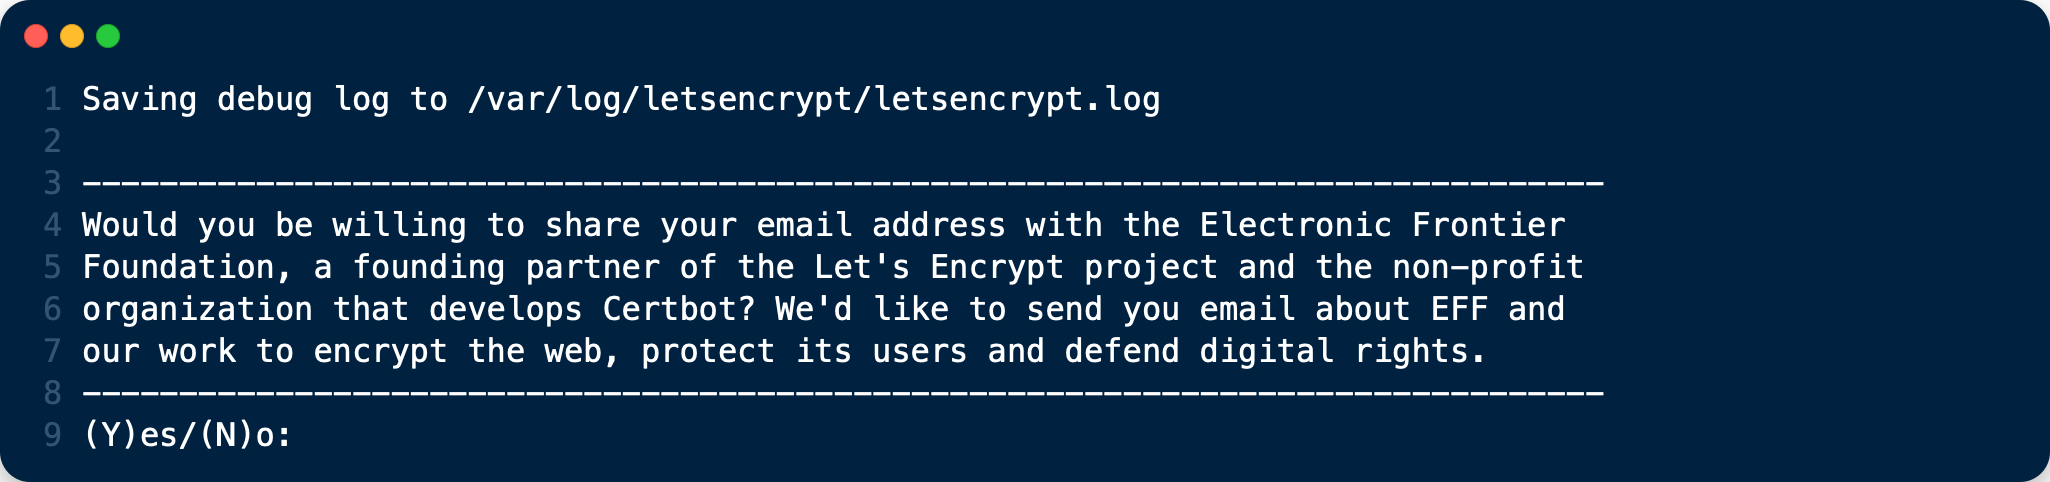
sudo certbot register --agree-tos --email <your-email-address>
When it executes, you’ll see a question similar to the following, which you can answer “Yes” or “No”:
When that completes, you’ll see a message similar to the following:

Update Your Registration
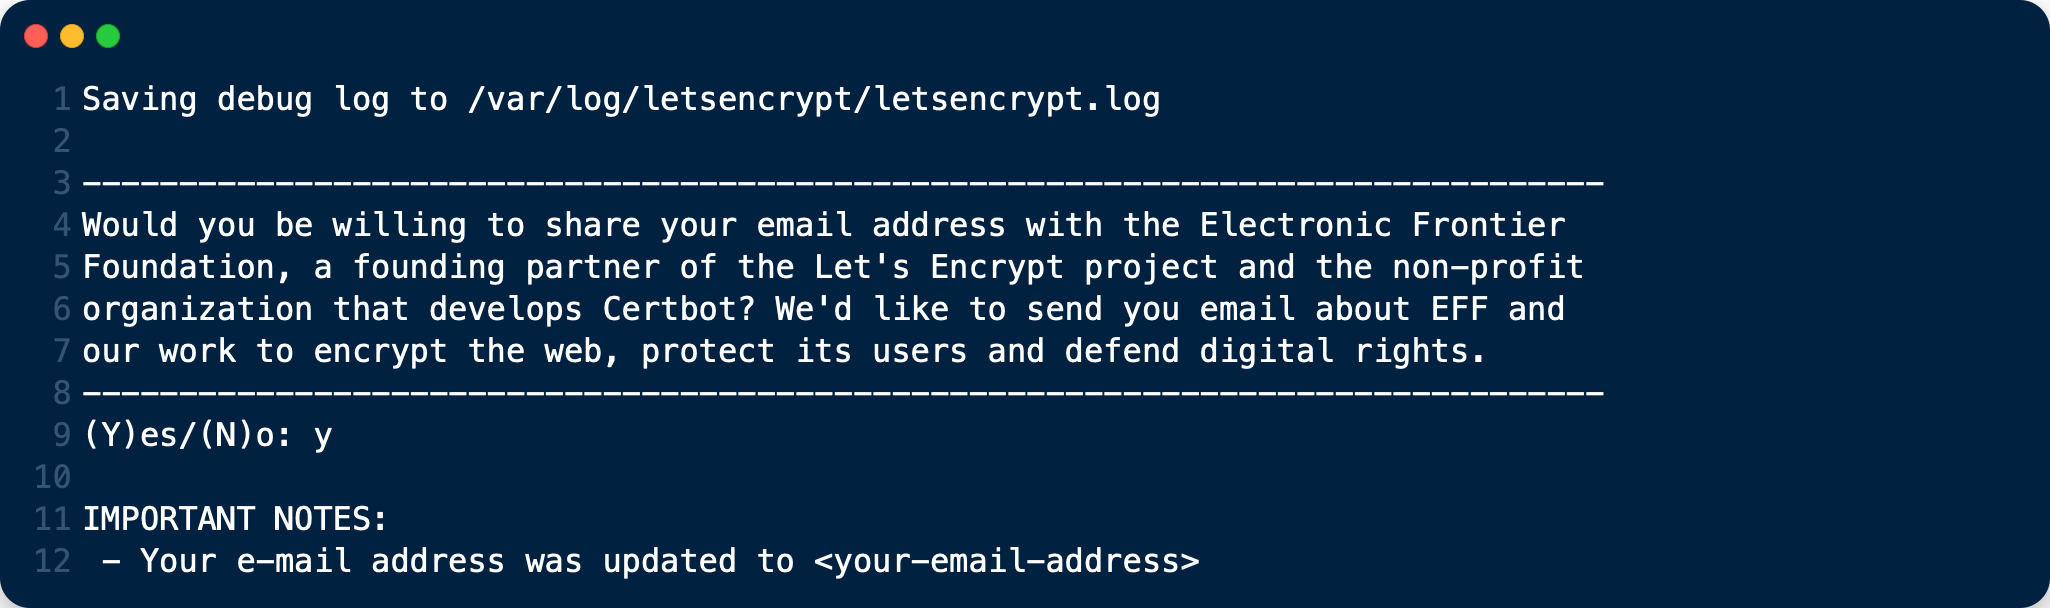
In case you want to update your registered email address use following command:
Note: This will affect all the certificates issued using this account.
sudo certbot register --update-registration --email <your-email-address>
When that completes, you’ll see a message similar to the following:
Create Let’s Encrypt’s Config Files
- Create following files in the Let’s Encrypt directory. They will help to maintain your certificates.
- Replace the path to Certbot and the Certbot script name based on your installation. You can find it by running which certbot.
- Rename
<your-domain-name>.shwith the name of the domain(s) you want to issue a certificate for. As an example, the script could be renamed toyour-domain-name.com.sh. - Make all files executable except cli.ini by running
sudo chmod +x <script-name>
All scripts have to be executed with sudo.
cd /etc/letsencrypt
touch cli.ini list.sh renew.sh renew-cron.sh delete.sh <your-domain-name>.sh
chmod +x /etc/letsencrypt/*.sh
cli.ini
This file defines some default settings used by Certbot. Use the email address you registered with.
# file: "/etc/letsencrypt/cli.ini"
rsa-key-size = 4096
email = <your-email-address>
agree-tos = True
authenticator = webroot
post-hook = service nginx reload
# post-hook = service apache2 reload
Comment / un-comment the post-hook parameter according which web server you use.
list.sh
This script lists all your issued certificates.
# file: "/etc/letsencrypt/list.sh"
#!/bin/bash

LE_PATH="/usr/bin"
LE_CB="certbot"

"$LE_PATH/$LE_CB" certificates
renew.sh
This script:
- Renews all your issued certificates.
- In case you have enabled the post hook for your webserver in
cli.ini, it will reload the web server configuration automatically if a certificate has been renewed.
# file: "/etc/letsencrypt/renew.sh"
#!/bin/bash

LE_PATH="/usr/bin"
LE_CB="certbot"

"$LE_PATH/$LE_CB" renew
renew-cron.sh
This script:
- Renews all your issued certificates but does not upgrade Certbot
- In case you have enabled the post hook for your webserver in
cli.ini, it will reload the web server configuration automatically if a certificate has been renewed.
This script is intended for use via cron.
  # file: "/etc/letsencrypt/renew-cron.sh"
  #!/bin/bash

  LE_PATH="/usr/bin"
  LE_CB="certbot"

  # Save  iptables policies
  iptables-save > /root/firewall_rules.backup

  # Stop/disable iptables firewall
  # -F : Flush all policy chains
  # -X : Delete user defined chains
  # -P INPUT/OUTPUT/FORWARD : Accept specified traffic
  iptables -F
  iptables -X
  iptables -P INPUT ACCEPT
  iptables -P OUTPUT ACCEPT
  iptables -P FORWARD ACCEPT

  # Let's Encrypt renew
  "$LE_PATH/$LE_CB" renew --no-self-upgrade --noninteractive

  # Restore firewall policies
  iptables-restore < /root/firewall_rules.backup
delete.sh
This script deletes an issued certificate. Use the list.sh script to list issued certificates.
# file: "/etc/letsencrypt/delete.sh"
#!/bin/bash

LE_PATH="/usr/bin"
LE_CB="certbot"

##
## Retrieve and print a list of the installed Let's Encrypt SSL certificates.
##
function get_certificate_names()
{
  "$LE_PATH/$LE_CB" certificates | grep -iE "certificate name" | awk -F: '{gsub(/\s+/, "", $2); printf("- %s\n", $2)}'
}

echo "Available Certificates:"

get_certificate_names
echo

read -p "Which certificate do you want to delete: " -r -e answer
if [ -n "$answer" ]; then
  "$LE_PATH/$LE_CB" delete --cert-name "$answer"
fi
<your-domain-name>.sh
As an example, this script creates a certificate for following domain / sub-domains. You can add or remove sub-domains as necessary. Use your domain / sub-domain names. The first (sub)domain name used in the script is taken for naming the directories created by Certbot.
Note: You can create different certificates for different sub-domains, such as
example.com,www.example.com, and<subdomain>.example.com, by creating different scripts.
# file: "/etc/letsencrypt/<subdomain>.example.com"
#!/bin/bash
# export makes the variable available for all subprocesses

LE_PATH="/usr/bin"
LE_CB="certbot"

# Assumes that example.com www.example.com and subomain.example.com are the domains
# that you want a certificate for
export DOMAINS="-d <your-domain-name>,www.<your-domain-name>,<subdomain>.<your-domain-name>"

"$LE_PATH/$LE_CB" certonly --config /etc/letsencrypt/cli.ini "$DOMAINS" # --dry-run
You can enable the --dry-run option which does a test run of the client only.
Create an SSL Certificate
With all the scripts created, to create an SSL certificate, run the following command:
sudo /etc/letsencrypt/<your-domain-name>.sh
After you run the script, you will see output similar to the following:
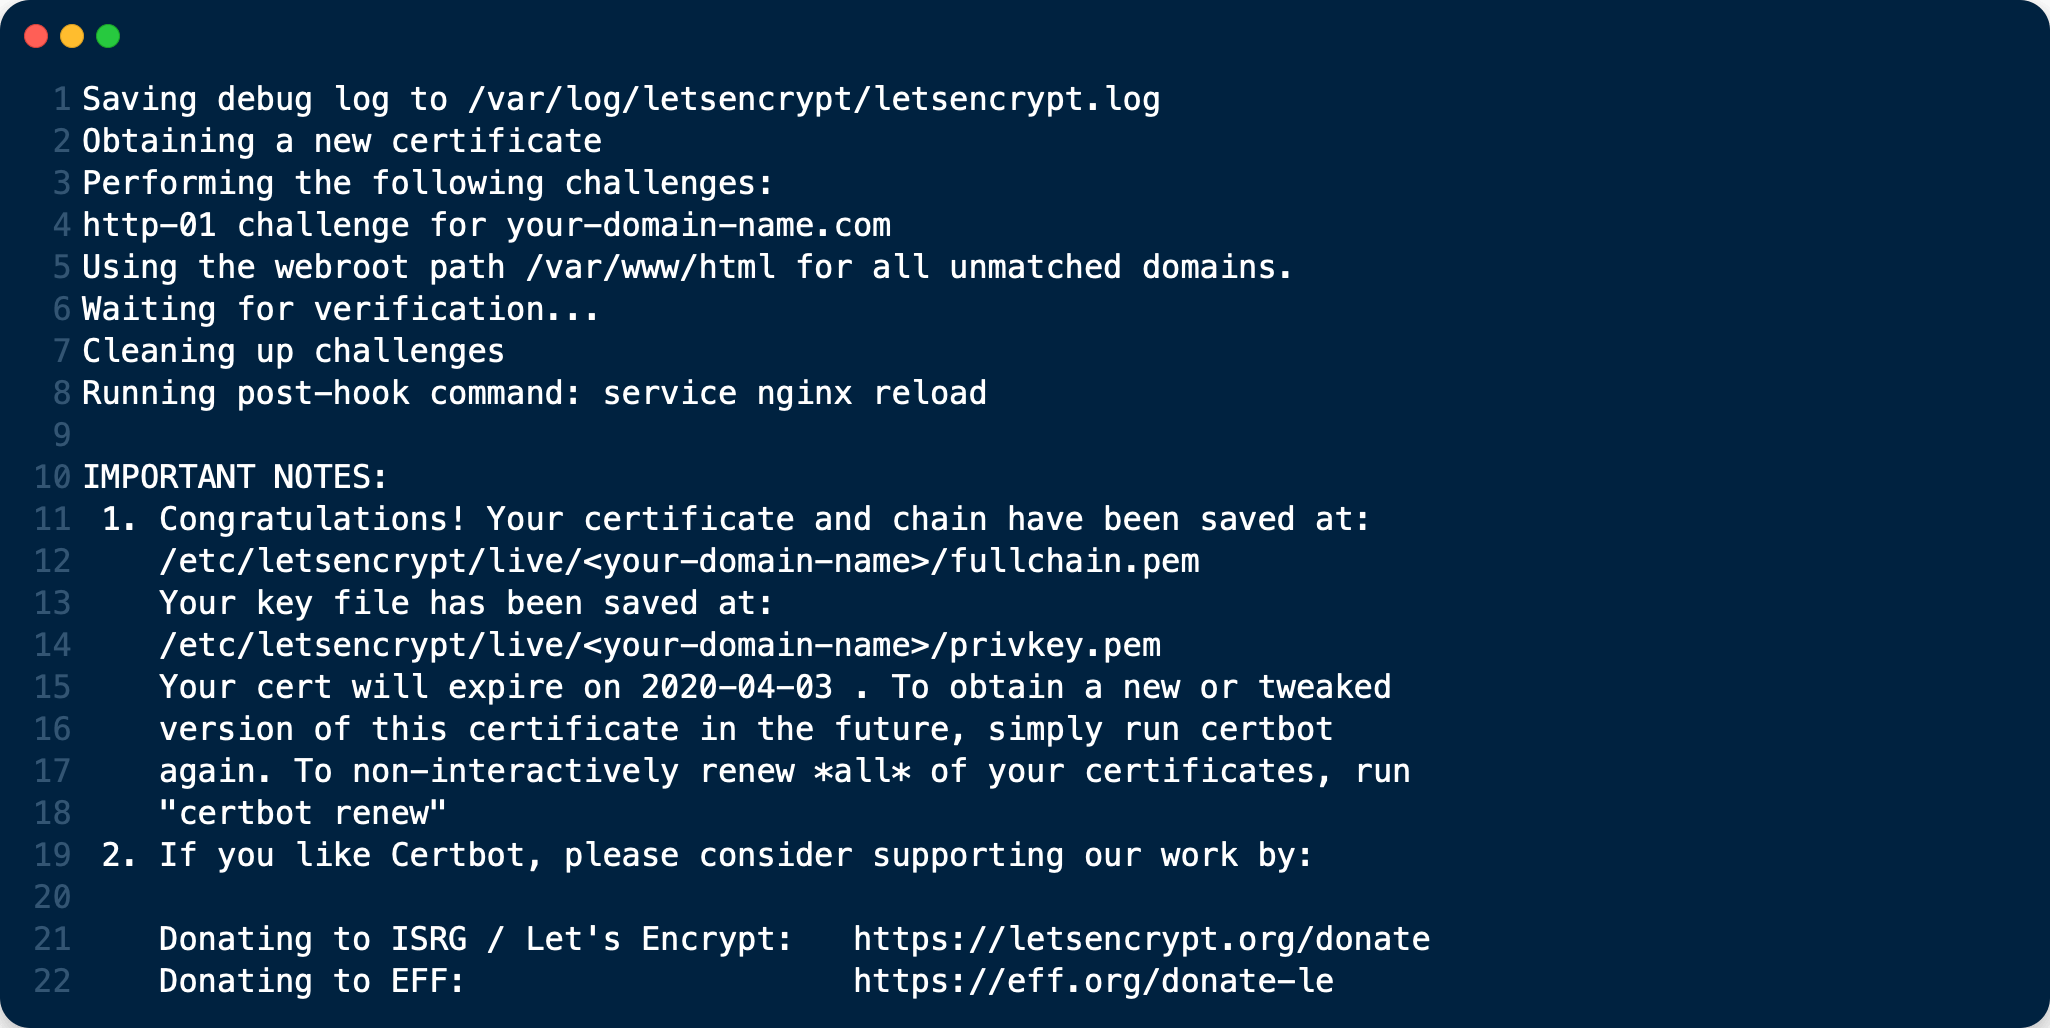
You can see that the SSL certificate’s been successfully created, and that it will expire on 2020-04-03.
Listing Existing Certificates
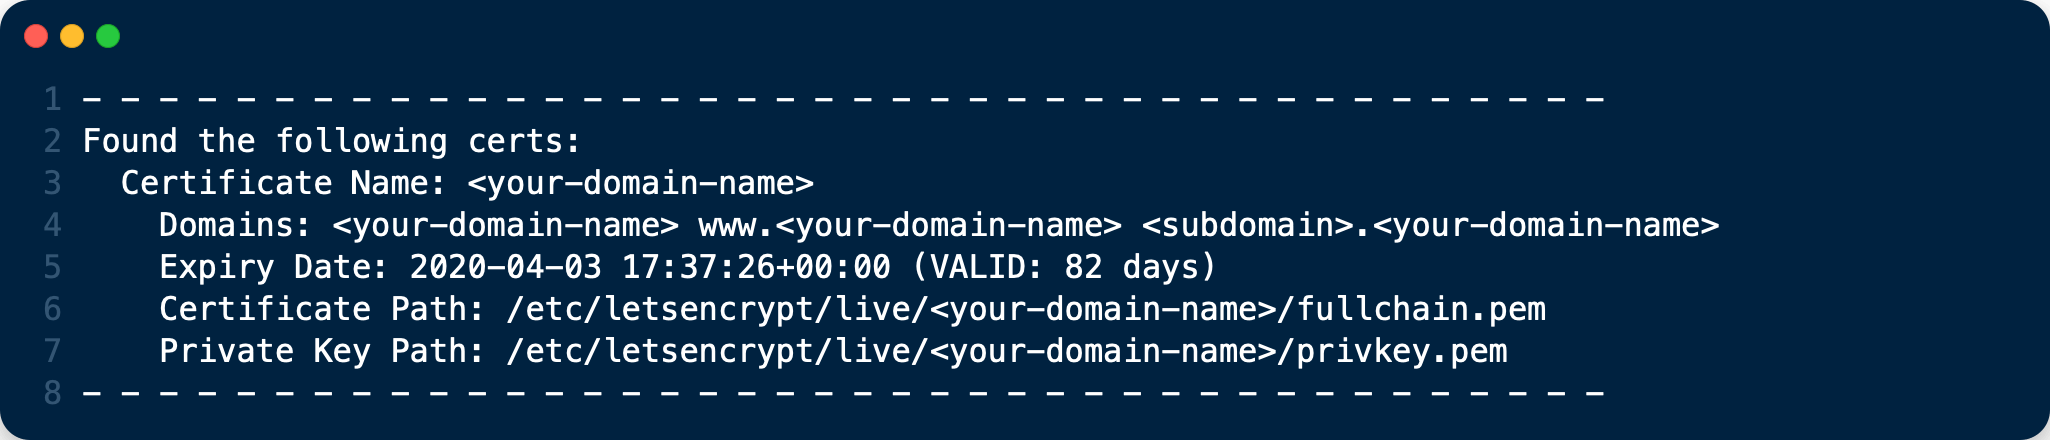
If you want to list (view) existing SSL certificates, use list.sh, which can be run as follows:
sudo /etc/letsencrypt/list.sh
Depending on the number of certificates, you can expect to see output similar to the following:
Clean up
mv /etc/letsencrypt/accounts /etc/letsencrypt/accounts.off
And now you can restart at the beginning ;-)
Nginx Web Server Setup
Go to
snippetsfolder and addssl_certificate,ssl_certificate_keyandssl_trusted_certificateentry inssl.confconfiguration filesudo vi /etc/nginx/snippets/ssl.conf// file: "/etc/nginx/snippets/ssl.conf" ssl_dhparam /etc/ssl/certs/dh4096.pem; ssl_session_timeout 1d; ssl_session_cache shared:SSL:50m; ssl_session_tickets off; ssl_protocols TLSv1.2 TLSv1.3; ssl_ciphers ECDHE-ECDSA-AES128-GCM-SHA256:ECDHE-RSA-AES128-GCM-SHA256:ECDHE-ECDSA-AES256-GCM-SHA384:ECDHE-RSA-AES256-GCM-SHA384:ECDHE-ECDSA-CHACHA20-POLY1305:ECDHE-RSA-CHACHA20-POLY1305:DHE-RSA-AES128-GCM-SHA256:DHE-RSA-AES256-GCM-SHA384; ssl_prefer_server_ciphers off; ssl_certificate /etc/letsencrypt/live/<subdomain>.<your-domain-name>/fullchain.pem; ssl_certificate_key /etc/letsencrypt/live/<subdomain>.<your-domain-name>/privkey.pem; ssl_trusted_certificate /etc/letsencrypt/live/<subdomain>.<your-domain-name>/chain.pem; ssl_stapling on; ssl_stapling_verify on; resolver 8.8.8.8 8.8.4.4 valid=300s; resolver_timeout 30s; add_header Strict-Transport-Security "max-age=63072000" always; add_header X-Frame-Options SAMEORIGIN; add_header X-Content-Type-Options nosniff;As with every configuration change in nginx, we need to restart the service
# Test configuration file for syntax errors by typing
sudo nginx -t

# reload Nginx to make the necessary changes
sudo systemctl reload nginx
Test the Setup
After you have setup and configured the web server and installed the SSL certificate using Certbot, you should now test the security of your new configuration. To do so, you can use the free service of SSL Labs. See an example screenshot of a test run below.
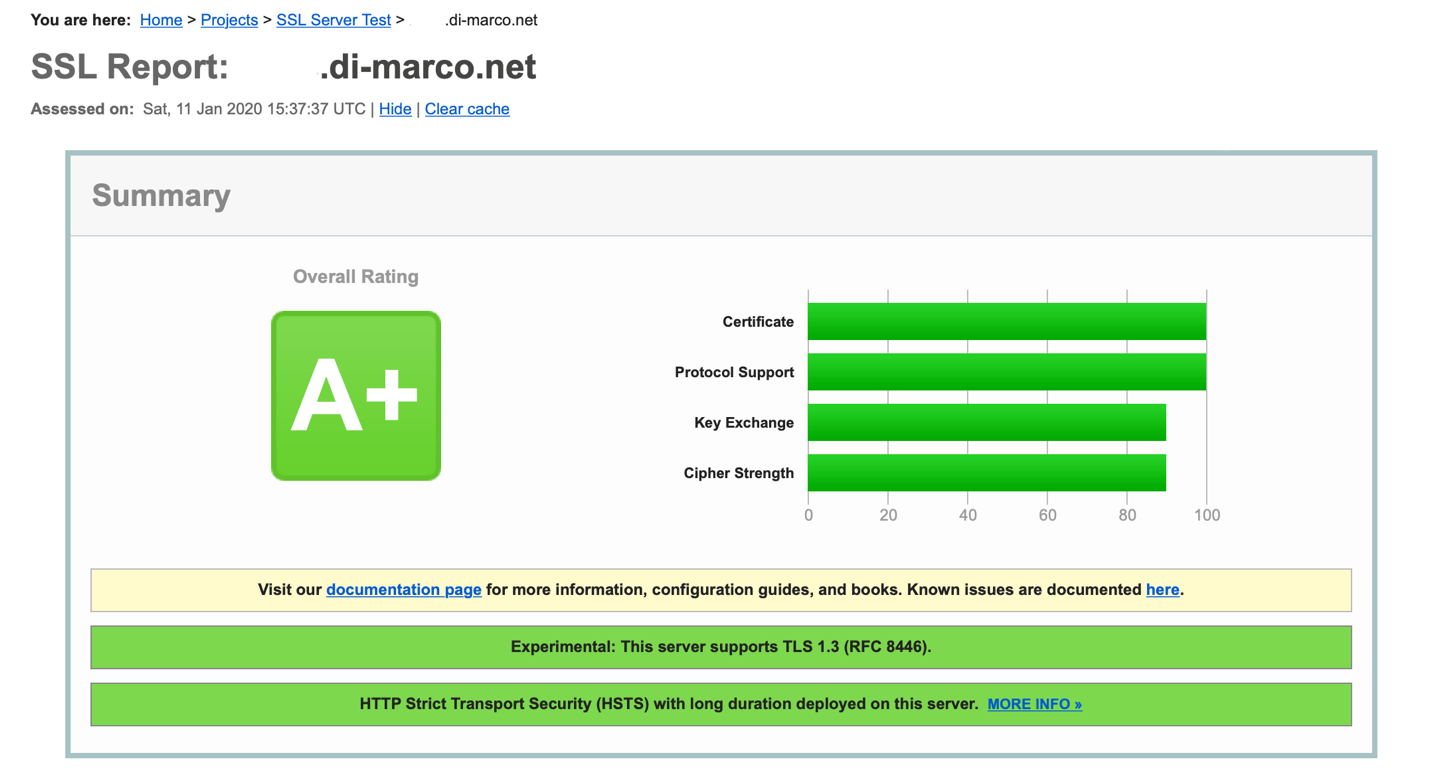
© SSL Labs result
Renewing SSL Certificates
As Let’s Encrypts certificates expire every 90 days, you should ensure you renew them before that time. There are two ways to do so: manually and automatically.
Manual Renewal
If you have provided your email address, you will receive reminder notifications.
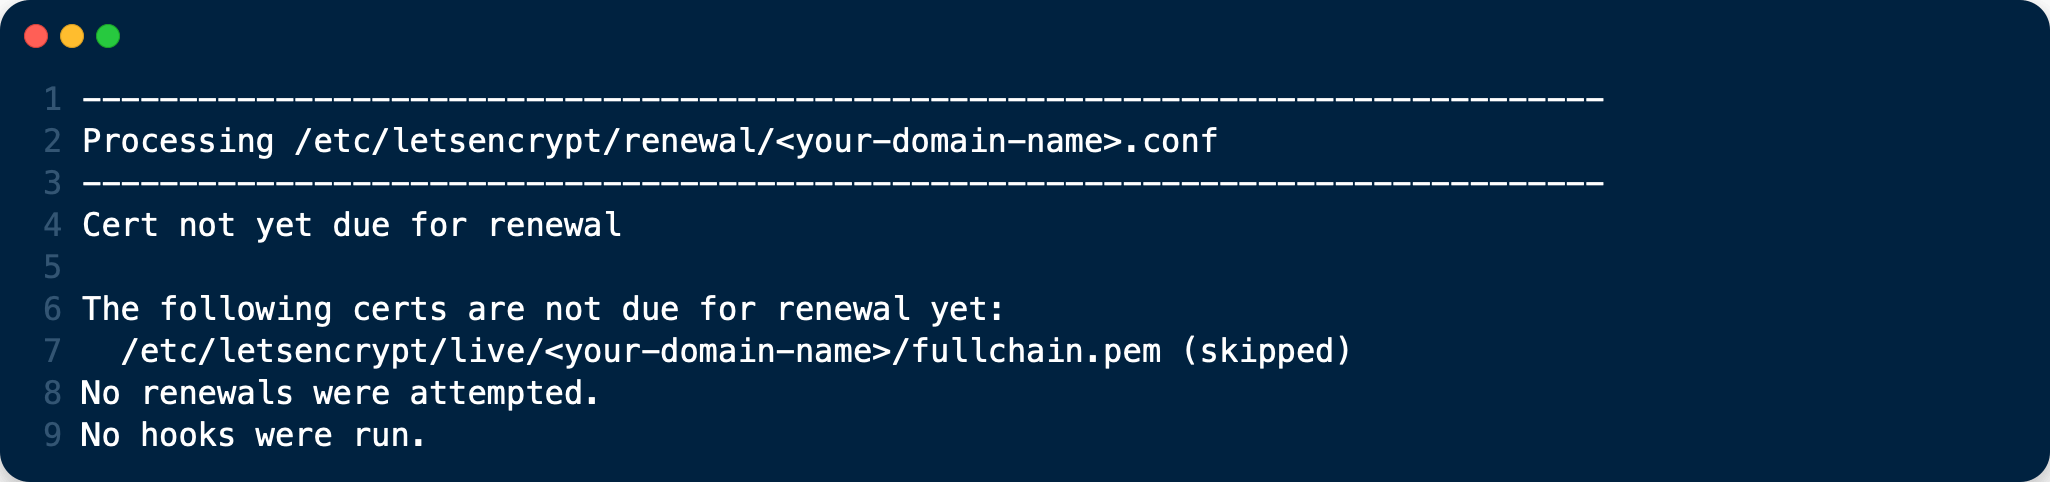
sudo /etc/letsencrypt/renew.sh
If the certificate is not yet due for renewal, you can expect to see output similar to that below:
Automatic Renewal via Crontab
Certificates are only renewed if they are due, so you can schedule Cron jobs to renew your SSL certificates on a more frequent basis. However, a weekly check is sufficient. To add a new Cron job to auto-renew your certificates, firstly run the following command to edit the job list.
sudo crontab -e
It is essential to use sudo to derive proper permissions.
Then, add the following at the end of the existing configuration:
15 05 * * 6 sudo -u root /etc/letsencrypt/renew-cron.sh
After you save and exit the file, the new job will have been added to the Cron job scheduler.
If you want to use own values, you can check them eg. at crontab.guru or modify the script for other options.
Add Extra Domains to the Certificate
If you want to add an extra domain, like subdomain.example.com, to your certificate, add the domain in the domain shell script above, re-run it and reload the web server config.
Deleting SSL Certificates
If you want to delete an SSL certificate, use the delete.sh script, running it as follows:
sudo /etc/letsencrypt/delete.sh
It will start off, as below, by displaying a list of the currently available SSL certificate domain names, and then prompt you to supply the certificate that you want to delete.
Available Certificates:

1. <your-domain-name>

Which certificate do you want to delete:
Provide the SSL certificate name that you want to delete and click enter, and the certificate and all of its related files will be deleted. After that you should expect to see a confirmation, as in the example output below.
-------------------------------------------------------------------------------
Deleted all files relating to certificate <your-domain-name>.
-------------------------------------------------------------------------------
PART 2 : Client authentication with a self signed certificate
SSL Client Certificate Authentication
Client certificate authentication is used for securing websites or other web services. This is one of the more advanced ways to authenticate to a service as it requires configuration on the server side as well as the client side.
We will go over how to get to create the CA (Certificate Authority) certificate for the server as well as generating a client-side certificate from the CA certificate and also how to convert the certificate to be used in web browsers and finally how to import and configure the web browser to authenticate using this certificate.
We will be using nginx web server to handle the server side. So an nginx web server is required as well as OpenSSL.
Generating Server Certificates
Let’s start with generating the certification authority certificates and private keys.
sudo mkdir -p /etc/pki
Creating the Certificate Authority
First, you must create a key for your Certificate Authority (CA); this key will be used to create the server-side certificate, and will sign all client certificate requests. That’s to say: it’s the master “password” for the whole system. Generate one, and keep it safe.
sudo openssl genrsa -des3 -out /etc/pki/ca.key 4096
You’ll be asked to encrypt the key with a passphrase. Be sure to note it, as you’ll be asked for it every time you create a new certificate or sign a client certificate request.
Create a CA Certificate
Next create a CA Certificate; this is the server-side certificate that will be sent via the TLS server to the client. Note this certificate is specific to the client-side certs, and is not a replacement for your typical certificate needed for HTTPS authentication; we’ll get to that later.
# sign a certificate for 365 days; replace that number with whatever's
sudo openssl req -new -x509 -days 365 -key /etc/pki/ca.key -out /etc/pki/ca.crt
You’ll be asked a number of questions; here’s what I’ve found:
- Note what you’ve entered for Country, State, Locality, and Organization; you’ll want these to match later when you renew the certificate.
- Do not enter a common name (CN) for the certificate; I’m unsure why, but I had problems when I entered one.
- Email can be omitted.
Renewing a certificate just requires running the same command; to generate a new certificate. If you need to see what you entered in the old certificate, you can run:
sudo openssl x509 -in /etc/pki/ca.crt -noout -text
This will list all information about the certificate, including the values mentioned above.
Next, a client certificate will be created; it’s up to you how you want to handle these, but remember this is effectively a password, and if you want to “change” it, you must revoke the certificate. So, think about how you’d like to handle your authentication: per user, per device?
You’ll want a client key first; this is generated in the same manner as the certificate key; you could even use that one (but don’t). Typically, if you had a number of users, the next two steps would be the ones you’d ask them to do, to create a certificate signing requests for you do sign.
Users: Create a Key, and a Certificate Signing Request
Create an RSA key, if you don’t have one already:
sudo openssl genrsa -des3 -out /etc/pki/user.key 4096
Then, create a Certificate Signing Request (CSR)
sudo openssl req -new -key /etc/pki/user.key -out /etc/pki/user.csr
A number of questions will be asked; answer each one, including the Common Name (CN) and email address. The CSR that’s created would be sent to the CA (an administrator, but in this case probably also yourself) to be signed.
Signing a CSR
A CSR must now be signed by the CA; this is the CA saying “I know this person or device: they are who they say they are.”
# sign the csr to a certificate valid for 365 days
sudo openssl x509 -req -days 365 -in /etc/pki/user.csr -CA /etc/pki/ca.crt -CAkey /etc/pki/ca.key -set_serial 01 -out /etc/pki/user.crt
You’ll typically want to increment the serial number with each signing. Once the certificate expires, a new CSR doesn’t need to be recreated; the same one can be signed, which will create a new certificate tied to that public key.
The signed certificate would be sent back to the user along with the CA cert (not private key!), for installation on their device.
Creating a PKCS #12 (PFX)
Now the signed certifcate must be made installable on a device in a way that bundles the client keys and certificate. The resultant archive is effectively a password, so it must be kept as safe as the other private keys.
To create the pfx:
sudo openssl pkcs12 -export -out /etc/pki/user.pfx -inkey /etc/pki/user.key -in /etc/pki/user.crt -certfile ca.crt
You will be asked to supply an “export password”, and it’s very recommended that one is set, since often you’ll need to transfer the PFX archive to a device such as your phone; you don’t want this sitting in your email without a password on it.
The PFX archive can now be imported into your web browser. To install the client certificates we need to download /etc/pki/user.pfx file from the server. Once file is downloaded on client it should be a case of just double clicking on .pfx file then enter the export password we created earlier.
Creating a .pem file
How to generate a .pem CA certificate and client certificate from a PFX file using OpenSSL.
sudo openssl pkcs12 -in /etc/pki/user.pfx -out /etc/pki/user.pem -nodes
nginx Setup
Now, lets look at setting up nginx for certificate auth, with a reverse proxy to our unauthenticated application.
A minimal nginx.conf that supports certificate auth, http redirected to https and a reverse proxy would look as follows for a domain example.com. Note that the HTTPS certificate in this example is provided by letsencrypt.
// file: "/etc/nginx/nginx.conf"
server {
    listen        443;
    ssl on;
    server_name example.com;

    include snippets/ssl.conf;
    include snippets/letsencrypt.conf;

    # client certificate
    ssl_client_certificate /etc/pki/ca.crt;
    # make verification optional, so we can display a 403 message to those who fail authentication
    ssl_verify_client optional;

   location / {
      # if the client-side certificate failed to authenticate, show a 403
      # message to the client
      if ($ssl_client_verify != SUCCESS) {
        return 403;
      }
}
As with every configuration change in nginx, we need to restart the service
# Test configuration file for syntax errors by typing
sudo nginx -t

# reload Nginx to make the necessary changes
sudo systemctl reload nginx
Now, when you visit the nginx server, your browser will be prompted for its client certificate; select the certificate that you installed, and you should be proxied through to the upstream server. If you visit from a browser without client certificates installed, you should see a 403 : forbidden without any sort of prompt.