Access Point setup and WIFI management for Linux debian devices

AP setup & WiFi management for Debian devices
Kelly Sikkema©
Table of Contents
RaspAP wifi configuration portal
RaspAP lets you quickly get a WiFi access point up and running to share the internet connectivity. The installer creates a known-good default configuration that “just works”. A handsome responsive interface gives you control over the relevant services and networking options. OpenVPN client support, SSL, security audits, themes and multilingual options round out the package.
Prerequisites
Start with a clean install of the latest release of Debian (currently Debian 10 (Buster)).
- Update, including the kernel and firmware, followed by a reboot:
sudo apt update
sudo apt dist-upgrade
sudo reboot
Quick installer
- Install
RaspAPfrom your shell prompt
curl -sL https://install.raspap.com | bash
The installer will complete the steps in the manual installation (below).
After the reboot at the end of the installation the wireless network will be configured as an access point as follows.
- IP address: 10.3.141.1
- Username:
admin - Password:
secret
- Username:
- DHCP range for wlan :
10.3.141.50to10.3.141.255 - SSID:
raspi-webgui - Password:
ChangeMe
As the name suggests, the Quick Installer is a great way to quickly setup a new AP. Best results are obtained by connecting to server to ethernet (eth0) or as a WiFi client, also known as managed mode, with wlan0. For the latter, refer to this FAQ.
Ad Blocking
This feature is currently in beta. To enable ad blocking, simply use the installer to (re)install RaspAP using the –adblock option:
curl -sL https://install.raspap.com | bash -s -- --adblock
More details are provided here.
Bridged AP
By default RaspAP configures a routed AP for your clients to connect to. A bridged AP configuration is also possible. Slide the Bridged AP mode toggle under the Advanced tab of Configure hotspot, then save and restart the hotspot.
In bridged mode, all routing capabilities are handled by your upstream router. Because your router assigns IP addresses to your hotspot and its clients, you might not be able to reach the RaspAP web interface from the default 10.3.141.1 address. Instead use your hostname followed by .local to access the RaspAP web interface.
More information on Bridged AP mode is provided here
Simultaneous AP and Wifi client
RaspAP lets you easily create an AP with a Wifi client configuration. With your server configured in managed mode, enable the AP from the Advanced tab of Configure hotspot by sliding the Wifi client AP mode toggle. Save settings and start the hotspot. The managed mode AP is functional without restart.
This option is disabled until you configure your server as a wireless client. For a server operating in managed mode without an eth0 connection, this configuration must be enabled before a reboot.
Manual installation
These steps apply to the latest release of Debian (currently Buster), Debian and Armbian. Notes for previous versions, Ubuntu Server 18.04 TLS and 19.10 are provided, where applicable.
| Distribution | Release | Architecture | Support |
|---|---|---|---|
| Raspbian | Buster | ARM | Official |
| Armbian | Buster | ARM | Official |
| Debian | Buster | ARM / x86_64 | Beta |
| Ubuntu | 18.04 LTS / 19.10 | ARM / x86_64 | Beta |
- Start off by following the project prerequisites, updating your kernel, firmware and packages to their latest versions:
sudo apt update
sudo apt dist-upgrade
sudo reboot
On Ubuntu Server, add a dependency and the ppa:ondrej/php apt package.
sudo apt-get install software-properties-common
sudo add-apt-repository ppa:ondrej/php
On Debian, Armbian and Ubuntu, install dhcpcd5. Note: skip this step if using Raspbian.
sudo apt-get install dhcpcd5
- Install
git,nginx,php7,hp7.3-fpm,hostapd,dnsmasqand some extra packages.
for Ubuntu, you may replace php7.3-cgi with php7.4-cgi. For Raspbian Stretch, replace php7.3-cgi with php7.0-cgi.
php5is no longer supported.
sudo apt-get install nginx git hostapd dnsmasq iptables-persistent vnstat qrencode php7.3-cgi hp7.3-fpm
- Enable
PHPfornginxand restart it for the settings to take effect.
upstream php-handler {
    #server 127.0.0.1:9000;
    server unix:/run/php/php7.3-fpm.sock;
}

server {
    listen 80;
    listen [::]:80;
    root /var/www/html;
    server_name example.com www.example.com;
    index ndex.html;

    # Enforce https
    return 301 https://$server_name$request_uri;
}

server {
    listen 443 ssl http2;
    listen [::]:443 ssl http2;
    server_name example.com www.example.com;

    include snippets/ssl.conf;

    # Path to the root of your installation
    root /var/www/html;

    location /RaspAP {
      alias /var/www/RaspAP;
      location ~ \.php$ {
         #fastcgi_pass fastcgi_backend;
         include fastcgi_params;
         fastcgi_param SCRIPT_FILENAME $request_filename;
         fastcgi_index index.php;
         fastcgi_pass php-handler
       }
    }
}
As with every configuration change in nginx, we need to restart the service
# Test configuration file for syntax errors by typing
sudo nginx -t

# reload Nginx to make the necessary changes
sudo systemctl reload nginx
- Prepare the web destination and git clone the files to
/var/www/RaspAP.
sudo rm -rf /var/www/RaspAP
sudo mkdir -p var/www/RaspAP
sudo git clone https://github.com/billz/raspap-webgui /var/www/RaspAP
Now comes the fun part. For security reasons, the www-data user which nginx runs under is not allowed to start or stop daemons, or run commands like ifdown and ifup, all of which we want RaspAP to do. So we will add the www-data user to sudoers, but with restrictions on what commands the user can run. Copy the sudoers rules to their destination:
cd /var/www/RaspAP
sudo cp installers/raspap.sudoers /etc/sudoers.d/090_raspap
The /etc/sudoers.d/090_raspap below
www-data ALL=(ALL) NOPASSWD:/sbin/ifdown
www-data ALL=(ALL) NOPASSWD:/sbin/ifup
www-data ALL=(ALL) NOPASSWD:/bin/cat /etc/wpa_supplicant/wpa_supplicant.conf
www-data ALL=(ALL) NOPASSWD:/bin/cat /etc/wpa_supplicant/wpa_supplicant-wlan[0-9].conf
www-data ALL=(ALL) NOPASSWD:/bin/cp /tmp/wifidata /etc/wpa_supplicant/wpa_supplicant.conf
www-data ALL=(ALL) NOPASSWD:/bin/cp /tmp/wifidata /etc/wpa_supplicant/wpa_supplicant-wlan[0-9].conf
www-data ALL=(ALL) NOPASSWD:/sbin/wpa_cli -i wlan[0-9] scan_results
www-data ALL=(ALL) NOPASSWD:/sbin/wpa_cli -i wlan[0-9] scan
www-data ALL=(ALL) NOPASSWD:/sbin/wpa_cli -i wlan[0-9] reconfigure
www-data ALL=(ALL) NOPASSWD:/sbin/wpa_cli -i wlan[0-9] select_network
www-data ALL=(ALL) NOPASSWD:/bin/cp /tmp/hostapddata /etc/hostapd/hostapd.conf
www-data ALL=(ALL) NOPASSWD:/bin/systemctl start hostapd.service
www-data ALL=(ALL) NOPASSWD:/bin/systemctl stop hostapd.service
www-data ALL=(ALL) NOPASSWD:/bin/systemctl start dnsmasq.service
www-data ALL=(ALL) NOPASSWD:/bin/systemctl stop dnsmasq.service
www-data ALL=(ALL) NOPASSWD:/bin/systemctl restart dnsmasq.service
www-data ALL=(ALL) NOPASSWD:/bin/systemctl start openvpn-client@client
www-data ALL=(ALL) NOPASSWD:/bin/systemctl enable openvpn-client@client
www-data ALL=(ALL) NOPASSWD:/bin/systemctl stop openvpn-client@client
www-data ALL=(ALL) NOPASSWD:/bin/systemctl disable openvpn-client@client
www-data ALL=(ALL) NOPASSWD:/bin/cp /tmp/ovpnclient.ovpn /etc/openvpn/client/client.conf
www-data ALL=(ALL) NOPASSWD:/bin/cp /tmp/authdata /etc/openvpn/client/login.conf
www-data ALL=(ALL) NOPASSWD:/bin/cp /tmp/dnsmasqdata /etc/dnsmasq.d/090_raspap.conf
www-data ALL=(ALL) NOPASSWD:/bin/cp /tmp/dhcpddata /etc/dhcpcd.conf
www-data ALL=(ALL) NOPASSWD:/sbin/shutdown -h now
www-data ALL=(ALL) NOPASSWD:/sbin/reboot
www-data ALL=(ALL) NOPASSWD:/sbin/ip link set wlan[0-9] down
www-data ALL=(ALL) NOPASSWD:/sbin/ip link set wlan[0-9] up
www-data ALL=(ALL) NOPASSWD:/sbin/ip -s a f label wlan[0-9]
www-data ALL=(ALL) NOPASSWD:/bin/cp /etc/raspap/networking/dhcpcd.conf /etc/dhcpcd.conf
www-data ALL=(ALL) NOPASSWD:/etc/raspap/hostapd/enablelog.sh
www-data ALL=(ALL) NOPASSWD:/etc/raspap/hostapd/disablelog.sh
www-data ALL=(ALL) NOPASSWD:/etc/raspap/hostapd/servicestart.sh
www-data ALL=(ALL) NOPASSWD:/etc/raspap/lighttpd/configport.sh
www-data ALL=(ALL) NOPASSWD:/etc/raspap/openvpn/configauth.sh
www-data ALL=(ALL) NOPASSWD:/bin/chmod o+r /tmp/hostapd.log
www-data ALL=(ALL) NOPASSWD:/bin/chmod o+r /tmp/dnsmasq.log
www-data ALL=(ALL) NOPASSWD:/bin/cp /tmp/dnsmasqdata /etc/dnsmasq.d/090_adblock.conf
www-data ALL=(ALL) NOPASSWD:/etc/raspap/adblock/update_blocklist.sh
- Create the RaspAP configuration directories. Add /etc/dhcpcd.conf as a base config:
sudo mkdir /etc/raspap/
sudo mkdir /etc/raspap/backups
sudo mkdir /etc/raspap/networking
sudo mkdir /etc/raspap/hostapd
sudo mkdir /etc/raspap/lighttpd
cat /etc/dhcpcd.conf | sudo tee -a /etc/raspap/networking/defaults > /dev/null
- Move RaspAP’s auth control file to the correct location.
sudo cp raspap.php /etc/raspap
- Set the files ownership to
www-datauser for the web files and RaspAP config.
sudo chown -R www-data:www-data /var/www/RaspAP
sudo chown -R www-data:www-data /etc/raspap
- Move the
hostapdlogging and service control shell scripts to the correct location.
sudo mv installers/*log.sh /etc/raspap/hostapd
sudo mv installers/service*.sh /etc/raspap/hostapd
- Set ownership and permissions for the logging and service control scripts.
sudo chown -c root:www-data /etc/raspap/hostapd/*.sh
sudo chmod 750 /etc/raspap/hostapd/*.sh
- Move the
raspapddaemon to the correct location and enable it.
sudo mv installers/raspapd.service /lib/systemd/system
sudo systemctl daemon-reload
sudo systemctl enable raspapd.service
- Copy the configuration files for
dhcpcd,dnsmasq, andhostapd. Optionally, backup your existinghostapd.conf.
sudo mv /etc/default/hostapd ~/default_hostapd.old
sudo cp /etc/hostapd/hostapd.conf ~/hostapd.conf.old
sudo cp config/default_hostapd /etc/default/hostapd
sudo cp config/hostapd.conf /etc/hostapd/hostapd.conf
sudo cp config/dnsmasq.conf /etc/dnsmasq.d/090_raspap.conf
sudo cp config/dhcpcd.conf /etc/dhcpcd.conf
sudo cp config/config.php /var/www/html/includes/
- Disable
systemd-networkdand copy the bridge configuration.
sudo systemctl stop systemd-networkd
sudo systemctl disable systemd-networkd
sudo cp config/raspap-bridge-br0.netdev /etc/systemd/network/raspap-bridge-br0.netdev
sudo cp config/raspap-br0-member-eth0.network /etc/systemd/network/raspap-br0-member-eth0.network
- (Optional) Optimize PHP, replacing php7.3-cgi with your installed version.
sudo sed -i -E 's/^session\.cookie_httponly\s*=\s*(0|([O|o]ff)|([F|f]alse)|([N|n]o))\s*$/session.cookie_httponly = 1/' /etc/php/7.3/cgi/php.ini
sudo sed -i -E 's/^;?opcache\.enable\s*=\s*(0|([O|o]ff)|([F|f]alse)|([N|n]o))\s*$/opcache.enable = 1/' /etc/php/7.3/cgi/php.ini
sudo phpenmod opcache
- Enable IP forwarding
echo "net.ipv4.ip_forward=1" | sudo tee /etc/sysctl.d/90_raspap.conf > /dev/null
sudo sysctl -p /etc/sysctl.d/90_raspap.conf
sudo /etc/init.d/procps restart
- Create
iptablesNAT rules and persist them.
sudo iptables -t nat -A POSTROUTING -j MASQUERADE
sudo iptables -t nat -A POSTROUTING -s 192.168.50.0/24 ! -d 192.168.50.0/24 -j MASQUERADE
sudo iptables-save | sudo tee /etc/iptables/rules.v4
- Unmask and enable
hostapd.service.
sudo systemctl unmask hostapd.service
sudo systemctl enable hostapd.service
- (Optional) Install
OpenVPN, enabling the option in RaspAP’s config and enable the openvpn-client service.
sudo apt-get install openvpn
sudo sed -i "s/\('RASPI_OPENVPN_ENABLED', \)false/\1true/g" /var/www/html/includes/config.php
sudo systemctl enable openvpn-client@client
- (Optional) Create
OpenVPNauth control scripts, set ownership and permissions.
sudo mkdir /etc/raspap/openvpn/
sudo cp installers/configauth.sh /etc/raspap/openvpn/
sudo chown -c root:www-data /etc/raspap/openvpn/*.sh
sudo chmod 750 /etc/raspap/openvpn/*.sh
- Reboot and it should be up and running.
sudo reboot
The default username is admin and the default password is secret.
RaspAP screenshot
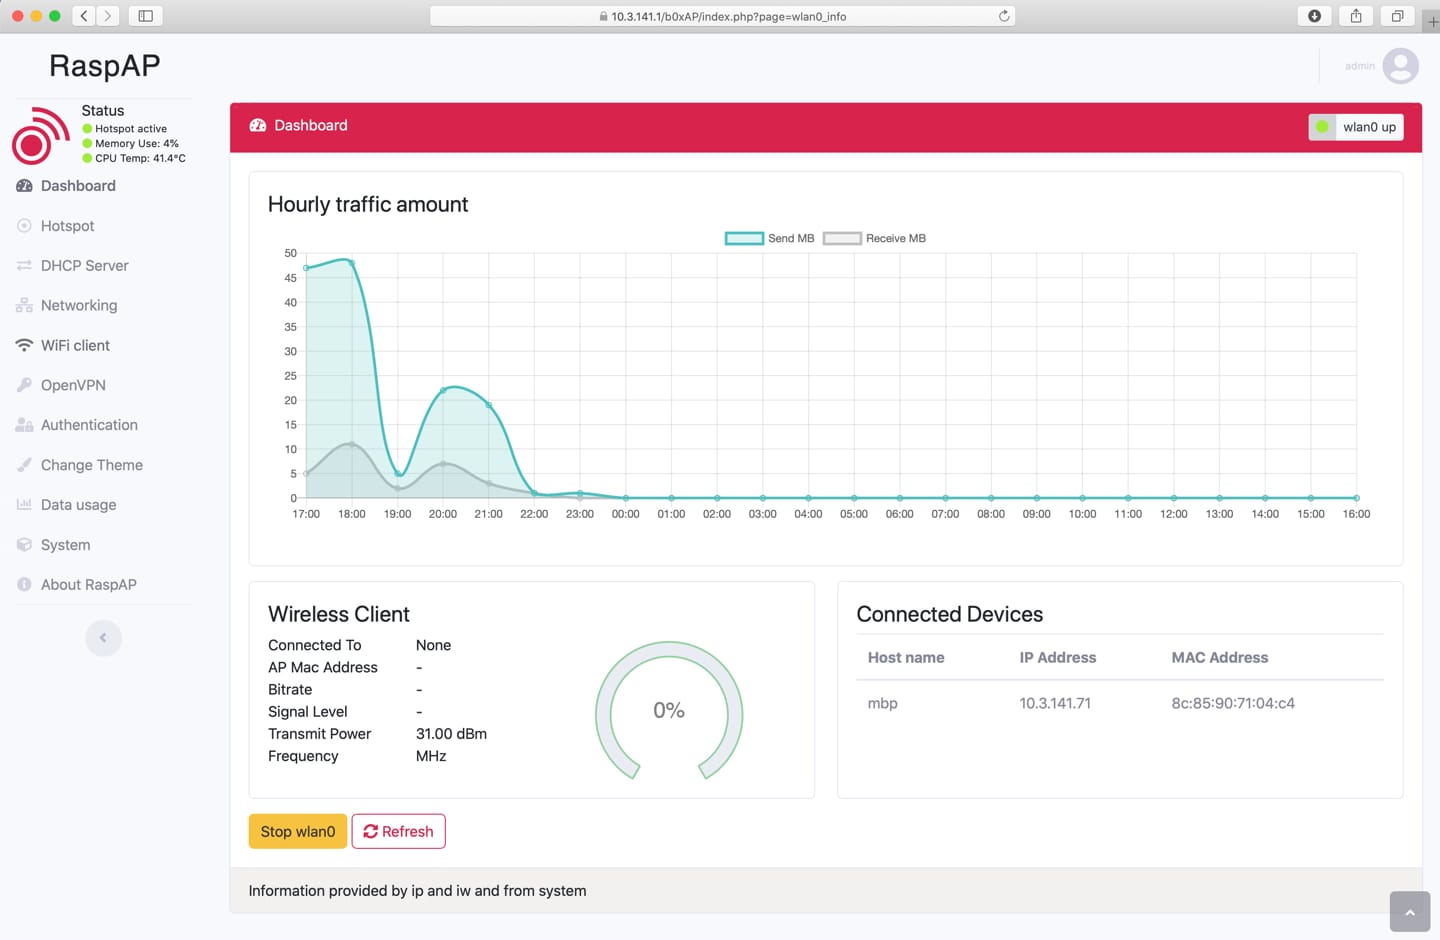
RaspAP GUI screenshot