Load-balance Internet connection across two or more ISPs

Load-balance your Internet connection across two or more ISPs for improved bandwidth and reliability
- Introduction
- Create a multi-homed linux load balancer with two internet connections and one LAN or WLAN connection
- Load balancing methods implémented
- Preparation
- Installation Net-ISP-Balance
- Download and unpack the distribution
- Check and install prerequisites
- Modify the
balance.confconfiguration file - Make edits to the firewall and route rules (optional)
- Test
load_balance.plin debug mode (optional) - Start
load_balance.pl - Arrange for
load_balance.plto be run on system startup time - Further Configuration
- Calling the Script by Hand
- How it Works
Introduction
Load balancing is where two or more ADSL, ADSL2+, VDSL or LTE broadband connections are connected to a dedicated load-balancing router. Load balancing provides increased resilience by maintaining an Internet connection even if an individual broadband connection goes down. A load-balancing router attempts to route Internet traffic optimally across two or more broadband connections to deliver a better experience to broadband users simultaneously accessing Internet applications.
Load-balancing do NOT bond multiple Internet connections together, like bonding (which can better transform slow broadband connections).
Load balancing reduces the risk of having no Internet connection
With load balancing, multiple broadband lines are connected to a load-balancing router. Many load-balancing routers can accept two broadband connections, while some (generally the more expensive routers) can support a greater number of connections. Some routers allow mobile broadband connections to be used. Load-balancing routers can automatically detect the loss of a connection (for example, if there is a line fault or errors on the line) and will route all Internet traffic through the remaining live connection(s).
Load balancing is not true bonding, so why bother?
There is much confusion about what load balancing is and what load-balancing routers actually do. If you’re unable to watch Netflix or TV+ through a single ADSL/ADSL2+ broadband connection and think that two lines with a load-balancing router would allow you to watch iPlayer using load balancing, you will be disappointed!
Load balancing does not combine (or aggregate) broadband connections so it does not, for example, create a single 6 Mbps Internet connection from two 3 Mbps connections (so you wouldn’t be able to watch a 5 Mbps high-definition streamed video).
So why bother with load balancing? Well, the key benefit of a load-balancing router lies with its ability to support multiple devices/users at the same time to improve the overall experience of users. Load balancing allows devices (such as PCs, notebooks, iPads and iPhones, TV …) to make use of the capacity of more than two Internet connections at the same time.
Let’s consider typical usage of broadband connections in the home and in the office, where the benefits of load balancing become clear.
In the home, there may be a number of people accessing Internet services at the same time through a variety of devices. For example, one person may be streaming a Netflix movies on his or her iPad, while another person is listening to a streamed music service (for example Spotify). At the same time, but in another room, someone may be trying to make a Microsoft Teams video call. As the number of Internet-capable devices increases, so does the possibility of having potentially conflicting demands on the same Internet connection.
Similarly, in an office environment, there may be a number of people accessing Internet services at the same time, which may include browsing, file and email downloading, video streaming and VoIP services.
With a single broadband connection, the available capacity has to be shared among all the users/devices. While a single 2 Mbps ADSL/ADSL2+ connection would easily allow a single user to stream video at 1.5 Mbps in isolation, multiple demands on the broadband connection at the same time could mean that the available capacity per user/device is reduced, and potentially the video streaming would not work (despite the fact that the total capacity of the ADSL connection is more than that needed to stream the video in isolation).
A load-balancing router attempts to share the available broadband connections between the multiple devices/users. So, for example, if you had two people trying to simultaneously view separate 1.5 Mbps movies streams, a load-balancing router should route movie traffic for the first user along the first connection, with the second connection used for the second user.
Load Balancing Methods for Every Application
Load balancing algorithms can help you easily fine-tune how traffic is distributed across connections
Weighted Balance
Assign more traffic to a faster link or less traffic to a connection with a bandwidth cap.
- Set a weight on the scale for each connection and outgoing traffic will be proportionally distributed according to the specified ratio. (e.g. 1:3:2)
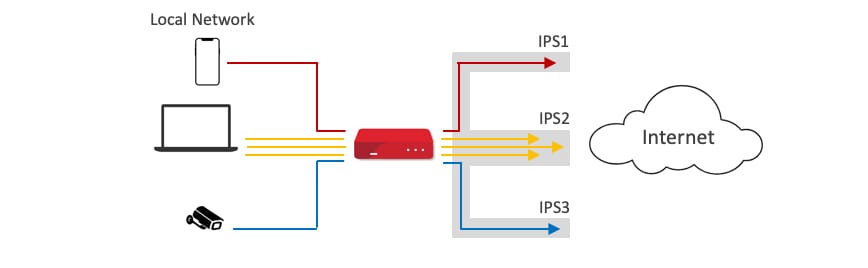
figure #1 - “Weighted Balance”
Priority
Route traffic to your preferred link as long as it’s available.
- Arrange the connection priority order, and traffic will be routed through the healthy link that has the highest priority in the list. Lower priority links will only be used if the current connection fails.
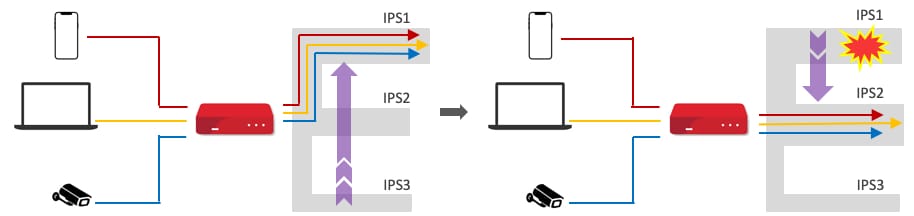
figure #2 - “Priority”
Overflow
Prevent traffic flow from slowing down when the connection runs out of available bandwidth.
- Drag and drop to arrange the connection overflow order and the highest priority link will route traffic as long as it has not been congested. Once it saturates, the lower priority links will start routing traffic.
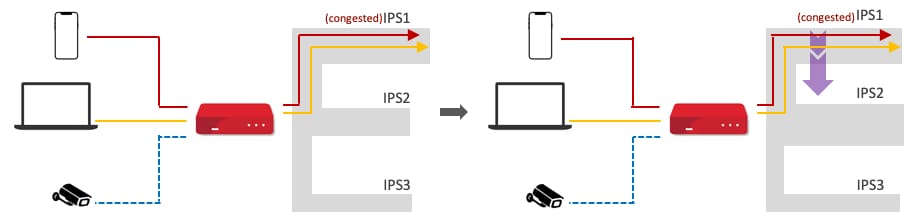
figure #3 - “Overflow”
Persistence
Eliminate session termination issue for HTTPS, E-banking, and other secure websites.
- Specify a traffic type and it will be routed through the same connection persistently based on its source and/or destination IP addresses. Traffic will keep routing on the same connection until the session ends.
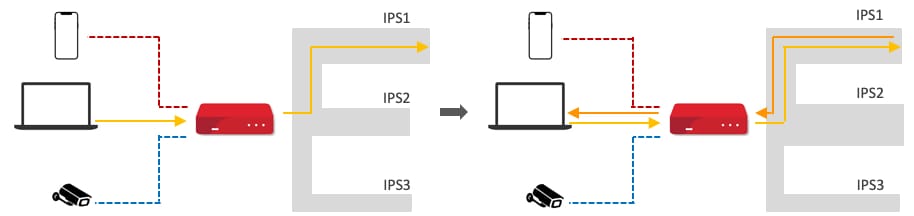
figure #4 - “Persistence”
Least Used
Help you choose the better connection with more free bandwidth.
- Traffic will be directed to the link with the most available bandwidth among the selected connections.
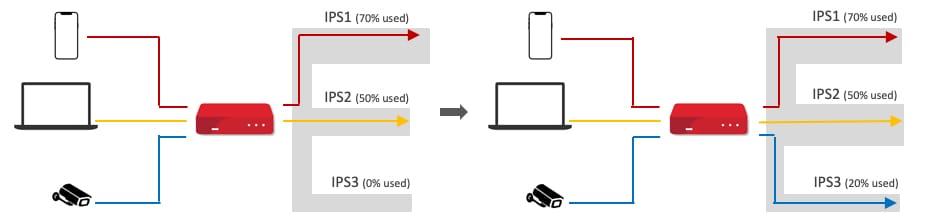
figure #5 - “Least Used”
Lowest Latency
Use the fastest connection based on the connection latency time of the second or third hops.
- At pre-defined time intervals, test data is sent to all healthy connections.
- All new traffic will be assigned to the link with the lowest latency time among the selected connections.

figure #6 - “Lowest Latency”
Enforced
Restrict outbound traffic to a particular connection.
- Select a connection and the specified traffic type will be routed through it at all times, whether the link is up or down.
- For scenarios like accessing a server that only allows users from a specific IP.
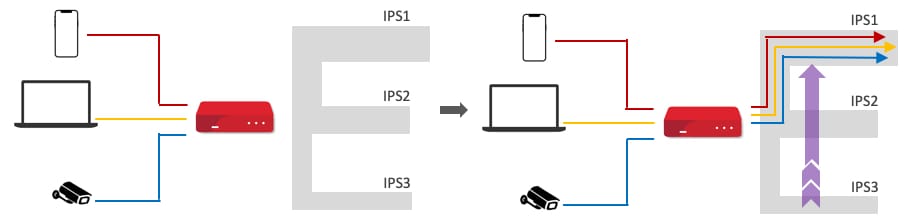
figure #7 - “Enforced”
Fastest Response Time
Use the fastest connection based on session response from the destination.
- At the start of each session, traffic is duplicated and sent to all healthy connections.
- The connection with the earliest response from the destination will be used to send all further traffic from that session.
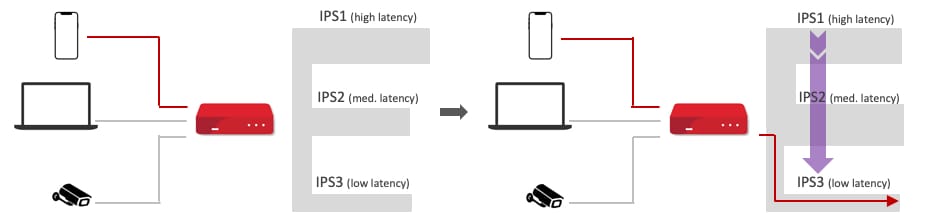
figure #8 - “Fastest Response Time”
Create a multi-homed linux load balancer with two internet connections and one LAN or WLAN connection
This post will allows you to load-balance Internet connection across two or more ISPs. You may apply it with a single host attached to two ISPs, or on a router/firewall machine to load balance your entire LAN. Network traffic is balanced across both ISP connections to increase upload and download capacity, and if one ISP fails, the other ISP(s) will take over automatically.
Bandwidth is distributed on a per-connection level. This means that you will not see the aggregated bandwidth on any particular download or speed benchmark, but you will see the benefits when multiple data transfers are occurring simultaneously, for example, when several individuals in your household are streaming movies. In addition, multi-connection file transfer protocols such as BitTorrent, will see the benefits of the load balancing.
Load balancing methods implémented
The list below indicates the compatibility with the methods specified above.
- Weighted Balance
- Priority
Overflow- not implémented- Persistence
Least Used- not implémentedLowest Latency- not implémented- Enforced
Fastest Response Time- not implémented
Preparation
In preparation for installing and configuration, you should ensure that your network is properly configured to allow for routing from your internal LAN through the router and to the Internet. To aid you in the preparatory steps, we’ll consider the following typical home router setup:
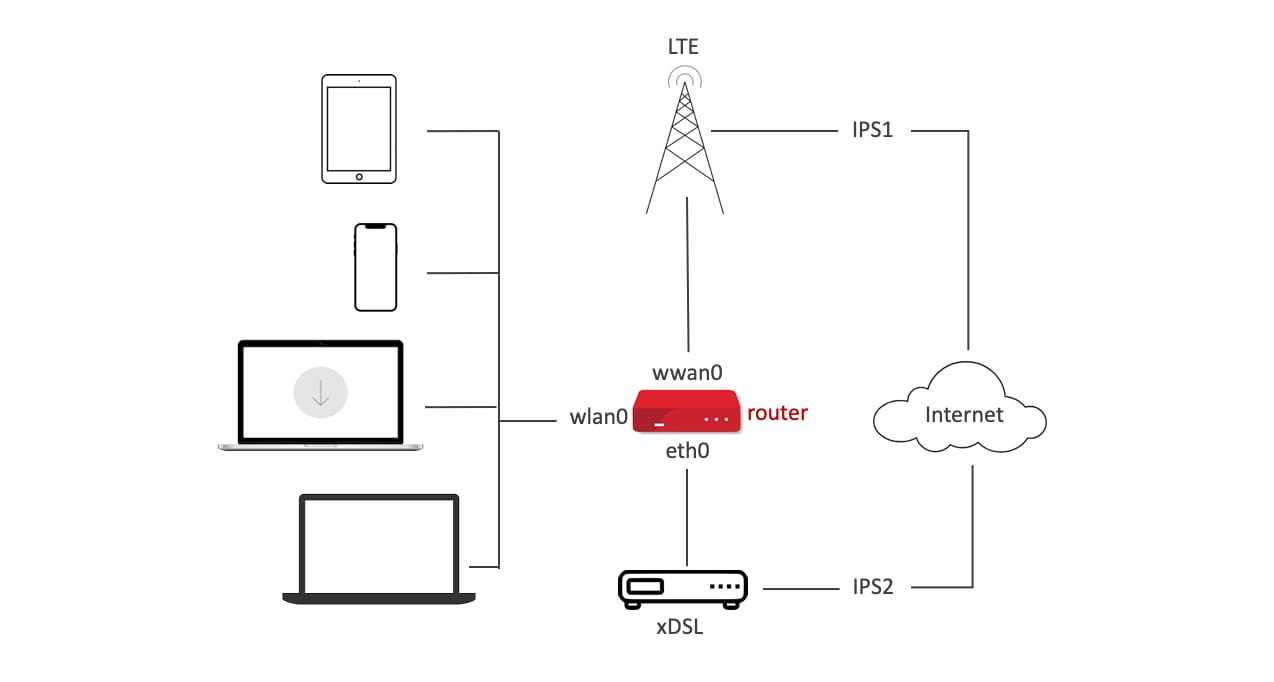
Network topology sample
The router/firewall is connected to the home LAN via network interface wlan0. It is connected to the internet via two ISPs, one using a router DSL attached to interface eth0, and the other using a LTE modem via interface wwan0. We will assume that the IP addresses for eth0 and wwan0 are assigned dynamically by the ISP, and that you have given wlan0 (the Wireless Lann interface) the IP address 10.3.141.1. There is at least one (and probably several) hosts on the LAN, each of which communicate through the router to reach the Internet. The router is where you will be installing and configuring the load balancing.
Before you install/configure load baloancing, you need to confirm four things:
- That the hosts on your LAN can communicate with the router.
- That the router can communicate with the internet via the modem attached to
eth0(the ISP1 connection). - That the router can communicate with the internet via the modem attached to
wwan0(the ISP2 connection). - That the router is capable of forwarding packets from the LAN through ISP1 and ISP2 using NAT.
- Test 1 : WLAN connectivity. First you’ll test basic connectivity between router. Log into the router, and confirm that you can ping one or more of the LAN host machines. Log into the router, and run the following ping command, assuming the LAN host you are testing to has IP address
10.3.141.71:
ping -I wlan0 10.3.141.71
PING 10.3.141.71 (10.3.141.71) from 10.3.141.1 wlan0: 56(84) bytes of data.
64 bytes from 10.3.141.71: icmp_seq=1 ttl=64 time=1.53 ms
64 bytes from 10.3.141.71: icmp_seq=2 ttl=64 time=94.7 ms
64 bytes from 10.3.141.71: icmp_seq=3 ttl=64 time=7.94 ms
...
Replace 10.3.141.71 with the IP address of a suitable host. If you are unsure of the address, log into the host and use the operating system’s net configuration system (“ifconfig” on Linux/Mac OSX, the “Network and sharing” control panel in Windows), and replace “eth1” with the appropriate network interface name for the LAN connection.
If this does not work, then do not try to install the load balancer until the problem has been fixed.
- Test 2 : ISP1 connectivity. With just ISP1 connected (via
eth0in the example) and the other ISP physically disconnected, confirm that you can ping the internet. Run the following command:
ping -I eth0 1.1.1.1
PING 1.1.1.1 (1.1.1.1) from 192.168.1.21 eth0: 56(84) bytes of data.
64 bytes from 1.1.1.1: icmp_seq=1 ttl=53 time=24.4 ms
64 bytes from 1.1.1.1: icmp_seq=2 ttl=53 time=23.2 ms
64 bytes from 1.1.1.1: icmp_seq=3 ttl=53 time=26.3 ms
The test address 1.1.1.1 is the Cloudflare public name server and is generally a good choice as an internet ping test destination, but you can use the IP address of any internet-accessible server machine. If necessary, change eth0 to the interface that is connected to ISP1.
- Test 3 : ISP2 connectivity. Physically disconnect ISP1 from the router and connect ISP2. Repeat the ping test against
1.1.1.1using the network interface that connects to ISP2.
Do not proceed to the next test until you’ve confirmed both ISP1 and ISP2 connectivity.
- Test 4 : Routing. With just one of the ISPs physically connected, reconfirm that you have ping connectivity between the router and the LAN and between the router and the internet. Then run the following commands on the router as the superuser:
echo 1 > /proc/sys/net/ipv4/ip_forward
iptables -P FORWARD ACCEPT
iptables -t nat -A POSTROUTING -o eth0 -j MASQUERADE
The first command activates packet forwarding on the router. The second tells the built-in firewall to allow packets to be forwarded from one interface to the next. The final command configures the firewall to activate NAT (network address translation) for all packets going out on interface wwan0. Important: eth0 should be replaced by the interface that connects to the currently attached ISP.
On Debian Linux, you will also need to allow IPForward
Enable IP forwarding
sysctl -w net.ipv4.ip_forward=1
or alternatively:
echo 1 > /proc/sys/net/ipv4/ip_forward
To make the change permanent insert or edit the following line in file /etc/sysctl.conf:
net.ipv4.ip_forward = 1
Now log into one of the LAN hosts and run the following command:
ping 1.1.1.1
PING 1.1.1.1 (1.1.1.1) from 10.3.141.71: 56(84) bytes of data.
64 bytes from 1.1.1.1: icmp_seq=1 ttl=53 time=24.4 ms
64 bytes from 1.1.1.1: icmp_seq=2 ttl=53 time=23.2 ms
64 bytes from 1.1.1.1: icmp_seq=3 ttl=53 time=26.3 ms
...
If the hosts on your LAN do not have ready access to the ‘ping’ command, then just open up a web browser and confirm internet reachability. If all goes well, you will be able to reach the internet from your LAN-connected host machines.
You should repeat this test on the other ISP, but physically disconnecting the first ISP’s modem and connecting the other.
If all tests pass, then you are ready to install and configure the Net-ISP-Balance package.
Installation Net-ISP-Balance
Here is a step-by-step summary of the steps to install, configure and test Net-ISP-Balance.
This package runs on Linux systems, and will not work on Windows or Mac OSX systems. It was designed to interoperate smoothly with distributions based on Debian (e.g. Ubuntu, Mint), as well as those based on RedHat (e.g. CentOS). Other distributions may or may not.
Download and unpack the distribution
Working on the target machine (router or Internet-connected host), download and unpack the zip file of the source code from https://github.com/lstein/Net-ISP-Balance.
cd ~
wget https://github.com/lstein/Net-ISP-Balance/archive/master.zip
unzip master.zip
cd Net-ISP-Balance-master
This will create the directory Net-ISP-Balance.
Alternatively, you may use git to clone the repository onto your local machine, and optionally check out a stable release :
cd ~
git clone https://github.com/lstein/Net-ISP-Balance.git
cd Net-ISP-Balance
Check and install prerequisites
The following software packages are required for Net-ISP-Balance to run:
- C compiler and
maketool. (apt-get install build-essentialon Debian/Ubuntu systems will do this for you.). Perlversion5.8or higher.
Enter the Net-ISP-Balance directory and run:
perl ./Build.PL
./Build installdeps
./Build test
sudo ./Build install
./Build test result
Building Net-ISP-Balance
t/01.config.t .. ok
All tests successful.
Files=1, Tests=45,  1 wallclock secs ( 0.05 usr  0.02 sys +  0.34 cusr  0.06 csys =  0.47 CPU)
Result: PASS
sudo ./Build install result
Building Net-ISP-Balance
Building Net-ISP-Balance
Installing /usr/local/bin/foolsm
Installing /usr/local/man/man1/load_balance.pl.1p
Installing /etc/network/balance.conf
Installing /etc/network/balance/pre-run/pre-run-script.pl
Installing /etc/network/balance/lsm/balancer_event_script
Installing /etc/network/balance/lsm/default_script
Installing /etc/network/balance/firewall/01.accept
Installing /etc/network/balance/firewall/02.forward.pl
Installing /etc/network/balance/firewall/01.accept.pl
Installing /etc/network/balance/post-run/post-run-script.pl
Installing /etc/network/balance/routes/02.local_routes.pl
Installing /etc/network/balance/routes/01.local_routes
Installing /usr/local/share/perl/5.32.1/Net/ISP/Balance.pm
Installing /usr/local/share/perl/5.32.1/Net/ISP/Balance/ConfigData.pm
Installing /usr/local/man/man3/Net::ISP::Balance::ConfigData.3pm
Installing /usr/local/man/man3/Net::ISP::Balance.3pm
Installing /usr/local/bin/load_balance.pl
Modify the balance.conf configuration file
Edit the example configuration file balance.conf to match your network topology. If you are on a Ubuntu/Debian system, this file will be located at /etc/network/balance.conf. If you are on a RedHat/CentOS system, you’ll find it in /etc/sysconfig/network-scripts/balance.conf. You’ll need to edit this file to match your network topology. Referring back to our example home router setup:
Network topology sample
The router/firewall is connected to the home LAN via network interface wlan0. It is connected to the internet via two ISPs, one using a router DSL attached to interface eth0, and the other using a LTE modem via interface wwan0.
The example balance.conf file contains a commented table that corresponds to this network topology:
## service    device   role     ping-ip     weight   gateway
#DSL           eth0     isp      1.1.1.1     1        default
#LTE           wwan0    isp      1.1.1.1     1        default
#LAN           wlan0    lan

mode=balanced
#mode=failover
Remove the # signs from the body of the table and edit to match your network.
The first column is a service name that is used to bring up or down the needed routes and firewall rules.
The second column is the name of the network interface device that connects to that service.
The third column is either “isp” or “lan”. There may be any number of these. The script will firewall traffic passing through any of the ISPs, and will load balance traffic among them. Traffic can flow freely among any of the interfaces marked as belonging to a LAN.
The fourth column is the IP address of a host that can be periodically pinged to test the integrity of each ISP connection. If too many pings failed, the service will be brought down and all traffic routed through the remaining ISP(s). The service will continue to be monitored and will be brought up when it is once again working. Choose a host that is not likely to go offline for reasons unrelated to your network connectivity, such as google.com, or the ISP’s web site. If this column is absent, then the host will default to www.google.ca, which is probably not what you want!
The fifth column (optional) is a weight to assign to the service, and is only valid for ISP rows. In the default balanced mode of operation, if weights are equal, traffic will be apportioned evenly between the two routes. Increase a weight to favor one ISP over the others. For example, if “LTE” has a weight of 2 and “DSL” has a weight of 1, then twice as much traffic will flow through the “LTE” service. If this column is omitted, then equal weights are assumed. The meaning of the weight column changes when running in failover mode. See below for more information
The sixth column (optional) is the IP address for the gateway host for this service. If absent or named “default”, the system will attempt to guess the proper gateway automatically. Note the guessing algorithm relies on the fact that the gateway is usually the first address in the IP range for the network attached to this interface. If this is not the case, then routing through the interface won’t work properly. Enter the correct gateway IP address in this field to correct this.
Uncomment one or the other of the mode options to select either balanced or failover mode. In the balanced mode (the default), traffic will be routed in a balanced way across all isp services proportional to their weights. In the failover mode, the service with the highest weight is used exclusively for all traffic. If this service loses connectivity, then the second highest weighted service will be used and so forth. When the preferred service becomes available again, traffic will again be routed through it.
If this package is running on a single Internet-connected host, not a router, then do not include a lan line.
There are additional configuration options related to fine control of packet forwarding as well as link status monitoring. You may wish to uncomment and adjust these as well:
# mode=balanced
# mode=failover
# forwarding_group=:lan :isp
# warn_email=root@localhost
# interval_ms=1000
# max_packet_loss=15
# max_successive_pkts_lost=7
# min_packet_loss=5
# min_successive_pkts_rcvd=10
# long_down_time=120
mode
The mode option allows you to select among the two operating modes, one of
balanced(the default) orfailover. In the latter case, all ISP interfaces will be pinged periodically, but only the one that is up and running and which has the highest weight will be selected for network traffic. If the preferred ISP becomes inaccessible, then the ISP interface with the next highest weight will be used until such time as the preferred one becomes available again.forwarding_group
The forwarding_group configuration option defines a set of services that the router is allowed to forward packets among. Provide a space-delimited set of service names or one or more of the abbreviations
:ispand:lan.:ispis an abbreviation for all ISP services, while:lanis an abbreviation for all LAN services. So for example, the two configuration lines below will allow forwarding of packets between LAN1, LAN2, LAN3 and both ISPs. LAN4 will be granted access to both ISPs but won’t be able to exchange packets with LANs 1 through 3:forwarding_group=LAN1 LAN2 LAN3 :isp forwarding_group=LAN4 :ispIf no forwarding_group options are defined, then the router will forward packets among all LANs and ISP interfaces. It is equivalent to this:
forwarding_group=:lan :ispwarn_email
Provides an email address to send notification messages to if the status of a link changes (goes down, or comes back up). You must have the mail program installed and configured for this to work.
interval_ms
Indicates how often to check the ping host for each ISP.
- min_packet_loss
max_packet_loss
These define the minimum and maximum packet losses required to declare a link up or down.
- min_successive_pkts_rcvd
max_successive_pkts_recvd
These define the minimum and maximum numbers of successively-transmitted pings that must be returned in order to declare a link up or down.
long_down_time
This is a value in seconds after a service that has gone down is considered to have been down for a long time. You may optionally run a series of shell scripts when this has occurred (see below).
Make edits to the firewall and route rules (optional)
Net-ISP-Balance allows you to add customized entries to the routing and firewall tables. See Further Configuration for more details.
Test load_balance.pl in debug mode (optional)
If you wish to check how the balancing script will configure your system when you execute it, then run (as a regular user) the following command:
sudo load_balance.pl -d > commands.sh # Ubuntu/Debian
Or for RedHat/CentOS
su -c load_balance.pl -d > commands.sh # RedHat/CentOS
The -d argument puts the script into debug mode. All commands that it would run on your behalf are placed into ‘commands.sh’ for your inspection. If you wish, you may pass these commands to the shell in order to preview how your system will perform under load balancing. An example of how to do this is shown below. Note that this doesn’t start the link status monitoring daemon needed for automatic failover.
/bin/sh commands.sh
Start load_balance.pl
Become the superuser and run load_balance.pl
sudo load_balance.pl # Ubuntu/Debian
Or for RedHat/CentOS
su -c load_balance.pl # RedHat/CentOS
This will configure the system for load balancing, installing a restrictive set of firewall rules, and launch the load status monitor (lsm) daemon to monitor each of the ISPs for activity.
Arrange for load_balance.pl to be run on system startup time
You may do this by adding an entry in rc.local:
if [ -x /etc/network/load_balance.pl ]; then
    /etc/network/load_balance.pl
fi
Modify as needed for RedHat/CentOS.
Alternatively, my preference is to invoke the script when the WLAN interface comes up. On Ubuntu/Debian systems, edit /etc/network/interfaces (Ubuntu/Debian), find the reference to the LAN interface, and edit it to add a post-up option as shown here:
auto wlan0
iface wlan0 inet static
  post-up /etc/network/load_balance.pl
  ...
On RedHat/CentOS systems, create an executable script named /sbin/ifup-local, and populate it with the following code:
#!/bin/sh

LANDEV=wlan0;

if [ "$1" eq "$LANDEV" ] ; then
   /etc/sysconfig/network-scripts/load_balance.pl
fi
Be sure to change wlan0 to the correct device for the LAN interface.
Further Configuration
The default is to establish a reasonably restrictive firewall which allows incoming ssh services to the router from the Internet and rejects all other incoming services. You may modify this if you wish by adding additional firewall rules and routes.
The routes and rules are located in these subdirectories on Ubuntu/Debian systems:
/etc/network/balance/firewall       # firewall rules
/etc/network/balance/routes         # routes
and in these directories on RedHat/CentOS systems:
/etc/sysconfig/network-scripts/balance/firewall       # firewall rules
/etc/sysconfig/network-scripts/balance/routes         # routes
Any files you put into these directories will be read in alphabetic order and added to the routes and/or firewall rules emitted by the load balancing script.
A typical routing rules file will look like the example shown below.
# filename: /net/network/balance/routes/01.local_routes.conf
ip route add 192.168.100.1  dev eth0 src 198.162.1.14
ip route add 192.168.1.0/24 dev wlan0 src 10.0.0.4
Each line will be sent to the shell, and it is intended (but not required) that these be calls to the ip command. General shell scripting constructs are not allowed here.
A typical firewall rules file will look like the example shown here:
# filename: /net/network/balance/firewall/02.accept.conf
# accept incoming telnet connections to the router
iptable -A INPUT -p tcp --syn --dport telnet -j ACCEPT

# masquerade connections to the DSL modem's control interface
iptables -t nat -A POSTROUTING -o wlan0 -j MASQUERADE
You may also insert routing and firewall rules via fragments of Perl code, which is convenient because you can get the configured service and interface names from the configuration file and can make use of a variety of shortcuts. To do this, simply end the file’s name with .pl and make it executable.
Here’s an example of a file named balance/firewall/02.forwardings.pl that defines a series of port forwarding rules for incoming connections:
$B->forward(80 => '192.168.10.35'); # forward port 80 to internal web server
$B->forward(443=> '192.168.10.35'); # forward port 443 to
$B->forward(23 => '192.168.10.35:22'); # forward port 23 to ssh on  web sever
The main thing to know is that on entry to the script the global variable $B will contain an initialized instance of a Net::ISP::Balance object. You may then make method calls on this object to emit firewall and routing rules. Please read the manual page for Net::ISP::Balance for further information (man Net::ISP::Balance after the package is installed).
Calling the Script by Hand
You can invoke load_balance.pl from the command line to manually bring up and down ISP services. The format is simple:
/etc/network/load_balance.pl ISP1 ISP2 ISP3 ...                     # Ubuntu/Debian
/etc/sysconfig/network-scripts/load_balance.pl ISP1 ISP2 ISP3 ...   # RedHat/CentOS
ISP1, etc are service names defined in the configuration file. All ISPs indicated on the command line will be maked as “up”, others will not be used for load balancing. If no services are indicated on the command line, then ALL the ISP services will be marked up initially and lsm will be launched to monitor their connectivity periodically.
Adding a -d option will print the routing and firewall commands to standard output for inspection.
How it Works
The script uses two load balancing techniques. The first is to set up a multipath default routing destination as described at “Routing for multiple uplinks/providers”
ip route add default \
  nexthop via 206.250.80.122  dev wwan0 weight 1 \
  nexthop via 198.5.13.201    dev eth0 weight 1
This balances network sessions originating from the router, but does usually not work for forwarded (NAT-ed) sessions from the LAN. To accomplish the latter, the script uses a combination of ip routing tables for outgoing connections, the firewall mark (fwmark) mechanism to select tables, and the iptables “mangle” chain to randomly select which ISP to use for outgoing connections:
iptables -t mangle -A PREROUTING -i wlan0 -m conntrack --ctstate NEW \
         -m statistic --mode random --probability 1 -j MARK-ISP1
iptables -t mangle -A PREROUTING -i wlan0 -m conntrack --ctstate NEW \
         -m statistic --mode random --probability 0.5 -j MARK-ISP2
This strategy is described at https://home.regit.org/netfilter-en/links-load-balancing/. The module always gives each ISP equal weight; a future version may support the ability to weight traffic towards one ISP or another.