Raspberry Pi - QMI Interface with LTE base HAT

The Qualcomm MSM Interface is a proprietary interface for interacting with Qualcomm baseband processors and is a replacement for the legacy cellular extensions of the Hayes command set. With mobile chipsets, communication between the application processor and the baseband processor happens through shared memory. On PCs with data cards, QMI is exposed through USB.
Fineas Anton©
Install QMI Interface
1) Unplug the USB cable from Base HAT.
2) Open a new terminal and run the update and upgrade command.
sudo apt update && sudo apt upgrade -y
3) Next, install the Raspberry Pi kernel headers needed for the QMI Interface.
sudo apt-get install raspberrypi-kernel-headers
If you are using Raspberry Pi 4, skip steps 4-7.
4) Check installed kernel headers packet version. In our case, it is 4.14.79. Note the version number.
ls /usr/src
pi@raspberrypi:~$ ls /usr/src
linux-headers-4.14.19+  linux-headers-4.14.79-v7+
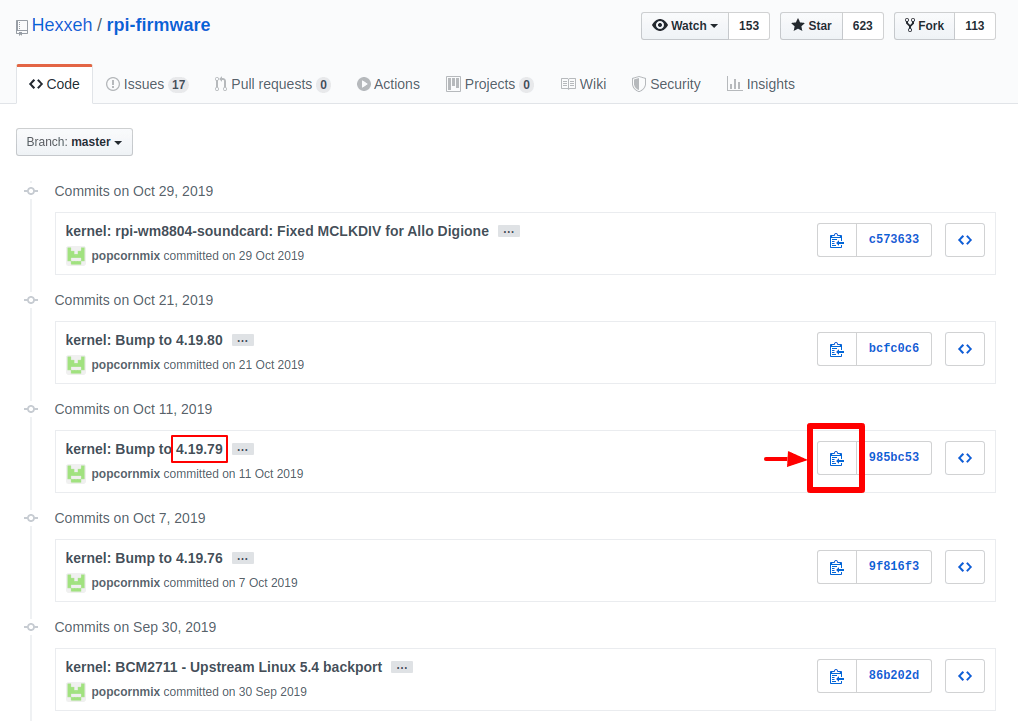
5) Navigate to the repository for Raspberry Pi firmware updates and locate the header version above on the page. In this case, we want to find release 4.14.79.
Copy the kernel commit-id by pressing the copy to clipboard button

6) Update the firmware of the Raspberry Pi using the commit number found in the repository relating to the kernel version.
sudo rpi-update 985bc5353e4f5fe5a11c8b6c4c646dc7165bbc21
7) Reboot your Raspberry Pi to activate the new firmware.
8) After rebooting, download the QMI installer file.
wget https://raw.githubusercontent.com/sixfab/Sixfab_RPi_3G-4G-LTE_Base_Shield/master/tutorials/QMI_tutorial/qmi_install.sh
9) Change the permission of the installation file.
sudo chmod +x qmi_install.sh
10) Run the installation file. Make sure the module is disconnected before running the installer script.
sudo ./qmi_install.sh
11) At the end of installation enter any key to reboot your Raspberry Pi. Attach the USB cable of the HAT.
12) Navigate to the Quectel files that were installed in the previous step.
cd files/quectel-CM
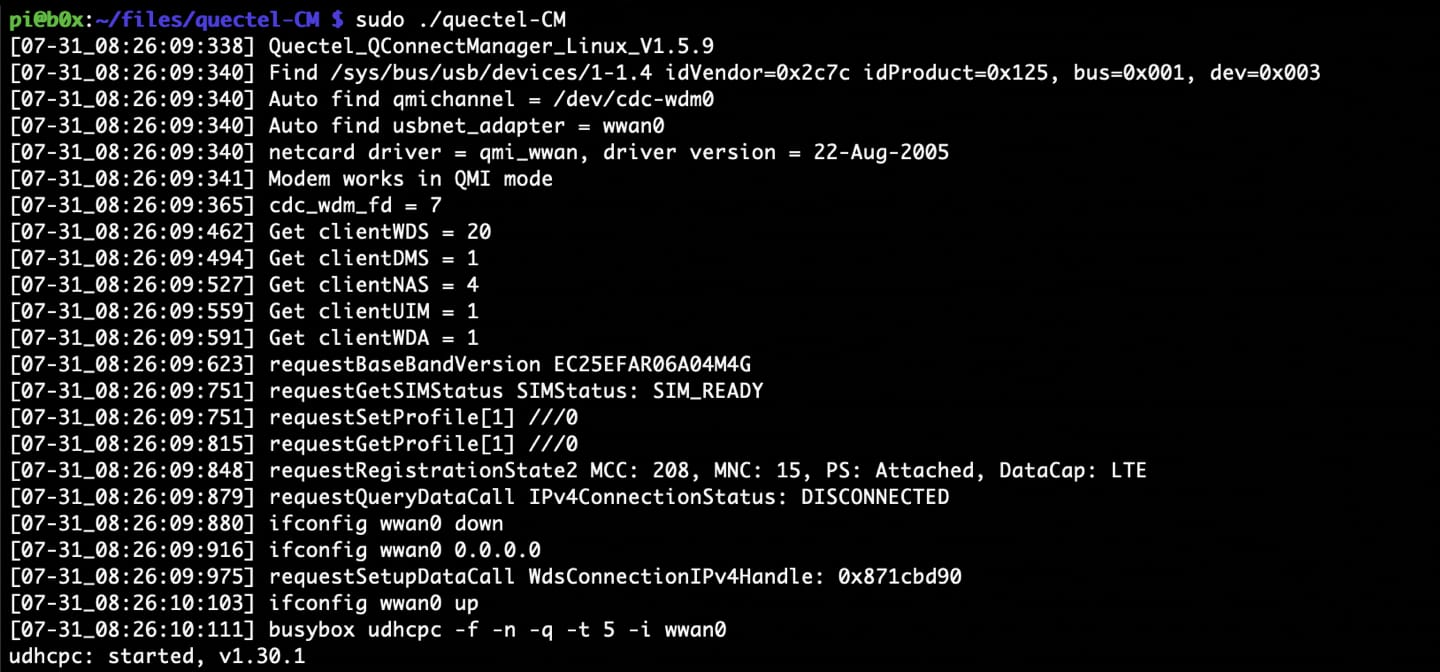
13) Now run the following command to connect to the Internet.
sudo ./quectel-CM -s internet

14) Now you can check your IP using.
15) Furthermore, you may check by pinging ping -I wwan0 -c 5 1.1.1.1

Auto Connect on reboot
If you want your Raspberry Pi to automatically connect to the Internet via the QMI interface then there is one more step you will need to follow.
1) Get the installation script.
wget https://raw.githubusercontent.com/sixfab/Sixfab_RPi_3G-4G-LTE_Base_Shield/master/tutorials/QMI_tutorial/install_auto_connect.sh
2) Make the installation file an executable.
sudo chmod +x install_auto_connect.sh
3) Now install the script.
sudo ./install_auto_connect.sh
4) It will then ask for APN. Type in your APN and then press ENTER.
sudo ./install_auto_connect.sh
What is the APN?
5) Once you press enter it will create and activate the service.
6) The name of the service is qmi_reconnect. To check if the service is active you can type.
sudo systemctl status qmi_reconnect.service
7) If it is working fine then you will be able to see active(running) in green.

Managing the Auto-connect/Reconnect service
To check if the service is active you can type.
sudo systemctl status qmi_reconnect.service
To stop your reconnect service, type:
sudo systemctl stop qmi_reconnect.service
To start the reconnect service when it is stopped, type:
sudo systemctl start qmi_reconnect.service
To stop and then start the service again, type:
sudo systemctl restart qmi_reconnect.service
By default, reconnect service is configured to start automatically when the server boots. If this is not what you want, you can disable this behavior by typing:
sudo systemctl disable qmi_reconnect.service
To re-enable the service to start up at boot, you can type:
sudo systemctl enable qmi_reconnect.service
Uninstall
If you are using auto-connect/reconnect service, stop the service and disable it.
sudo systemctl stop qmi_reconnect.service
sudo systemctl disable qmi_reconnect.service
Then delete the files.
sudo rm -r ~/files
sudo rm /usr/src/qmi_reconnect.sh
sudo rm /etc/systemd/system/qmi_reconnect.service