Multi WAN and Internet Bonding with OpenMPTCProuter

Internet Bonding with OpenMPTCProuter use MultiPath TCP (MPTCP) to really aggregate multiple Internet connections.
- Foreword : Bonding vs Load Balancing
- Internet Bonding with OpenMPTCProuter
Foreword : Bonding vs Load Balancing
There are two approaches to combining multiple WANs access: Bonding and Load Balancing. We generally recommend bonding, but there are scenarios where Load Balancing can be a useful solution.
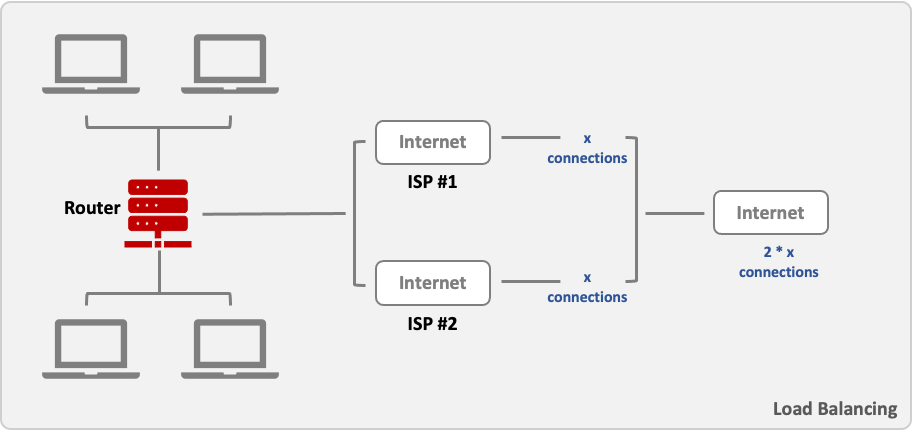
Load Balancing
Load balancing is way of distributing traffic over multiple connections. It does not bond the connections together, but distributes the available resources among clients and connections.
For example, in a network with 4 clients that have established 10 connections to the Internet each, 50/50 ratio load balancing can distribute this traffic equally over two different network interfaces using different ISPs. (Other ratios can be applied as well.)
Advantages
Local internet performance: You can split traffic evenly, or even by specific channels, in order to prioritise critical users and activities over non-critical. As an example, you could give corporate users 95% of available bandwidth and guest Wi-Fi only 5%. Because breakout occurs locally, you’re also not met with the overheads of bonding protocols or encryption for VPN.
Compatibility: Load balancing supports open standards such as IPSEC when setting up VPNs. This means that existing equipment can more likely be used and services do not need to be run through the same MSP. While the VPN itself will only run on one active channel at a time, it can be set to auto-failover between channels should the link fail.
Disadvantages
Failover isn’t instant: While the service improves local internet speed, it is not ideal if pure corporate connectivity is required via a VPN. Though a VPN connection will fail over to a second channel if the connection is interrupted, this will not be instant – resulting in a noticeable outage and packet loss.
Performance: Because traffic is only running over one tunnel, it cannot take advantage of the additional bandwidth available on other active channels.
Outages and packet loss: If you have packet loss or latency-sensitive applications running over your corporate connection, load balancing is not ideal as you’ll only have one active channel with a failover time period. There are also no mechanisms to monitor latency and packet loss, meaning the connection is not intelligent enough to switch between channels when one is degraded.
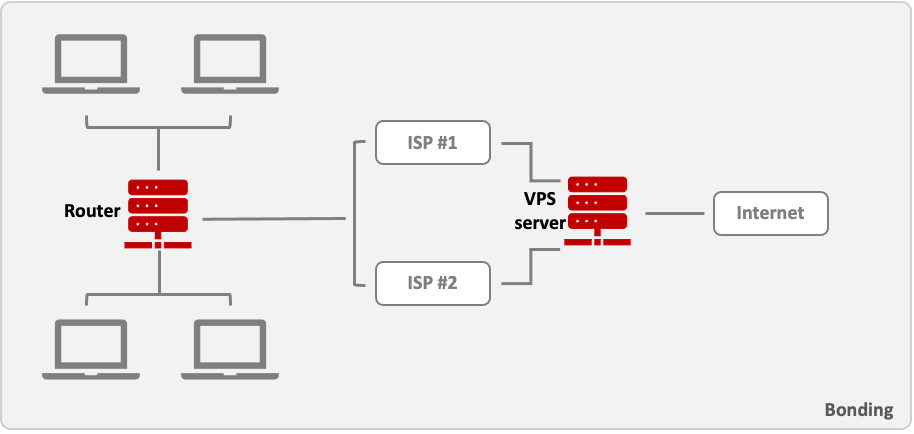
Bonding
Bonding is the process of aggregating multiple individual connections into a single connection. In other words, bonding can combine the resources of multiple ISPs in order to increase the speed of a single connection.
It works by establishing multiple connections over different ISPs to a VPN server. Data is sent and received over all connections and added up at the server. Thus, bonding can provide much faster data rates for a single connection.
For example, let’s assume that a device behind a router with two SIM cards wants to establish a connection with a host on the Internet. When the router is using bonding, two separate connections to a VPN server are established over each SIM card interface. Then data from the end device to the host can be transferred via the server using both connections at the same time.
As mentioned above, load balancing optimizes Internet traffic per sockets. Channel bonding, on the other hand, goes one step further and optimizes traffic into even smaller chunks of data called network packets. Following the ‘tubes’ analogy for sockets, we can think of these network packets as the ‘liquid’ that flows through those tubes.
Broadband bonding makes it possible to spread these individual packets across multiple Internet connections. By splitting all your web traffic at the packet level, even large, single-socket transfers, such as VPN connections, video streaming, and file transfers, can be given a major speed boost!
Advantages
Reliability: By using multiple links at once to split the traffic flow across each in real time, you can re-transmit dropped packets instantly via another active channel. This makes it ideal for applications that are sensitive to packet loss or latency.
Monitoring: Bonding allows the use of mechanisms to monitor the performance of each channel in terms of speed, latency and packet loss. This means Quality of Service (QoS) can be configured according to this data, for example not sending voice down a channel that has exceeded a pre-defined latency threshold.
Performance: When a VPN is required for corporate connectivity, bonding allows each channel to form its own tunnel while the bonding protocols split the traffic up across all the active channels, meaning all of them are used for the VPN traffic. This allows for instant failover and no packet loss.
Disadvantages
Traffic flow: Because all traffic is sent through the bonded tunnel to the central hub before breaking out, it can influence native internet performance. The encryption overhead of the VPN can also impede performance.
Low performing channels: The bond is only as good as the worst performing channel. For example, if you have four channels – three running a 4G service and one running a 3G service – the bond will run at the speed and latency capacity of the 3G service.
Compatibility: Because bonding is not an open standard, different MSPs will have their own approach to doing this, which is usually proprietary to their equipment and common standards for VPN such as IPSEC cannot be used. This means that you’ll likely to have to use the same MSP for both core and site devices.
Performance: 4G routers commonly auto-tune their bonded connections with a priority on reliability and minimum packet loss, rather than on performance. We sometimes find we need to tune the settings to achieve the right balance between reliability and performance.
Bonding and Load Balancing Comparaison
However, the two techniques work best in their specific scenarios.
| Online Activity | Load Balancing | Bonding |
|---|---|---|
| Web Browsing | + | + |
| Bittorrent | + | + |
| Download Large File | - | + |
| Uploads | - | + |
| Streaming Movie | - | + |
| VPN | - | + |
Bonding when you require
- Reliability
- Latency-sensitive applications
- Connection to the corporate network
- Increasing available bandwidth
Load balancing when
- You are accessing internet-delivered applications
- You are not running applications that are sensitive to packet loss or latency
- You don’t require high speed access to a corporate network
- Or perhaps you don’t have the time to install a hub in your own data centre or the desire to use a provider’s hub
Internet Bonding with OpenMPTCProuter
In this post I show you how to install the excellent OpenMPTCProuter software, made by Yannick Chabanois, which has truly changed the way I use Internet! But first, I will explain a bit about the setup, and the components that are needed.
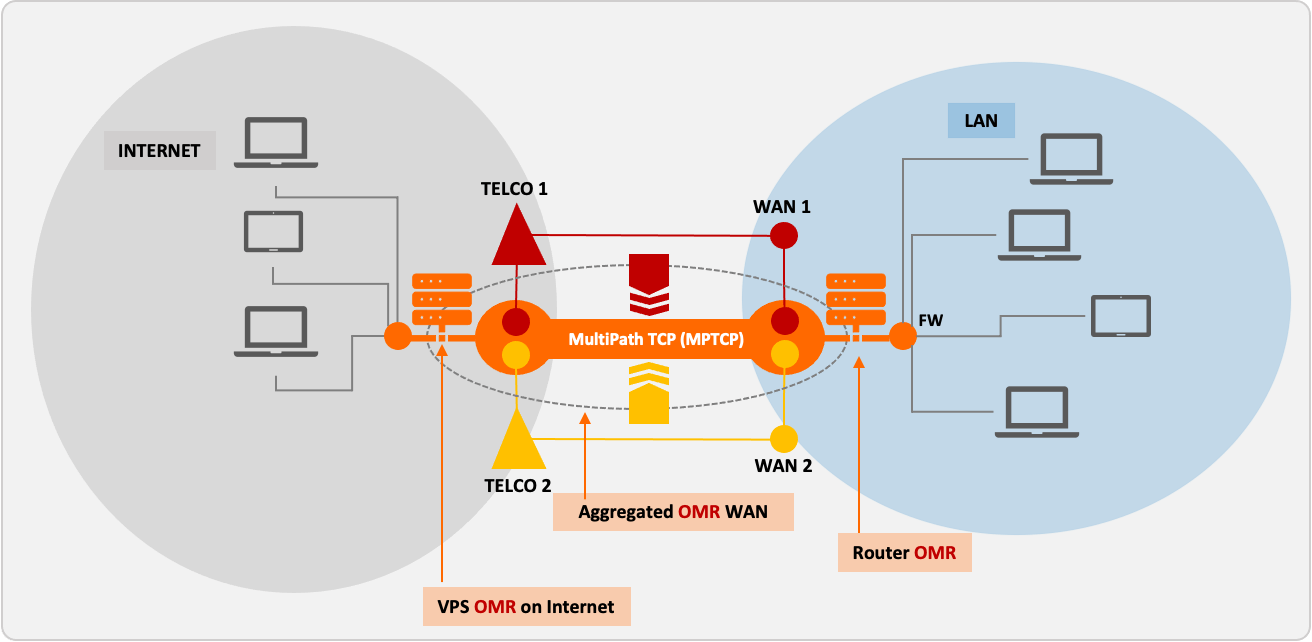 OpenMPTCProuter Bonding overview
I will not go into details about the technology of Multipath TCP.
OpenMPTCProuter Features
Aggregation
Bonding connections to really aggregate bandwidth from up to 8 internet connections with different characteristics : Fiber, xDSL, LTE (4G or 5G), Starlink/SpaceX Provide hybrid Internet with any ISP
Failover
Always up with connection and server failover
Security
All data between the router and the server part are encrypted by default and can be obfuscated
Prerequisite
- Intel/AMD-based PC with Gigabit Ethernet, at least 1 GB of RAM, and a 8 GB storage or Raspberry Pi 4B(*) with those same specs and an microSD card
- 5 port Gigabit switch
- 4 Ethernet cables with 4 pairs (8 wires, Cat 5/5e or better)
- 2 Internet connections or more - and modems can be xDSL, cable, 4G, fiber, Starlink/SpaceX, or whatever… (**)
- Cloud VPS with 1 GB of RAM and at least 1 vCore, as closest to you as possible (ping time matters!), with network speed greater than 120% of what you expect to achieve (***)
(*) You cannot use a Raspberry Pi 3B or less, unless you have less than 90 Mb/s of total Internet speed available, as the Ethernet port of the Pi 3B is limited to 100 Mbps total. Additionally, the Pi 3B’s CPU is slower which can cause problems with the bonding and trigger packet loss or cause the Pi to crash.
(**) You cannot use a FTTB deployment where you are provided only an Ethernet cable to your apartment that you plug into a router! Only ISPs which provide a modem/router can be used!
(***) Explanation: If you have 2x 50 Mbps connections that you want to bond into a 100 Mbps connection, your VPS should have at least 120 Mb/s network speed limit to account for protocol overheads. Actual results may vary. Ping from your home to the VPS should be less than 15ms.
How this work ?
By default OpenMPTCProuter (OMR) use:
- ShadowSocks-libev for TCP traffic between OMR and the VPS
- Glorytun TCP for UDP and ICMP traffic Both use MPTCP to aggregate links connections.
You can use:
- Glorytun UDP, it support aggregation, without the need of MPTCP
- MLVPN, support also aggregation, use UDP too, so doesn’t use MPTCP
- OpenVPN TCP that use MPTCP (but it’s slower than default configuration)
The VPS is needed to combine links connections and access Internet at full aggregated speed.
Setup part 1: The server
Obtain a VPS, with Ubuntu 20.04 x86_64 or Debian 10 Buster x86_64, with at least 512 GB RAM (1 Go RAM is better) and 1 vCore. Make sure the network speed of the server is satisfactory, as that will be the maximum bonded speed you can achieve, and make sure the ping from your home connection is low (20ms or lower). It is best to pick a server in a datacenter in the same country as you. Note the server’s IP address.
The VPS/server need to have the lowest latency as possible with your connections.
I using an AWS Lightsail instance (with Linux Debian, 512MB RAM, 1 vCPU, 20GB SSD & 1TB Transfer) at € 3.50 per month. It has a public IP address and one of my domain names points to it.
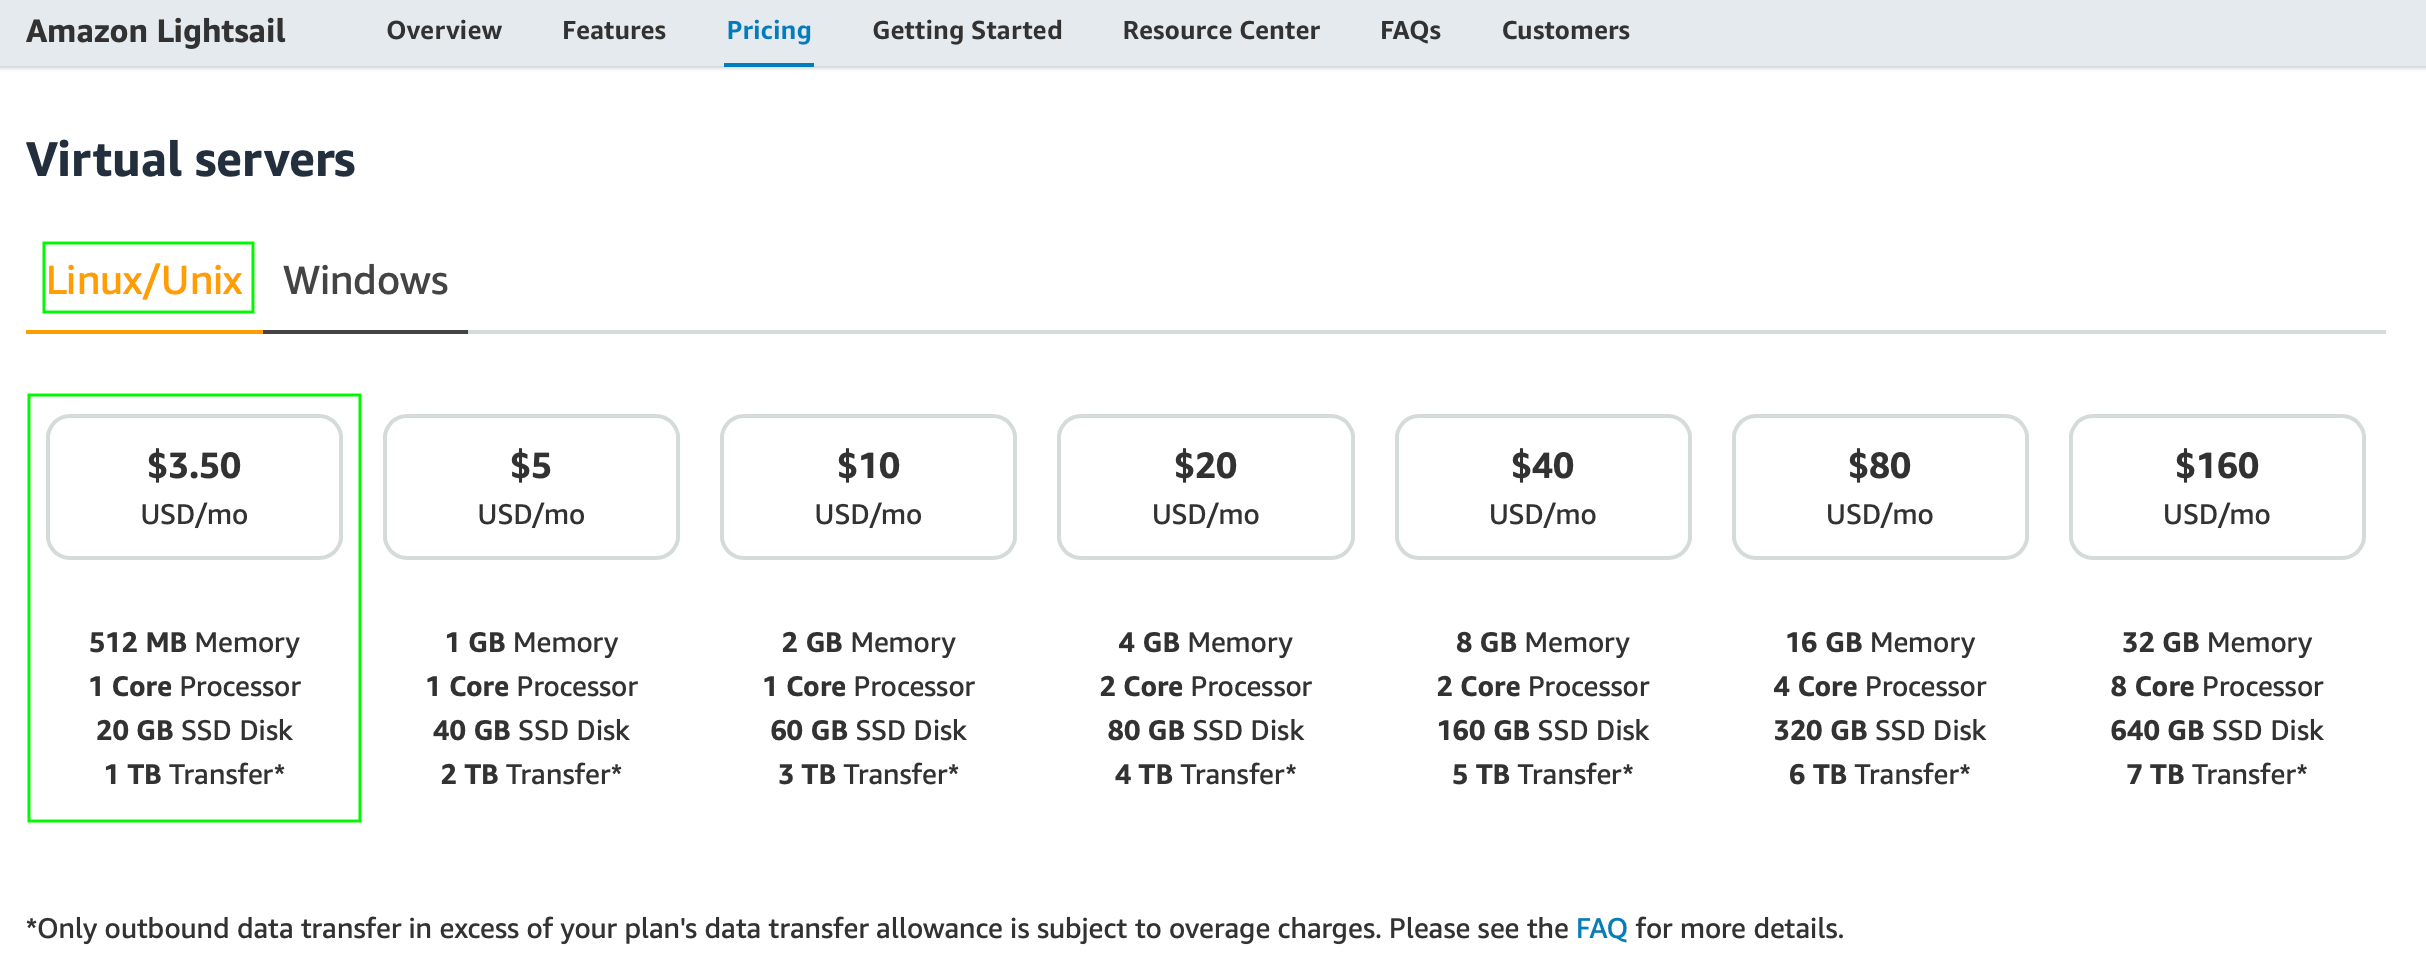 AWS Lightsail pricing
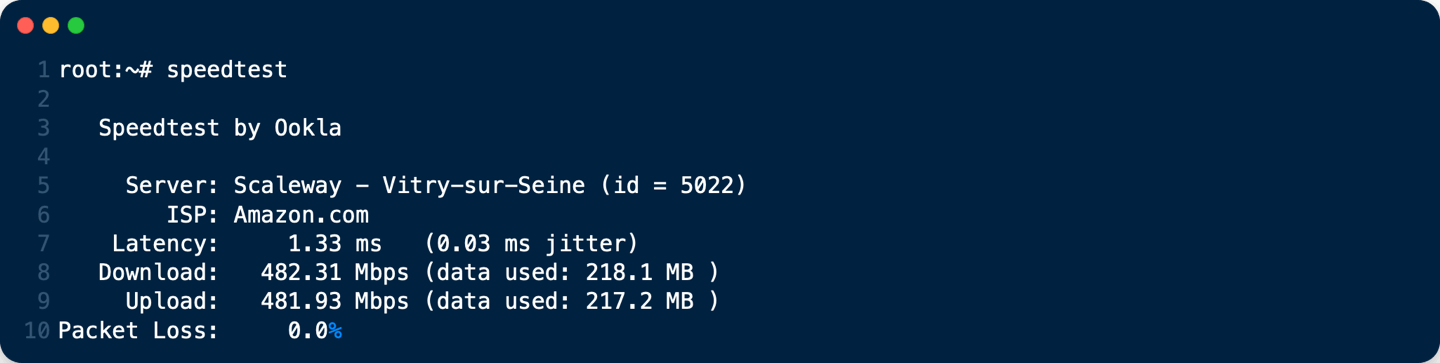 AWS Lightsail Bandwidth with Speedtest CLI
Install/Update on Debian 10 Buster x86_64
If you want IPv6, configure it on the server before running the script.
Connect with SSH on your server
You may need to update your server:
apt-get update && apt-get upgrade
- Then, as
root:
wget -O - https://www.openmptcprouter.com/server/debian10-x86_64.sh | sh
This will install and configure mptcp kernel, shadowsocks, glorytun and shorewall (as firewall). Key for shadowsocks and glorytun are generated by the script.
- SSH port is changed to
65222(TCP) - Shadowsocks port is
65101(TCP & UDP) - Glorytun port is
65001(TCP & UDP) - OMR JSON admin is
65500(TCP) - OpenVPN port is
65301(TCP) - MLVPN ports are
65201-65208(UDP) - Iperf3 on port
65400(TCP & UDP) - DSVPN port is
65401(TCP) - V2Ray port is
65228(TCP)
Don’t forget to open these ports on your VPS For AWS lightsail: Connect to your lightsail console, go to your intance and select Networking tab 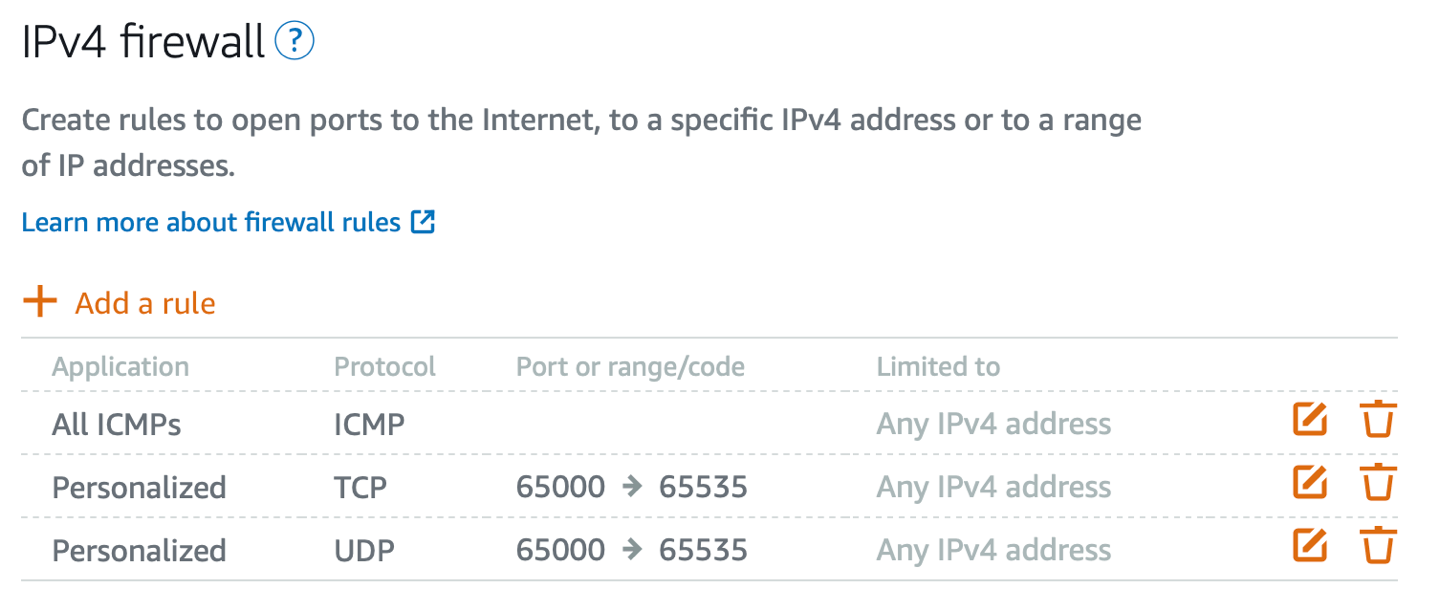 Allow ICMP, and TCP - UDP for ports range 65000 to 65535
After install, keys are saved in /root/openmptcprouter_config.txt file
root:~# cat /root/openmptcprouter_config.txt
SSH port: 65222 (instead of port 22)
Shadowsocks port: 65101
Shadowsocks encryption: chacha20
Your shadowsocks key: ************************************
Glorytun port: 65001
Glorytun encryption: chacha20
Your glorytun key: ************************************
A Dead Simple VPN port: 65401
A Dead Simple VPN key: ************************************
MLVPN first port: 65201'
Your MLVPN password: ************************************
Your OpenMPTCProuter ADMIN API Server key (only for configuration via API access, you don't need it): ************************************
Your OpenMPTCProuter Server key: ************************************
Your OpenMPTCProuter Server username: openmptcprouter
The SSH port will be changed to 65222, so use that to connect via SSH from now on.
VPS must be rebooted after installation.
To update OpenMPTCProuter server part, you have to download and run the script again. Keys will be preserved.
Setup part 2: Install the router image
The hard part is done, what’s left is to install the system image on the router. OpenMPTCProuter image is a fork of OpenWrt with added elements necessary to enable true WAN Bonding. Download images HERE.
For Raspberry Pi 4B : Download Raspberry PI 4B (64-bits) ext4-factory image, which is a .img.gz file.
Extract the file (you need to use gunzip on Linux, and write it to the SD card with Balena Etcher. Insert the microSD card into the Raspberry Pi and proceed with the next step.
Setup part 3: Prepare the modems
To prepare the modems, you need to do the following:
- Set the modems LAN IP addresses to 192.168.1.1 for the first, 192.168.2.1 for the second modem and 192.168.3.1 for the third modem …
- Turn off the modems DHCP server. This is very important.
The exact ways to do this vary wildly depending on the model of your modem, but it is important to first change the IPs, and THEN disable DHCP. Failure to do so properly means you have to factory reset the modem or configure a static IP address on your PC to access the web UI of the modem.
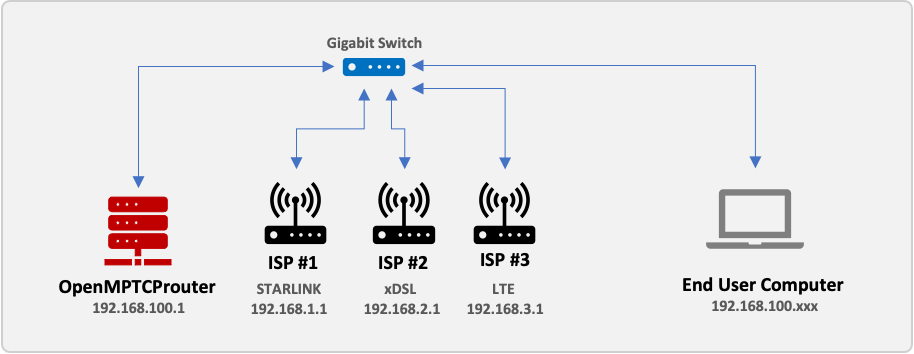
Setup part 4: The wiring
The wiring is actually super simple in this case, in contrast with the load balancing setup.
Take the Gigabit Ethernet switch, and plug into it the Three modems, the router (Raspberry Pi or Mini PC) and your own computer. Make sure all cables are functioning to spec, to avoid any problems.
Here is a sample wiring diagram:
Setup part 5: OpenMptcpRouter configuration
You must put your computer in the same network as the OpenMptcpRouter router (the default OpenMptcpRouter network is 192.168.100.x and the OpenMptcpRouter is in 192.168.100.1).
- Open
https://192.168.100.1/and log in with the usernameroot(at default there is no password, leave it empty).

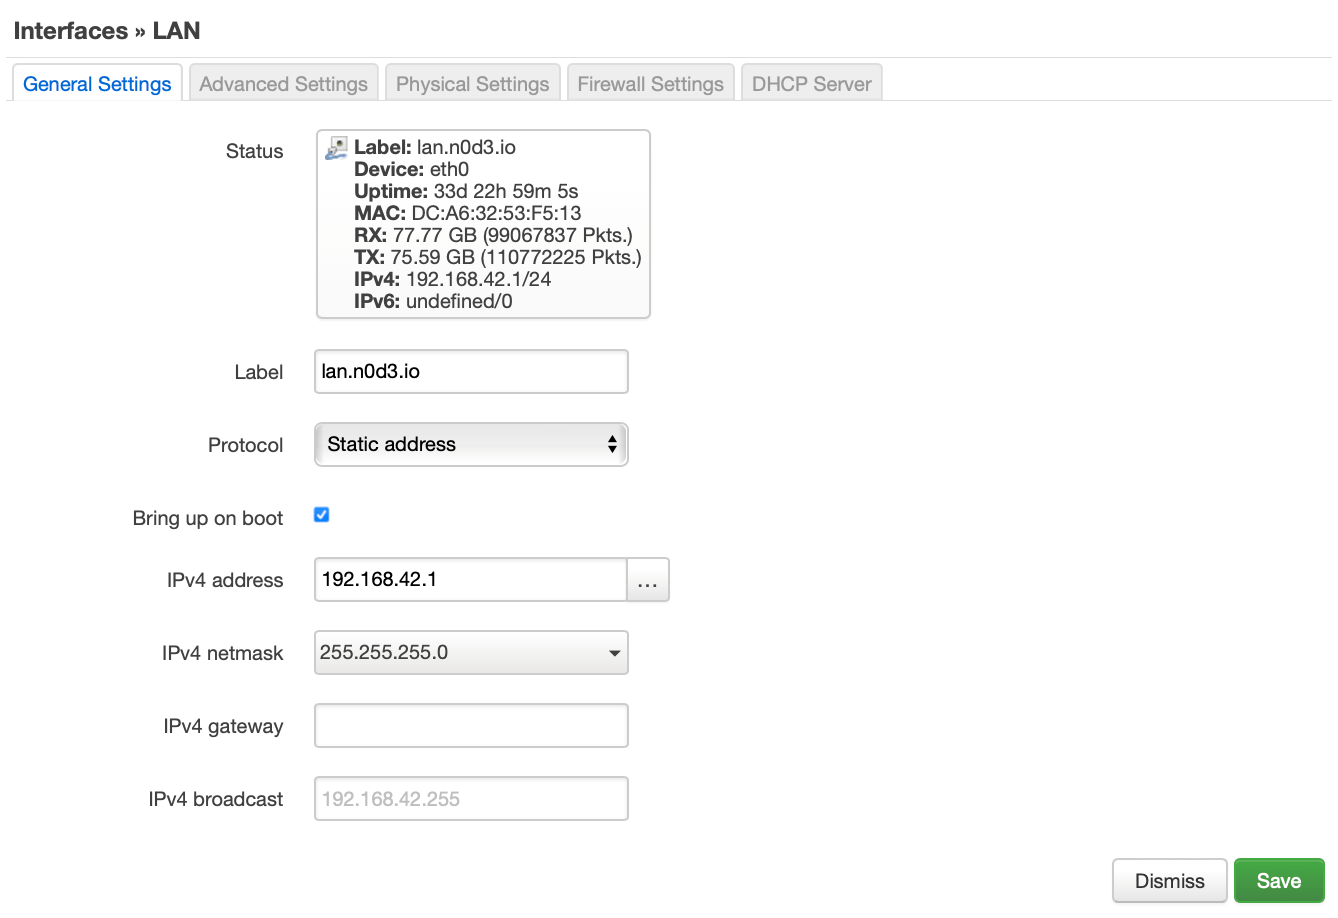
Your can change, the IP and the network of the OpenMptcpRouter: To do this, go to Network –> Interfaces –> LAN in OpenMptcpRouter GUI. Click to Edit boton to change network parameters. 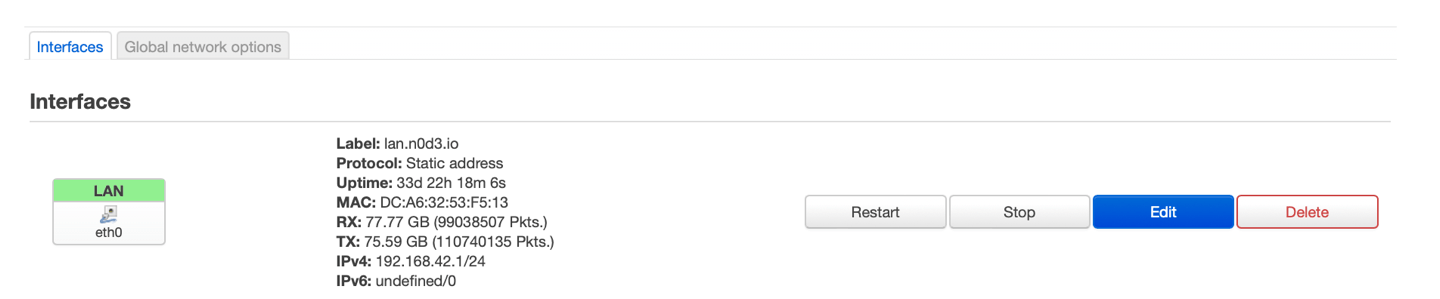
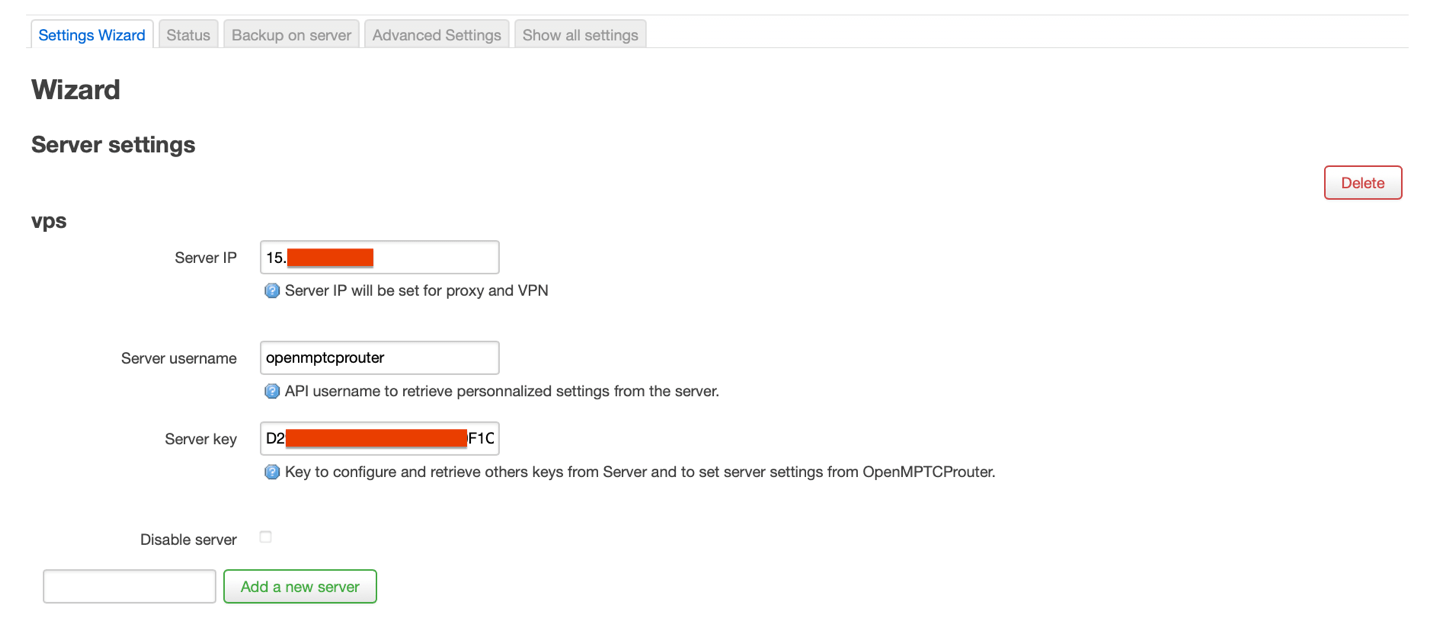
On the OpenMptcpRouter server VPS, open the
openmptcprouter_config.txtfile and copy theOpenMPTCProuter Server KeyvalueIn the OpenMptcpRouter router GUI go to
System–>OpenMPTCProuter–>Settings Wizard, and enter theServer Keyand the public IP address of your VPS server.
Scroll down to the two predefined interfaces, wan1 and wan2. Enter the labels, and the parameters as follows:
For WAN1: Protocol - Static address, IPv4 address - 192.168.1.42, Subnet mask - 255.255.255.0, IPv4 Gateway - 192.168.1.1
For WAN2: Protocol - Static address, IPv4 address - 192.168.2.42, Subnet mask - 255.255.255.0, IPv4 Gateway - 192.168.2.1
For WAN3: Protocol - Static address, IPv4 address - 192.168.3.42, Subnet mask - 255.255.255.0, IPv4 Gateway - 192.168.3.1
(the only difference is the IP subnet 192.168.1.0, 192.168.2.0, and 192.168.3.0 … as you configured in step 3.)
Click Save & Apply, and after a few seconds you will be redirected to the Status page (System –> OpenMPTCProuter –> Status). If everything is OK, it should look like this:
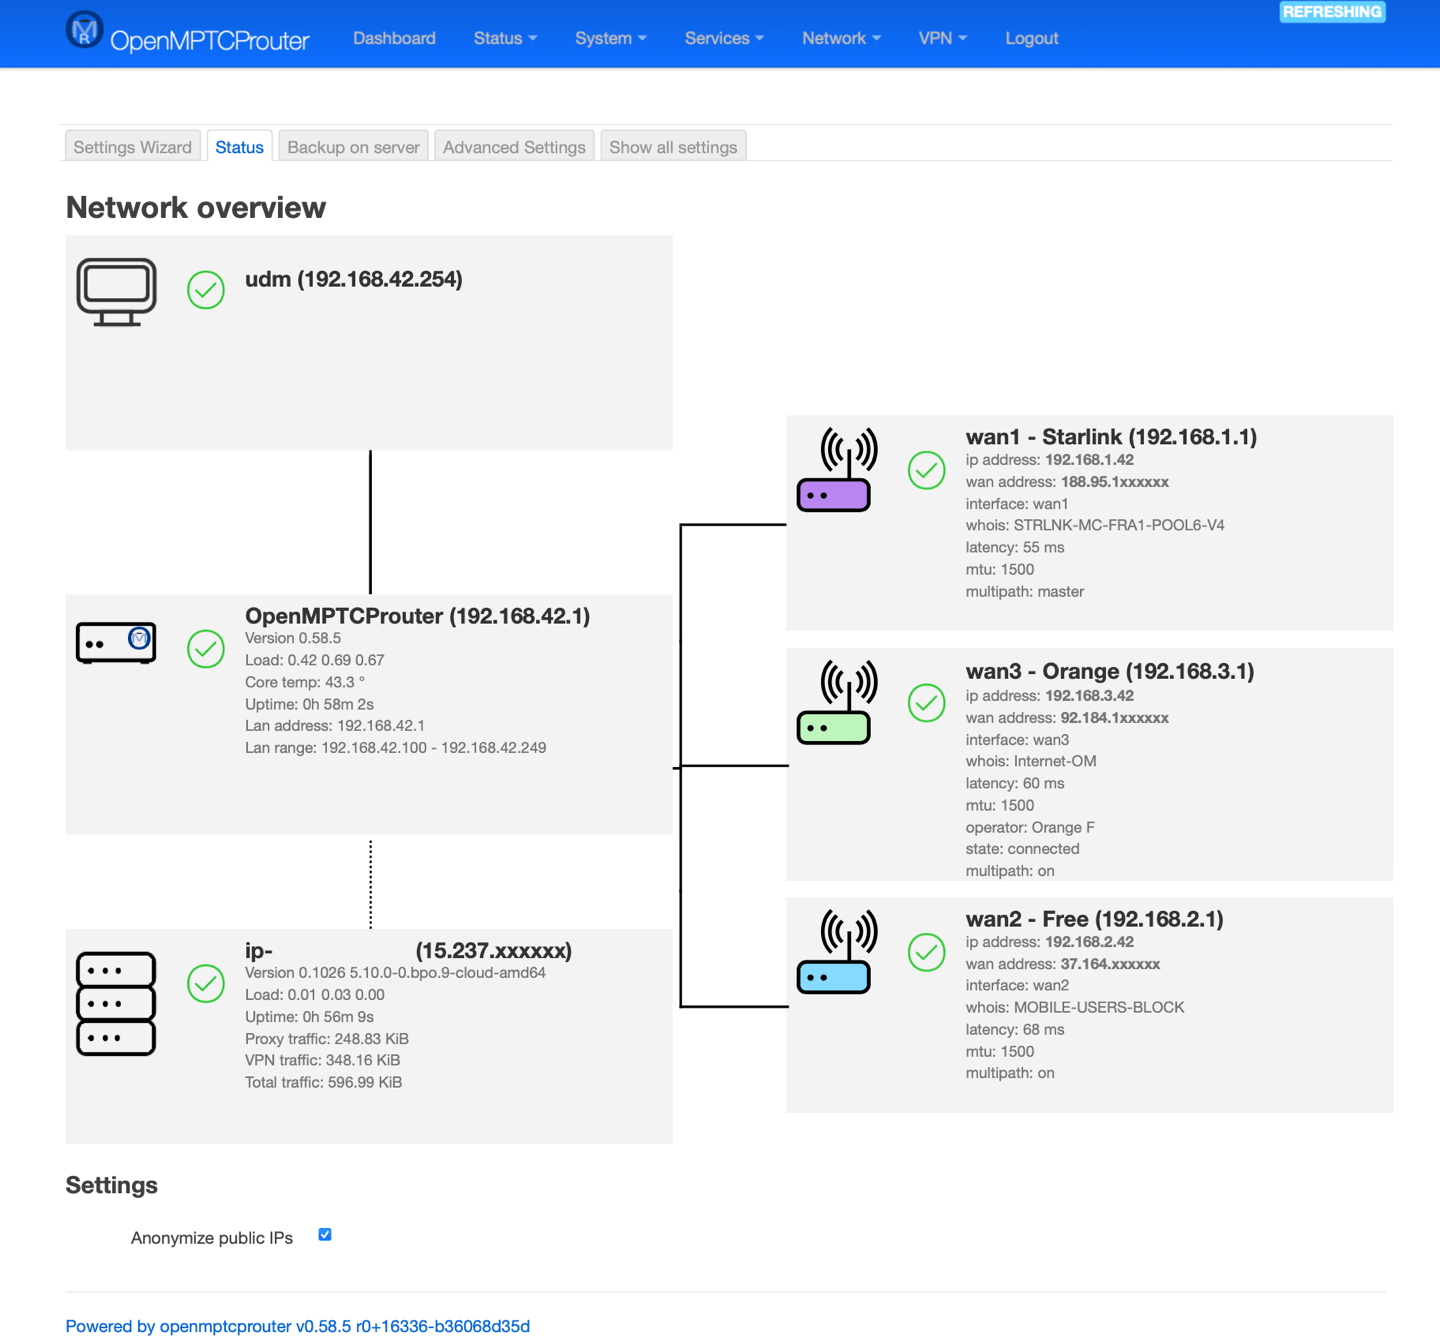
You can check egaly the Dashboard page

That’s it!
How to Update OpenMptcpRouter?
- Save the configuration: (
System–>Backup/Flash Firmware–>Backup–>Generate archive).
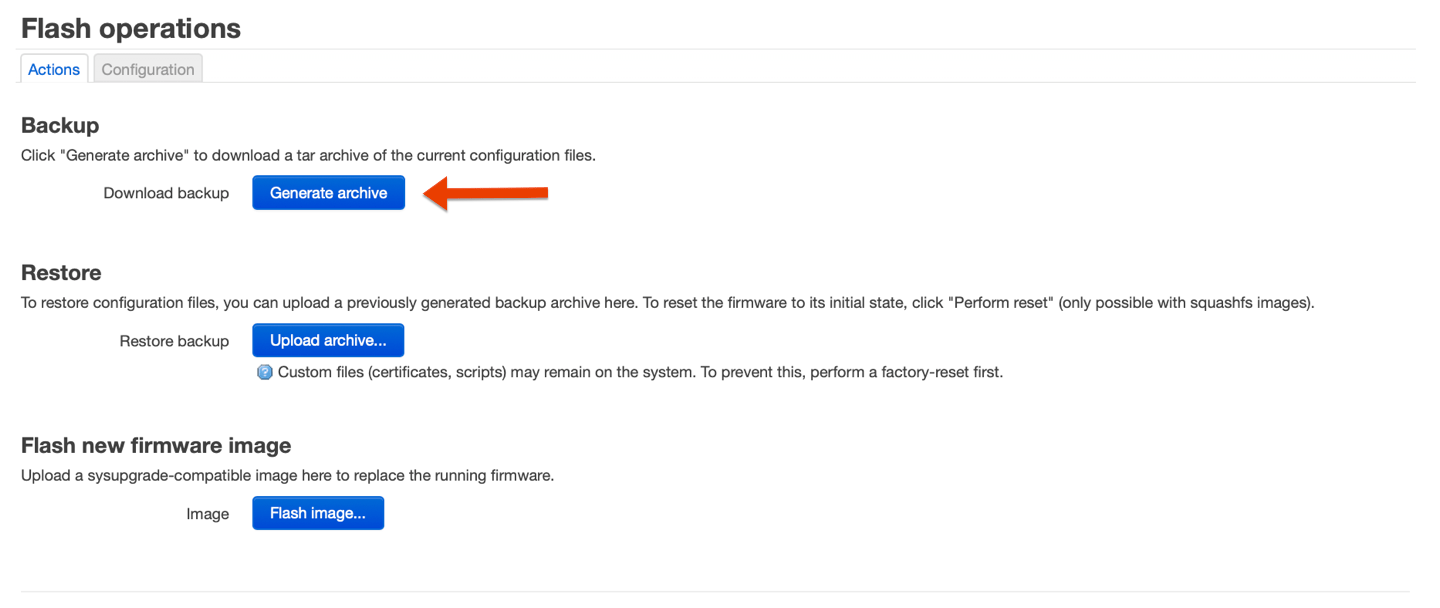
Then 2 choices:
- Write the latest image on the
SD card, restore the configurationSystem–>Backup/Flash Firmware–>Backup–>Restore backup


Or
- Download the image (
.img) then useSystem–>Backup/Flash Firmware–>Backup–>Flash new firmware image(this can fail, you really should backup your configuration).

This can fail, you really should backup your configuration
Don’t update packages via the interfaces, current packages are from OpenWRT snapshot and this can break everything.
Tips
Tips: The case of blocked sites
All internet flow that passes through aggregation is encrypted using a VPN. Your public IP becomes that of the VPS server.
Some services like NETFLIX, MYCANAL, DISNEY+, APPLE TV+ … may be alarmist and block your access.
There is an option in OMR to work around this problem (OMR Bypass). In the OpenMptcpRouter router GUI go to Services –> OMR Bypass
- Click
Addboton inDomainssection
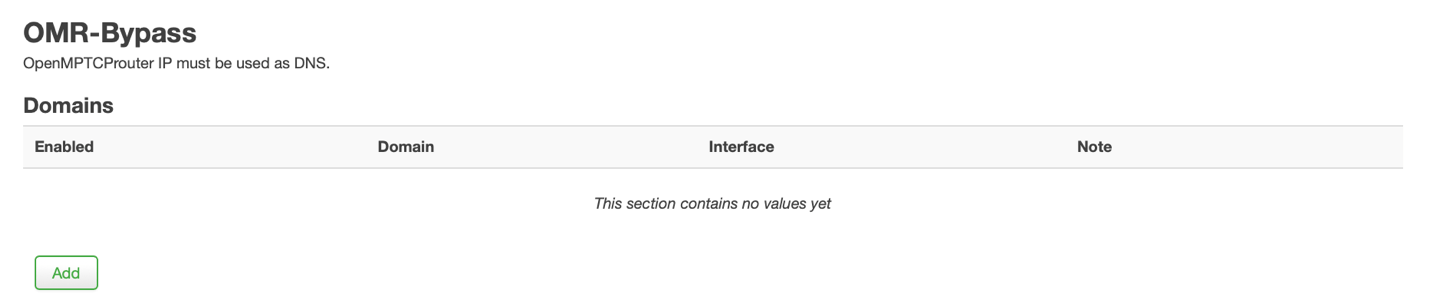
- configure the
Domainthat should bypass the aggregated VPN andSaveit
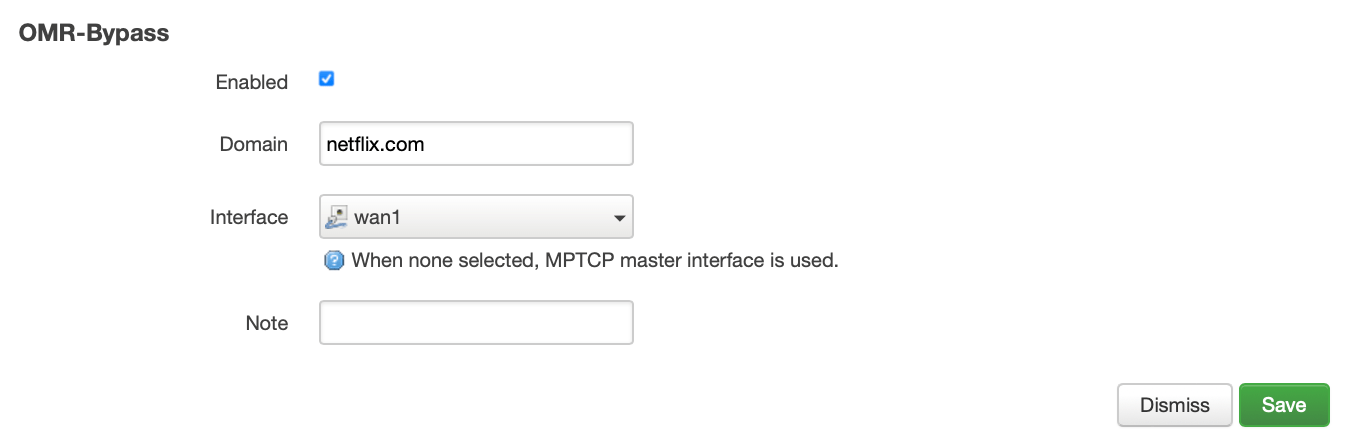
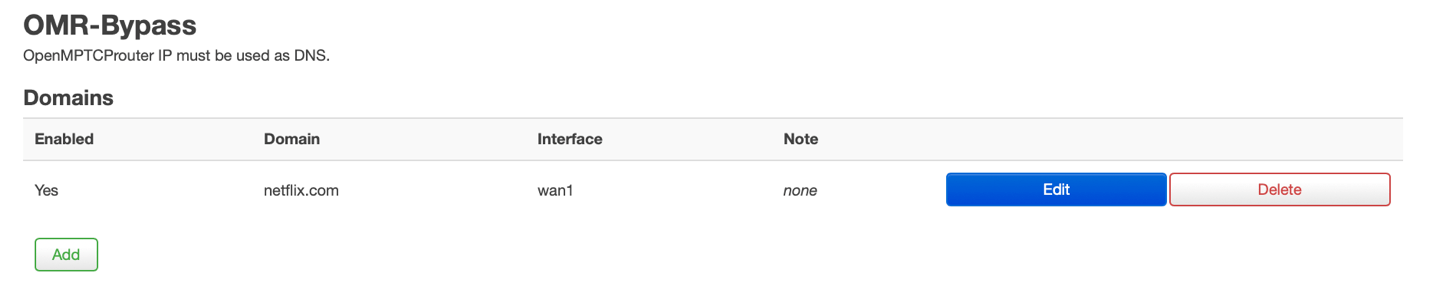
OMR-Bypass allows you to present to the site the IP of your WAN1, WAN2 or WAN3 … and thus to access the site.
- And click to
Save & Apply
Tips: Custom DNS
By default OpenMPTCProuter use root DNS servers. If you want to use some alternate DNS, in the router GUI go to Network –> DHCP and DNS
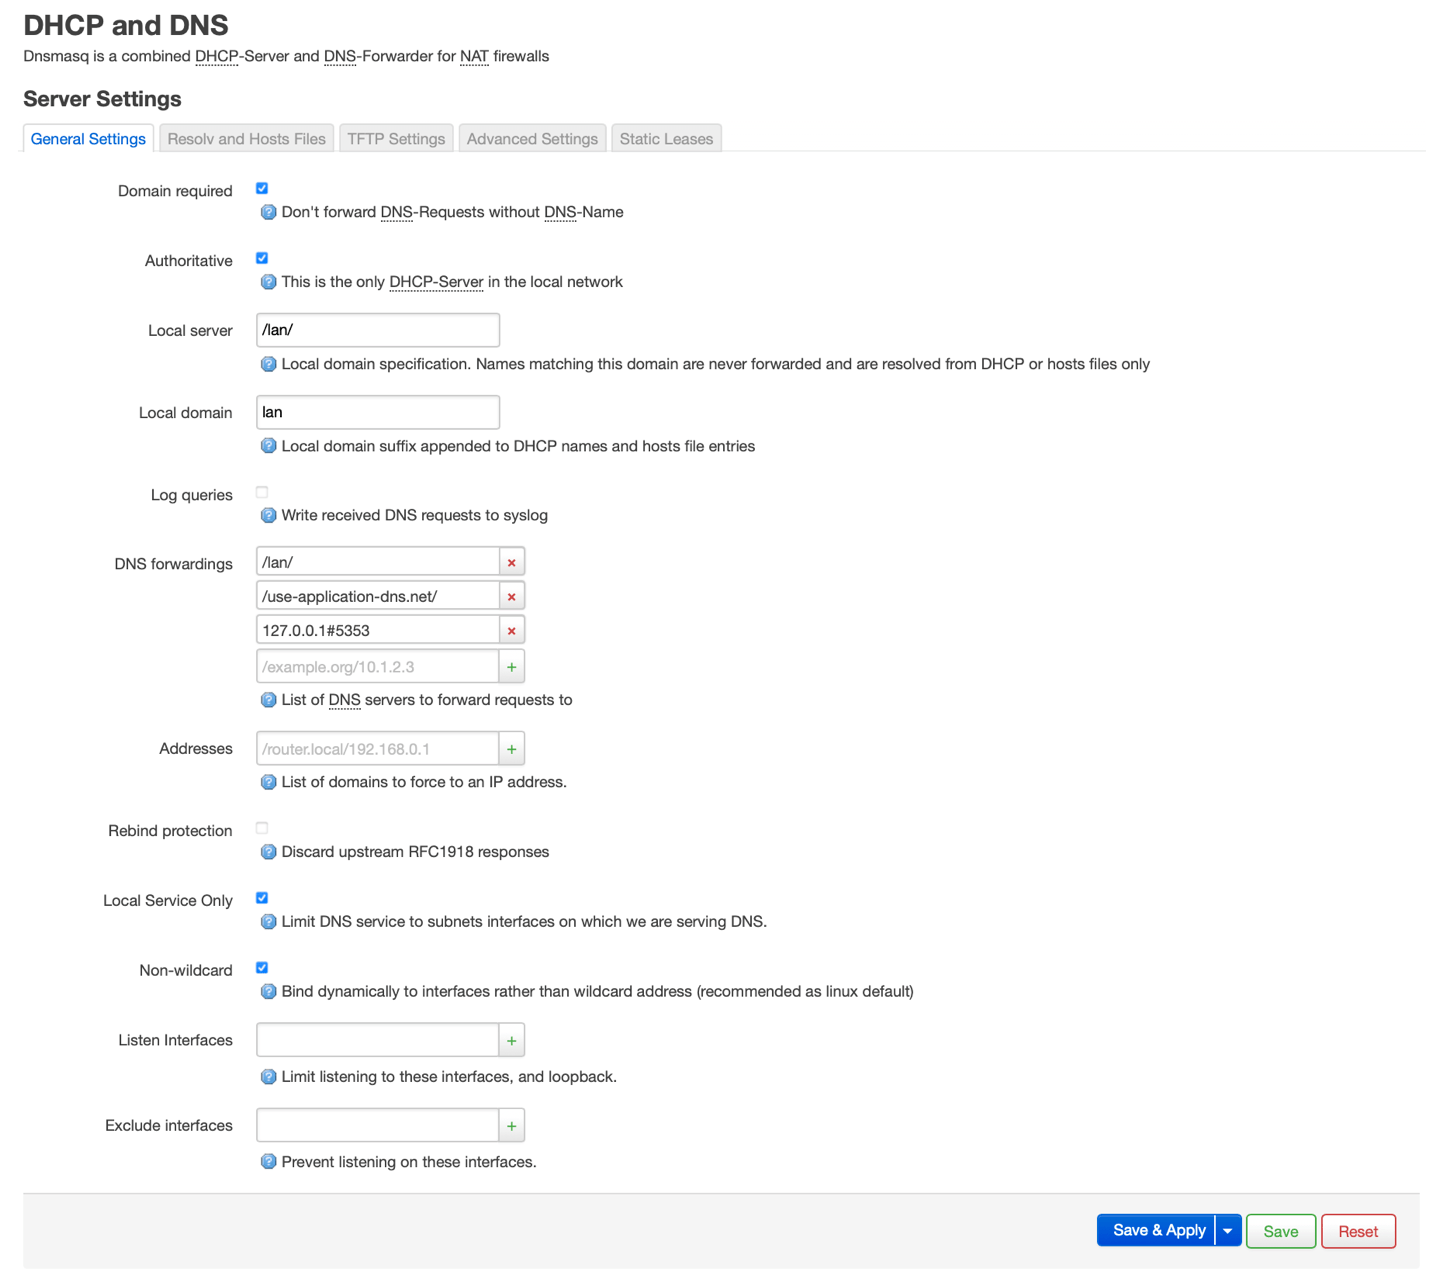
In DNS forwardings remove the 127.0.0.1#5353 default entry and add the server you want (ie. 9.9.9.9 for quad9 DNS):

And click Save & Apply
Tips: Test speed
There is several tools available on OpenMPTCProuter to test speed
omr-test-speed
- To test aggregated download speed:
omr-test-speed
- To test a wan1 download speed:
omr-test-speed wan1
- To test a wan2 download speed:
omr-test-speed wan2
- To test aggregated download speed:
omr-test-speed tun0
Ctrl+C to stop after at least 2 minutes to have real speed.
omr-iperf
- To test aggregated upload speed from server:
omr-iperf
- To test aggregated download speed to server:
omr-iperf vps -R
Where vps is the name of the VPS.
Tips: Inactive TCP session are killed/SSH timeout after 2 minutes
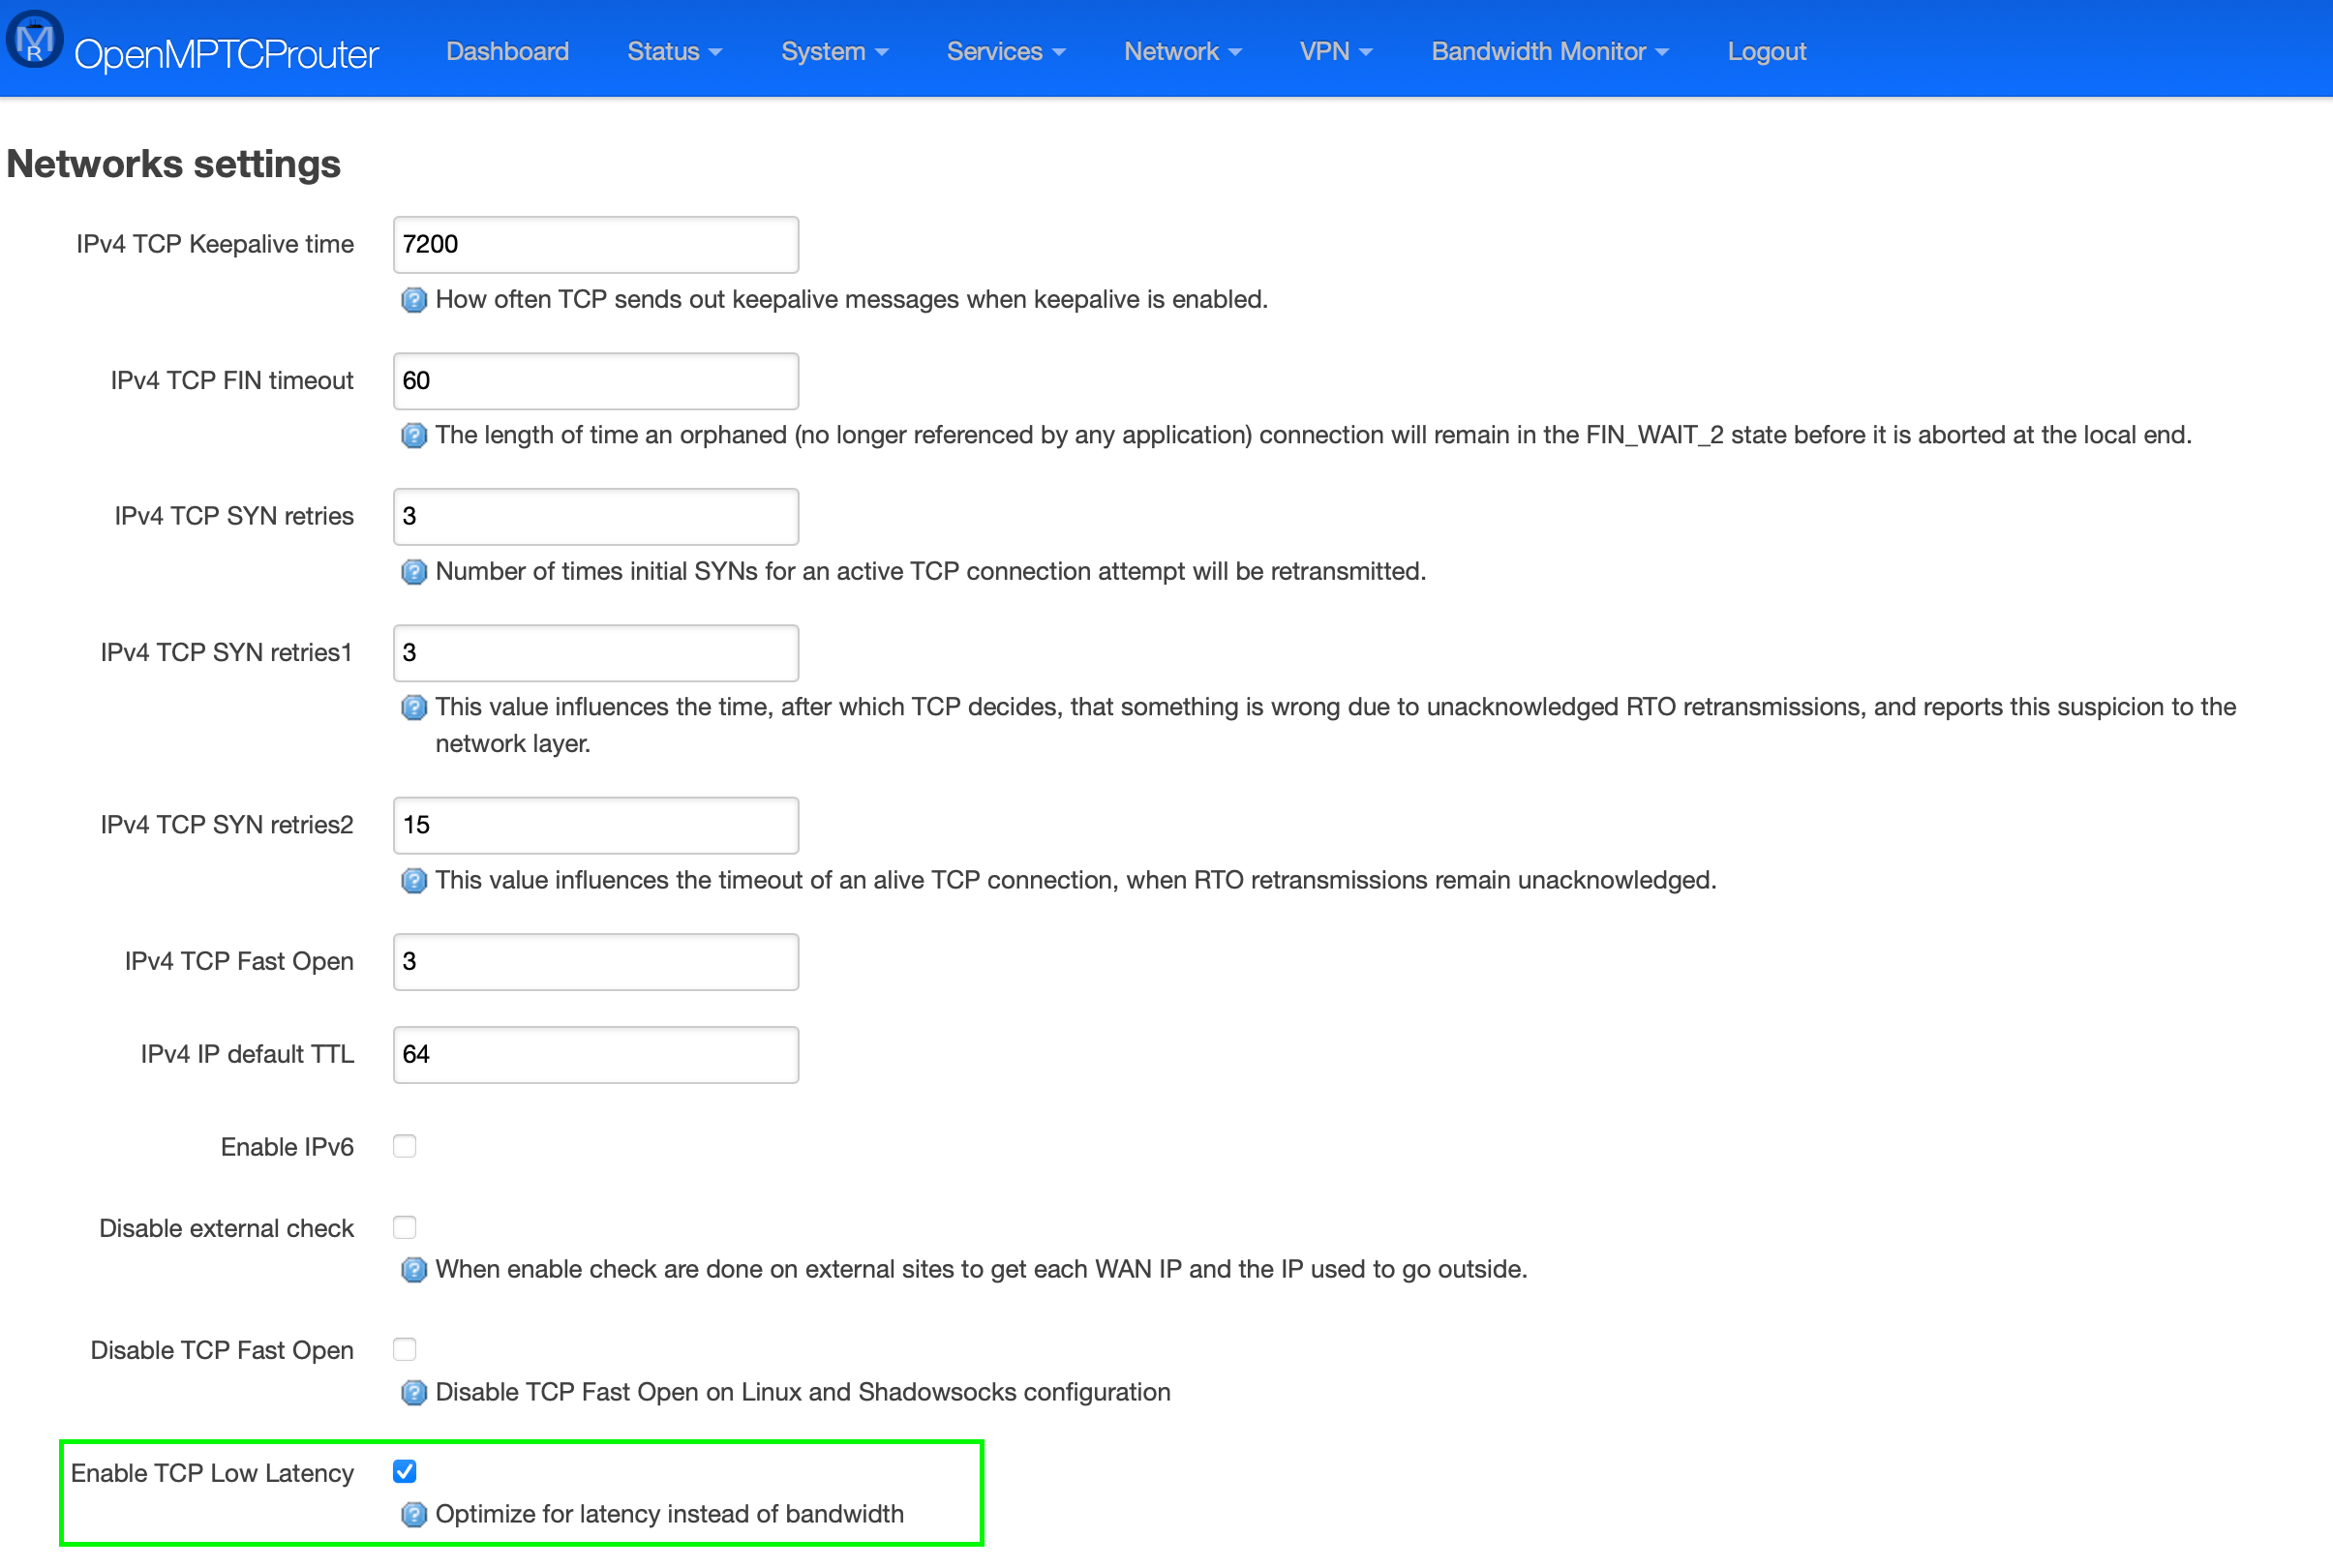
For SSH, you can modify ServerAliveInterval in ssh configuration. You can also increase IPv4 TCP Keepalive time in the menu System –> OpenMPTCProuter –> Advanced Settings.

Increase IPv4 TCP Keepalive time and click Save & Apply
Tips: How to get system log on the router via SSH ?
You can get them with the command: logread
Tips: Select primary WAN with best ping
How to select primary WAN with best ping : Under System –> OpenMPTCPRouter –> Advanced Settings Enable TCP Low Latency And the master interface selection must be dynamically change.