LTE and Starlink ISP - How to access to your LAN from outside

LTE and Starlink ISP - How to access to your LAN from outside.
Lars Kienle©
- Prerequisites
- Principle
- To implement this solution, you must:
- Functioning
- How to do
With LTE or Satellite (eg. Starlink / SpaceX) Internet access , and unlike ADSL or Fiber, we are not directly connected to the Internet: We are connected to the private network of operator’s and it’s he witch routes requests to the Internet.
It’s for this reason, that it’s not possible to open a port to the outside to establish an incoming connection. The public address assigned by the operator (and which is seen by the sites to which we connect) is shared by the others customer of the operator. Thusly, the LTE or Starlink router does not have a real public IP address: the operator assigns it a WAN address which is generally a private class A IP address (eg. IP 0.0.0.0 to 126.255.255.255).
If you want to access certain equipment on your LAN, several techniques can be used. One of them is to establish a Reverse SSH Tunneling between a machine on its LAN and a machine accessible from the Internet (VPS) that we fully control (eg. to open the network ports).
Prerequisites
Have a VPS server :
- With SSH access
- With access to the configuration of external ports
- With access to ssh configuration and users
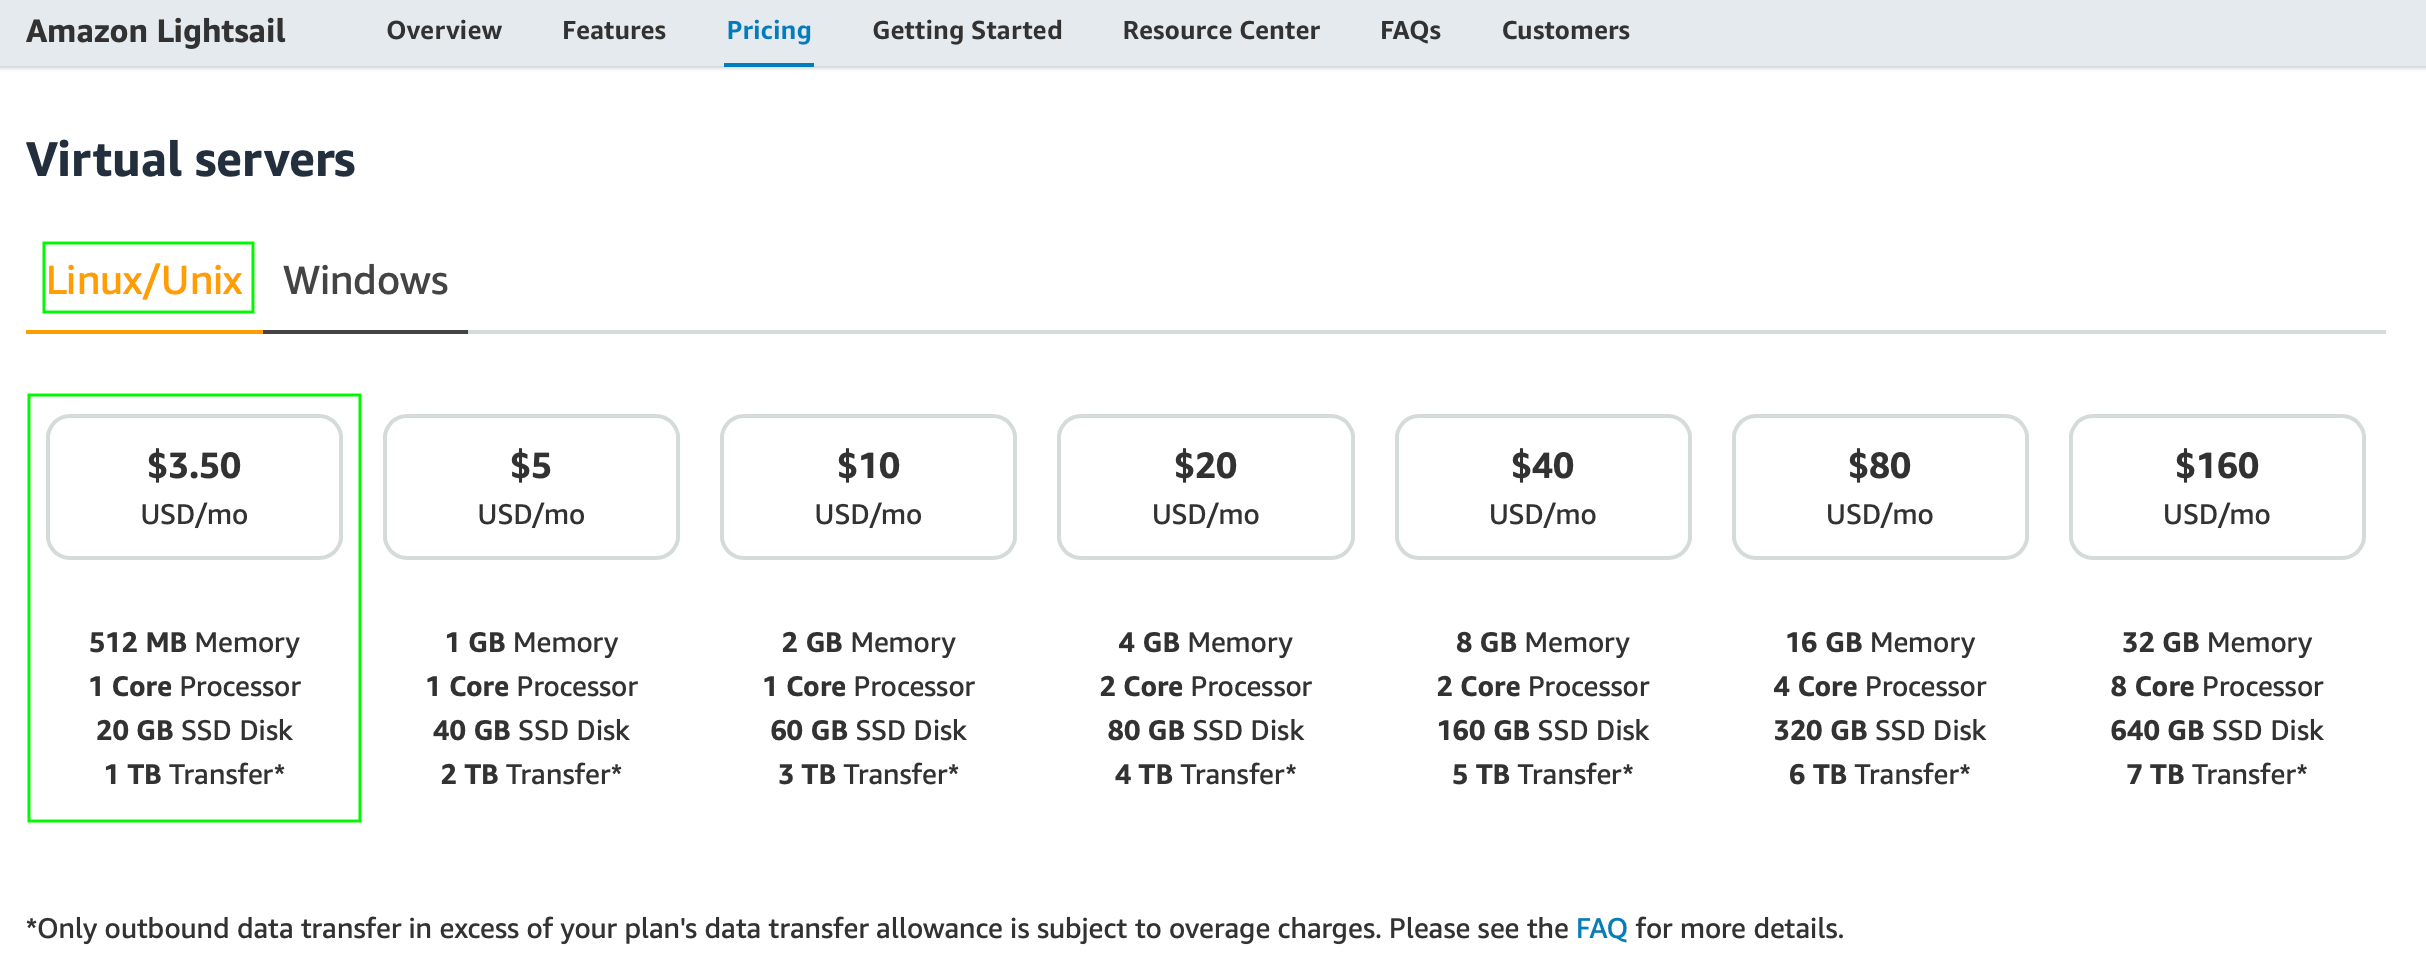
I using an AWS Lightsail instance (with Linux Debian, 512MB RAM, 1 vCPU, 20GB SSD & 1TB Transfer) at € 3.50 per month. It has a public IP address and one of my domain names points to it.
Have a server on the LAN
- With an SSH client
The external connection will only be possible when this machine is turned on.
Principle
- A Raspberry Pi on its LAN (or any other machine with an SSH client) creates an encrypted tunnel between an external VPS server and one or more machines on the LAN
- By connecting to the VPS server, you can access the LAN machines that you have configured
To implement this solution, you must:
- Open the ports on the VPS server
- Create an account (without login) on this server so that the Raspberry Pi on the LAN can connect to it
- Configure SSH on the VPS server to allow port forwarding
- Configure SSH on the Raspberry Pi on the LAN to facilitate connection recovery when connection is lost
- Generate an authentication key to connect to the VPS server
- Create the tunnel when starting the server on the LAN (our Raspberry PI)
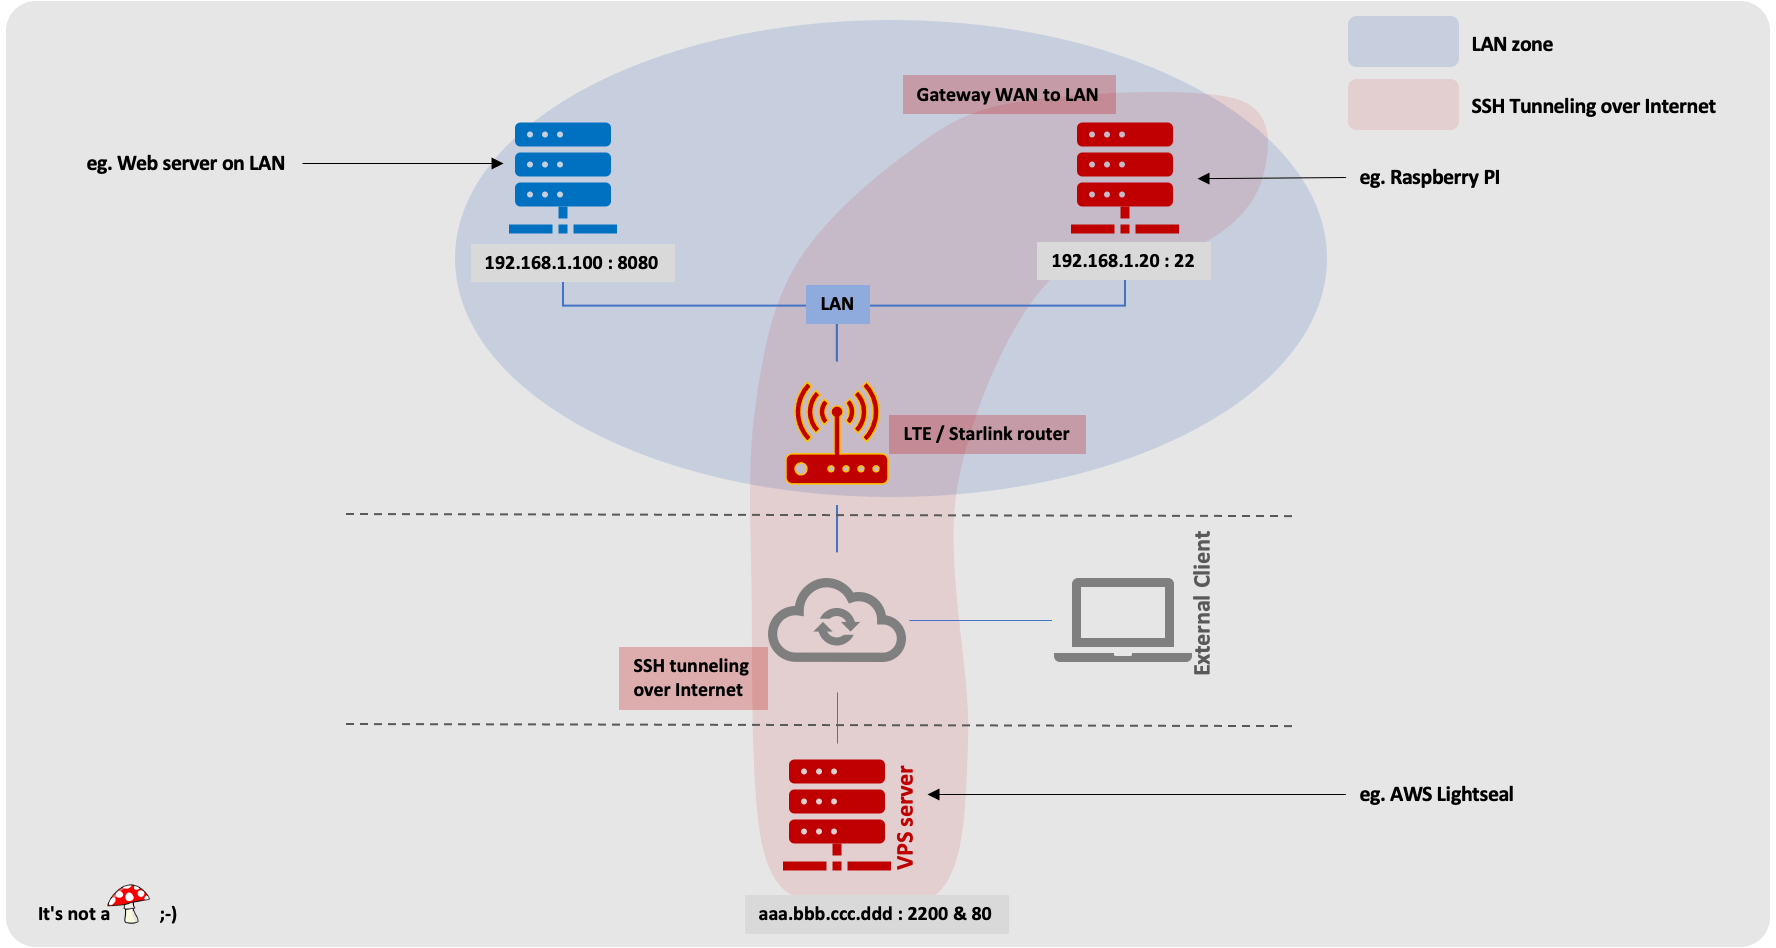
In this example, we are going to give access from the outside to a web server on our LAN We will use the following IP addresses, which should of course be replaced by the ones actually used:
- External VPS server: with public IP
aaa.bbb.ccc.dddwith SSH access on port2200. Port80will be redirected to the LAN server; - Raspberry Pi on the LAN:
192.168.1.20with SSH access on port22; - The machine that we want to give access from the outside:
192.168.1.100. With a Web Server started on port8080.
Functioning
step 1
1.1 : The Raspberry Pi (192.168.1.20) opens a secure SSH tunnel to the VPS server (aaa.bbb.ccc.ddd: 2200).
1.2 : The Raspberry Pi (192.168.1.20) also establishes the connections with the machine from the LAN (192.168.1.100).
These connections will in fact only be established at the time of an incoming connection.
The reverse-ssh opens a port on the VPS server (ie. 80 in our example). This port will be redirected to port 8080 of the LAN machine 192.168.1.100 to which you want to give access from the outside.

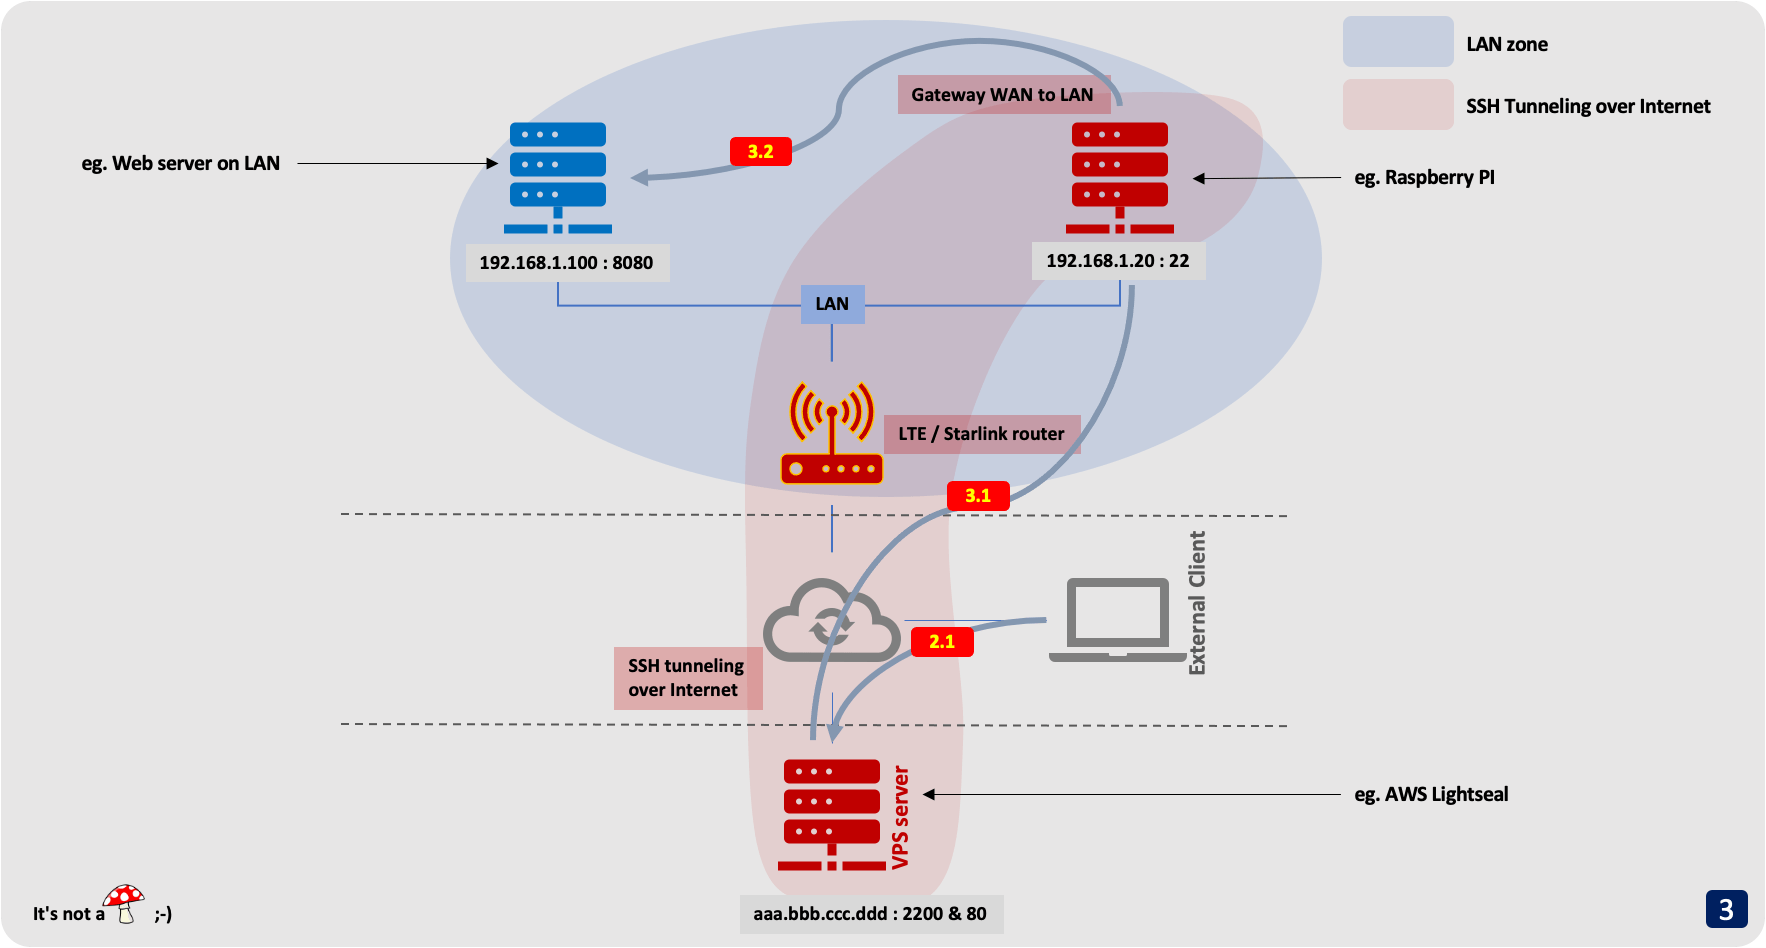
step 2 : An external machine (on the Internet) wants to connect to your server on the LAN
2.1 : For this, it connects to the VPS server (ie. http://www.domainname.io)
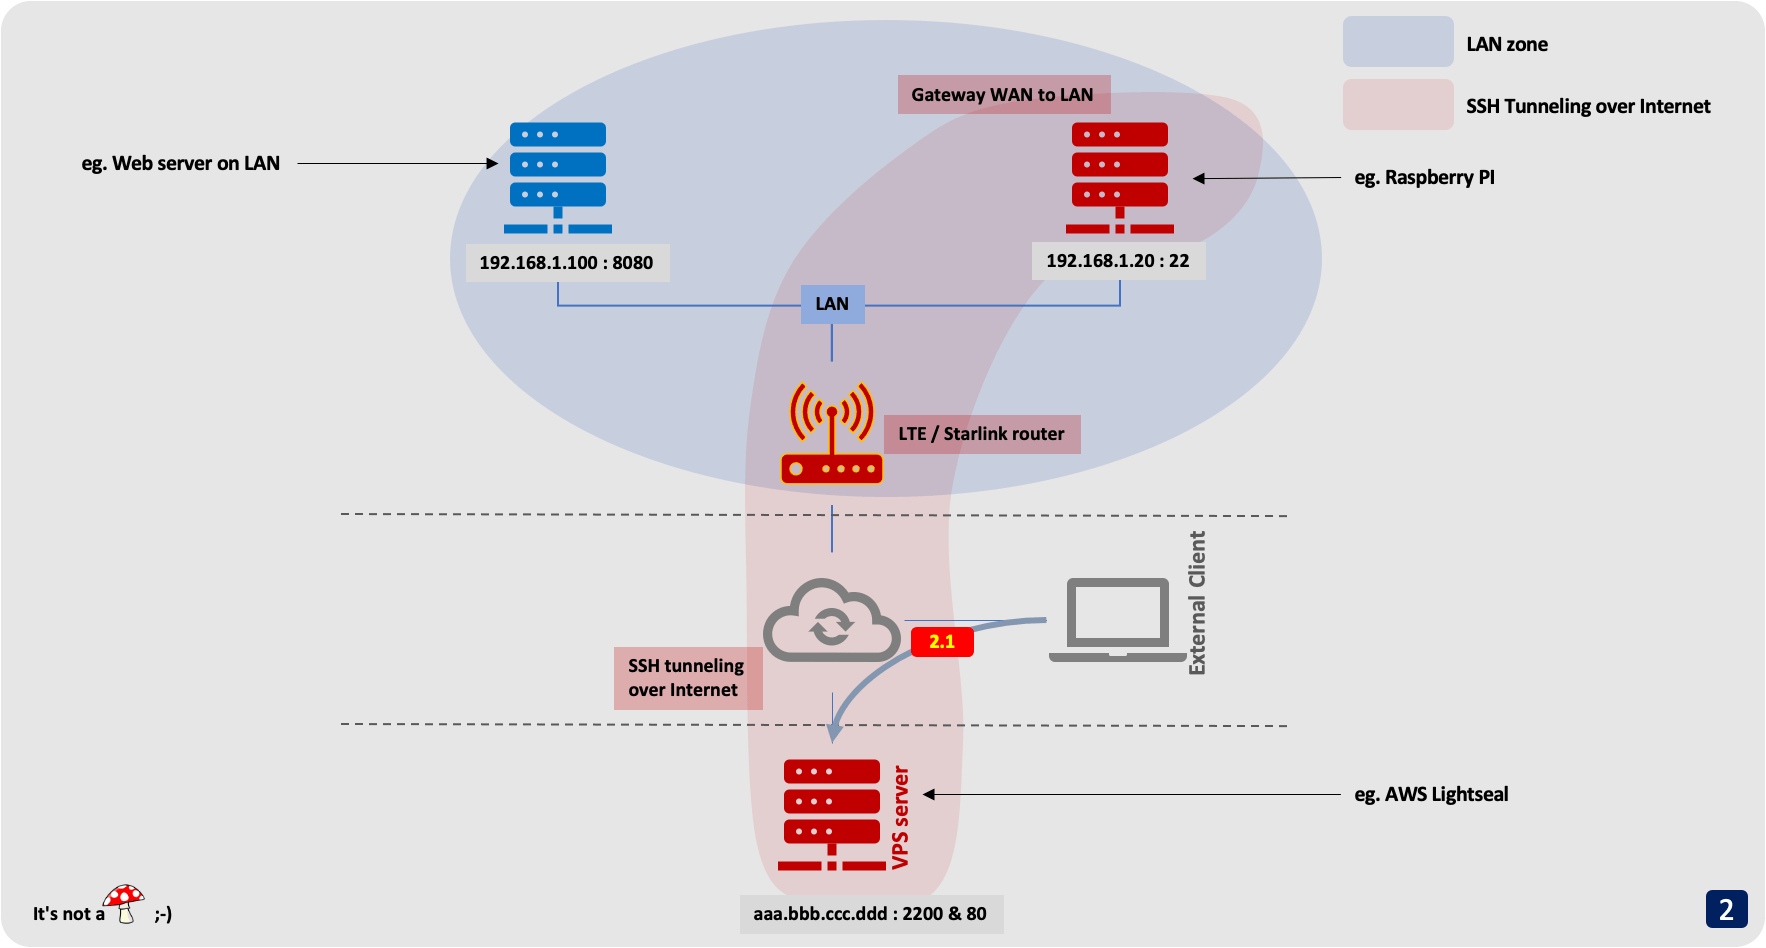
step 3 : This connection is redirected to the machine on the LAN
3.1 : The connection to port 80 of the VPS server (aaa.bbb.ccc.ddd) is redirected to the Raspberry Pi (192.168.1.20) through the secure tunnel.
3.1 : The SSH client on Raspberry Pi (192.168.1.20) redirects the tunnel to the final machine on the LAN (192.168.1.100), on port 8080. This connection is not encrypted but it is not important (it is on LAN).
How to do
On VPS server
VPS with public IP aaa.bbb.ccc.ddd
Open the ports on the VPS server
The ports on the VPS (aaa.bbb.ccc.ddd) server to open for our example are:
2200forSSHaccess of theVPSserver80for the redirection ofhttpflow to our LAN
How to change default 22 SSH port to 2200
- Start by opening the
/etc/ssh/sshd_configconfiguration file
sudo vi /etc/ssh/sshd_config
- Look for the
#Port 22line. We’ll need to uncomment this line and change the number to our desired port number. For this example, we’ll switch the port number to 2200.
From:
#Port 22

To:
Port 2200
- Save the changes you’ve made to this file and exit. Finish up my reloading the sshd service.
sudo service sshd restart
- To make sure everything is working, you can try to SSH on the new port. You’ll need to use the
-poption to instruct the client to use some other port than the default22
ssh -p 2200 <user_name>@localhost
Create a new user (ie. nosh) with no shell access
By default when creating a user account, a shell is assigned to the user as define in the /etc/default/useradd file.
While creating a user account you can explicitly specify shell which user should login.
Linux comes with a /sbin/nologin shell which displays a message This account is currently not available, when a user attempt to connect. This is one way to disable the user from access the login shell.
sudo useradd -s /sbin/nologin nosh
For more detail see this tip: “How to Disable Shell Access to User Account in Linux”
Edit /etc/ssh/sshd_config and change GatewayPorts & ClientAliveInterval keyword-argument
sudo vi /etc/ssh/sshd_config
GatewayPorts yes        # Specifies whether remote hosts are allowed to connect to ports forwarded for the client.
ClientAliveInterval 30  # Sets a timeout interval in seconds after which the connection is closed if no data has been received from the client
For more detail see sshd_config(5) man page
And reload sshd service without reboot server with the commande bellow:
sudo service sshd restart
Or use the commands below :
sudo cp /etc/ssh/sshd_config /etc/ssh/sshd_config.save
sudo sed -i -e 's/GatewayPorts.*/GatewayPorts yes/' '/etc/ssh/sshd_config'
sudo sed -i -e 's/ClientAliveInterval.*/ClientAliveInterval 30/' '/etc/ssh/sshd_config'
sudo service sshd restart
On Raspberry Pi server inside your LAN
Raspberry Pi with private IP 192.168.1.20
Edit /etc/ssh/ssh_config and change TCPKeepAlive, ServerAliveCountMax, ServerAliveInterval & ExitOnForwardFailure keyword-argument
sudo vi /etc/ssh/ssh_config
TCPKeepAlive yes          # Specifies whether the system should send TCP keepalive messages to the other side
ServerAliveCountMax 3     # Sets the number of server alive messages
ServerAliveInterval 15    # Sets a timeout interval in seconds after which if no data has been received from the server
ExitOnForwardFailure yes  # Specifies whether ssh(1) should terminate the connection if it cannot set up
For more detail see sshd_config(5) man page
Configure passwordless login (as root)
sudo ssh-keygen -t ed25519 -f /root/.ssh/id_ed25519
Copy the public key to the VPS server
sudo cat /root/.ssh/id_ed25519/id_ed25519.pub | ssh nosh@aaa.bbb.ccc.ddd "mkdir -p ~/.ssh; cat >> ~/.ssh/authorized_keys"
For more detail see How to configure passwordless login in macOS and Linux post
Install autossh
Install autossh binary to build an ssh tunnel with auto recovery when the connection lost
sudo apt install autossh
Script to create a reverse SSH tunnel
# file: "ux_tunnel_wan_to_lan.sh"
#!/bin/bash
export AUTOSSH_POLL=30;
sudo /usr/lib/autossh/autossh -M 20000 -C -N -f -n -T \
     -R \*:2222:127.0.0.1:22 \
     -R \*:80:192.168.1.100:8080 \
     nosh@aaa.bbb.ccc.ddd -p 2200 >> /dev/null 2>&1
autossh options :
-M : Monitoring port used by autossh
-C : Data is compressed
-N : Do not run a remote command. Redirect ports only
-f : Start in the background
-n : no read on stdin
-T : Disable the pseudo-terminal
-p 2200 : SSH port of the VPS server. To be replaced by the port used
-R : Configure reverse-ssh redirection
Specify \* as the interface to open the port for all network interfaces of the VPS server (by default, the reverse-ssh only opens the interface port lo)
You must open 2222 and 80 ports numbers on the VPS server so that it can be accessed from the outside
And finally test now
You can test that everything is correctly configured:
- test
http://www.domainname.ioorhttp://aaa.bbb.ccc.ddd - test
ssh -p 2222 www.domainname.ioorssh -p 2222 aaa.bbb.ccc.ddd
Now you know how to give access to any machine on your LAN with LTE or Starlink/SpaceX access