Use Plex Media Server with a Let's Encrypt Certificate

You can use a free Let’s Encrypt certificate for your self-hosted Plex Media Server. With Certbot and a simple Bash script, this will provide a secure connection without certificate warnings. It will also auto-renew certificates
Maxim Berg©
- Motivation
- HTTP or DNS Let’s Encrypt Challenge
- PKCS #12 Certificate
- Use the Let’s Encrypt Certificate in Plex
- DNS Resolution and Port Fowarding
- Last Steps
Motivation
There are two possible options how to secure the connection to your Plex server when exposing it to the public Internet:
Use a reverse proxy like HAProxy or nginx that forwards the traffic and performs SSL offloading. Use Plex’s remote access feature and forward the port on your firewall directly to your Plex server. Generally I would prefer the reverse proxy since I can use my existing reverse proxy which already has a valid Let’s Encrypt certificate. Also, I have more control on how the server is exposed to the public Internet. Unfortunately, a few Plex features like the Sonos integration and the mobile Plex apps are not working with this setup since they need direct access. So I chose the remote access (reverse proxy will work fine if those features are not important for you). The following guide will explain how to use a valid Let’s Encrypt certificate with Plex remote access.
HTTP or DNS Let’s Encrypt Challenge
Verification of the domain can either be done via an HTTP challenge or a DNS challenge. I choose a DNS challenge because it doesn’t require opening port 80 to the public Internet. In the following, I use a DNS challenge using Cloudflare. The rest of this guide works the same, even when you choose to use a different type of challenge or a different DNS provider.
Install the DNS Cloudflare plugin:
sudo apt update
sudo apt install -y python3-certbot-dns-cloudflare
Create the file ~/.secrets/certbot/cloudflare.ini with the API token you created in your Cloudflare account:
dns_cloudflare_api_token = SECRET_TOKEN
PKCS #12 Certificate
Certbot generates a private key file, a certificate file, and the CA file. By default, these files get created in /etc/letsencrypt/live/plex.example.com/. Plex however, expects a PKCS #12 certificate file that bundles all of these together. I created a script that is triggered by Certbot’s renewal hook, which will convert the Certbot output into a PKCS #12 certificate file that is compatible with Plex.
In the following, I’m using plex.example.com as a domain, replace this with your own domain name. Also replace PASSWORD with a random password of your choice.
Create the /etc/letsencrypt/renewal-hooks/post/create_p12_file.sh file with the following content:
# file: "/etc/letsencrypt/renewal-hooks/post/create_p12_file.sh"
openssl pkcs12 -export \
  -out /var/lib/plexmediaserver/plex_certificate.p12 \
  -in /etc/letsencrypt/live/plex.example.com/cert.pem \
  -certpbe AES-256-CBC -keypbe AES-256-CBC -macalg SHA256 \
  -inkey /etc/letsencrypt/live/plex.example.com/privkey.pem \
  -certfile /etc/letsencrypt/live/plex.example.com/chain.pem \
  -passout pass:PASSWORD

chmod 755 /var/lib/plexmediaserver/plex_certificate.p12
The chmod command is necessary because this Bash script will be executed as root and the Plex user has to be able to access the file. After the creation of the script file, use sudo chmod +x /etc/letsencrypt/renewal-hooks/post/create_p12_file.sh to make it executable.
Now you can initialize Certbot and obtain the first Let’s Encrypt certificate:
sudo certbot certonly \
  --dns-cloudflare \
  --dns-cloudflare-credentials ~/.secrets/certbot/cloudflare.ini \
  -m youremail@example.com \
  -d plex.example.com
Every time the certificate is close to experiation, Certbot should renew the certificate and regenerate the /var/lib/plexmediaserver/plex_certificate.p12 file using the renewal hook. To achieve this, install a cronjob using this command (see Certbot automated renewals for details):
SLEEPTIME=$(awk 'BEGIN{srand(); print int(rand()*(3600+1))}'); echo "0 0,12 * * * root sleep $SLEEPTIME && certbot renew -q" | sudo tee -a /etc/crontab > /dev/null
Now, edit /etc/crontab file, and check the last line
# /etc/crontab: system-wide crontab
# Unlike any other crontab you don't have to run the `crontab'
# command to install the new version when you edit this file
# and files in /etc/cron.d. These files also have username fields,
# that none of the other crontabs do.

SHELL=/bin/sh
PATH=/usr/local/sbin:/usr/local/bin:/sbin:/bin:/usr/sbin:/usr/bin

# Example of job definition:
# .---------------- minute (0 - 59)
# |  .------------- hour (0 - 23)
# |  |  .---------- day of month (1 - 31)
# |  |  |  .------- month (1 - 12) OR jan,feb,mar,apr ...
# |  |  |  |  .---- day of week (0 - 6) (Sunday=0 or 7) OR sun,mon,tue,wed,thu,fri,sat
# |  |  |  |  |
# *  *  *  *  * user-name command to be executed
17 *	* * *	root    cd / && run-parts --report /etc/cron.hourly
25 6	* * *	root	test -x /usr/sbin/anacron || ( cd / && run-parts --report /etc/cron.daily )
47 6	* * 7	root	test -x /usr/sbin/anacron || ( cd / && run-parts --report /etc/cron.weekly )
52 6	1 * *	root	test -x /usr/sbin/anacron || ( cd / && run-parts --report /etc/cron.monthly )
#
0 0,12 * * * root sleep 1923 && certbot renew -q
For testing, you can use sudo certbot renew --force-renewal to force a renewal and trigger the post renewal hook.
Use the Let’s Encrypt Certificate in Plex
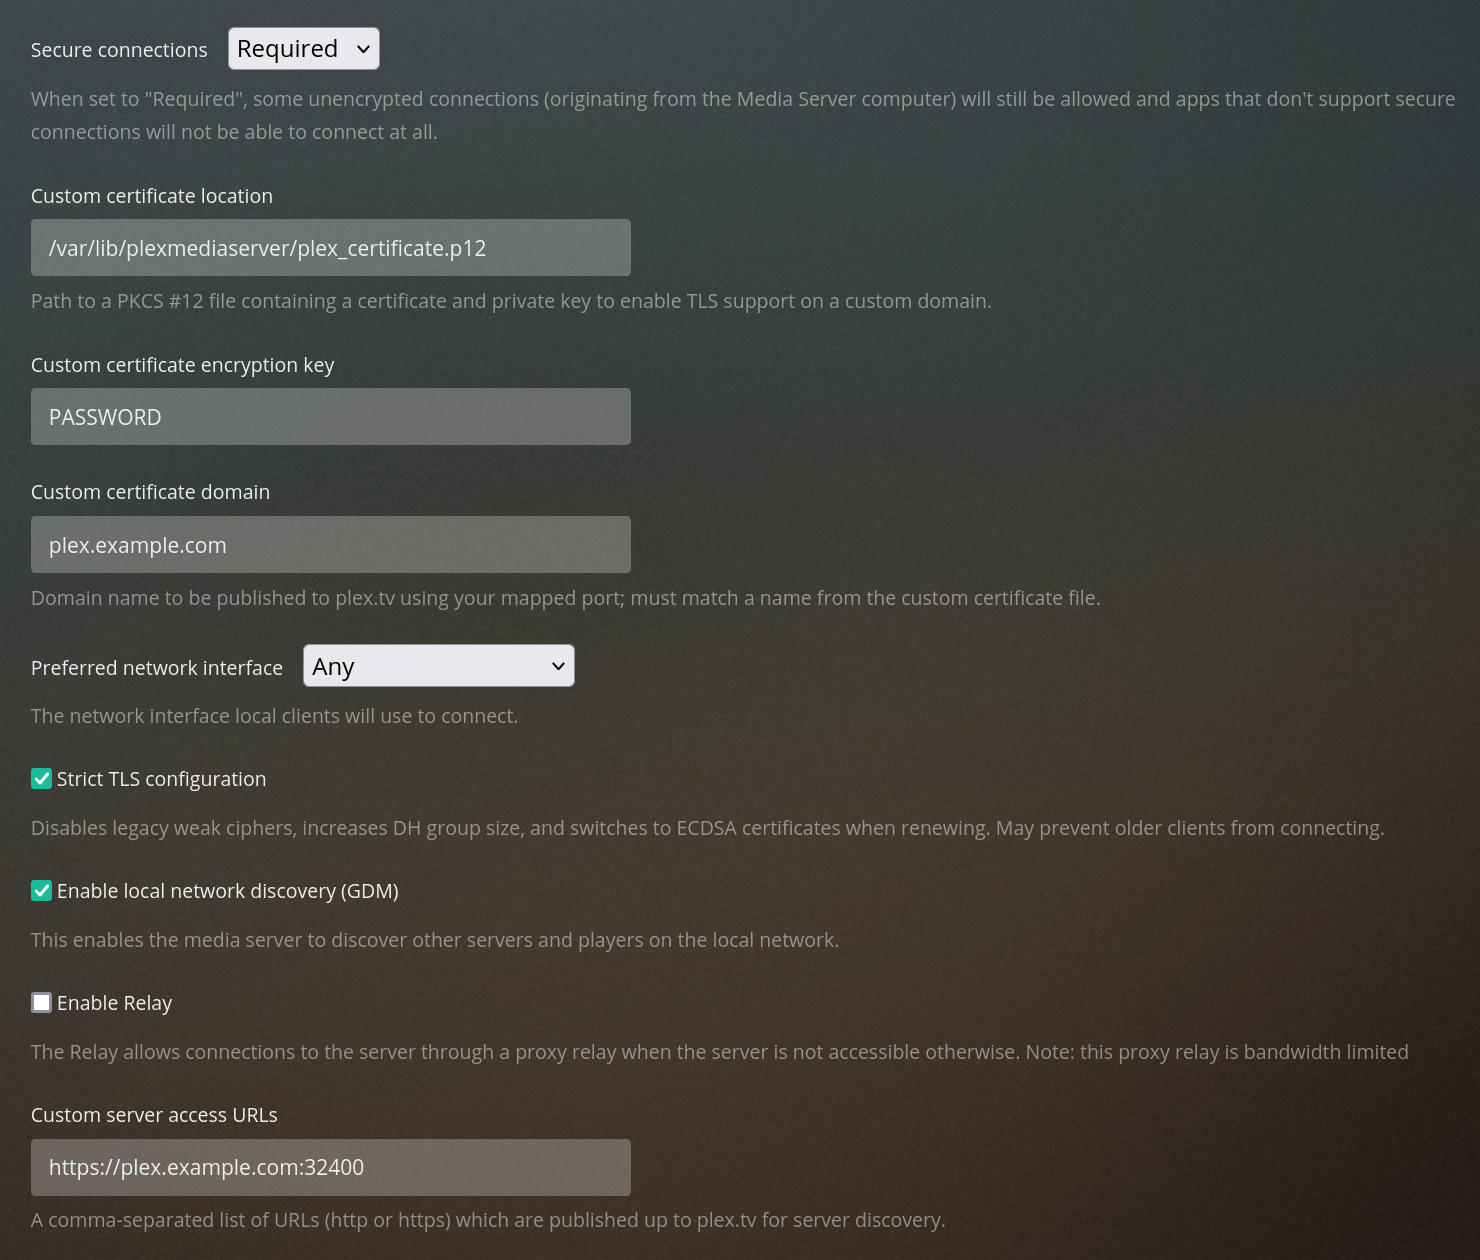
Go to the “Network” tab of the Plex settings. Set the following configuration (replace PASSWORD and plex.example.com):
- Secure connections: Required
- Custom certificate location:
/var/lib/plexmediaserver/plex_certificate.p12 - Custom certificate encryption key:
PASSWORD - Custom certificate domain:
plex.example.com - Enable Strict TLS configuration
- Custom server access URLs:
https://plex.example.com:32400
DNS Resolution and Port Fowarding
The last step is to set up DNS resolution and port forwarding. I’m not going into great detail here because it depends on both your DNS provider and your firewall.
In summary, ensure that your domain plex.example.com resolves to your public IP and forward port 32400 on the public IP to port 32400 of the Plex server.
Last Steps
Go to the “Remote Access” tab of the Plex settings and enable remote access. If you see the message, so your setup is working!
Fully accessible outside your network