n0d3 b0x v1
Projects | | Links:
/!\ n0d3 b0x v1 is deprecated/retired, see n0d3 b0x v2
Michael Dziedzic©
Sunday 12 April 2020
- Hardware
- Serial Connection
- Setup
MACaddress - Intall Linux Debian
busteron SD Card - Intall Linux Debian
busteroneMMC8040ClearFog-GT-8Kbased boards - Install somes required debian packages
- Tips
- Configure the Linux required security and more
Hardware
The motherboard : ClearFog-GT-8K
ClearFog-GT-8K pairs the robust ARMADA A8040 quad-core 2Ghz ARM Cortex A72 processor with high level network capabilities and connectivity – providing the perfect solution for a range of networking needs.
ClearFog-GT-8K features an array of 4 1GbE copper LAN connections (with 2.5G uplink to SoC), a 1GbE WAN interface, and an SFP+ connector (up to 10GbE). Other features include USB 3.0 port, 3 mPCIe, up to 16GB DDR4 memory, eMMC (up to 64GB), optional M.2 support via adapter, microSD, GPIO header, and supports Linux Kernel 4.4x, and Google IoT Core (for easy connection to the Google Cloud Platform).
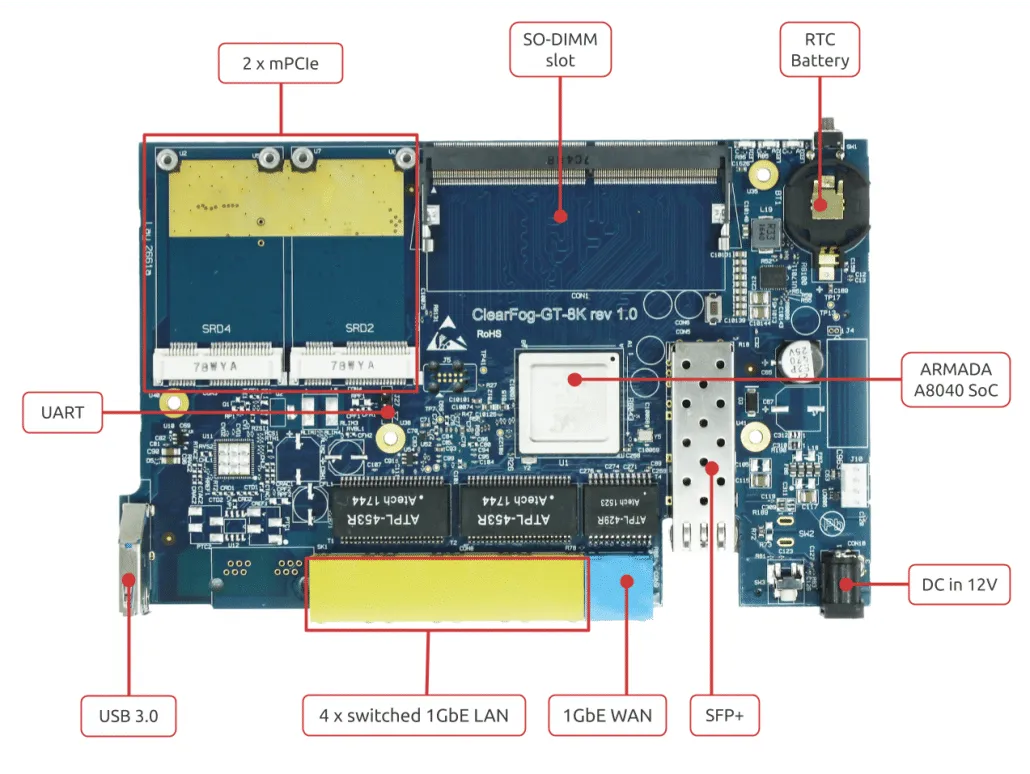
ClearFog-GT-8K - top view
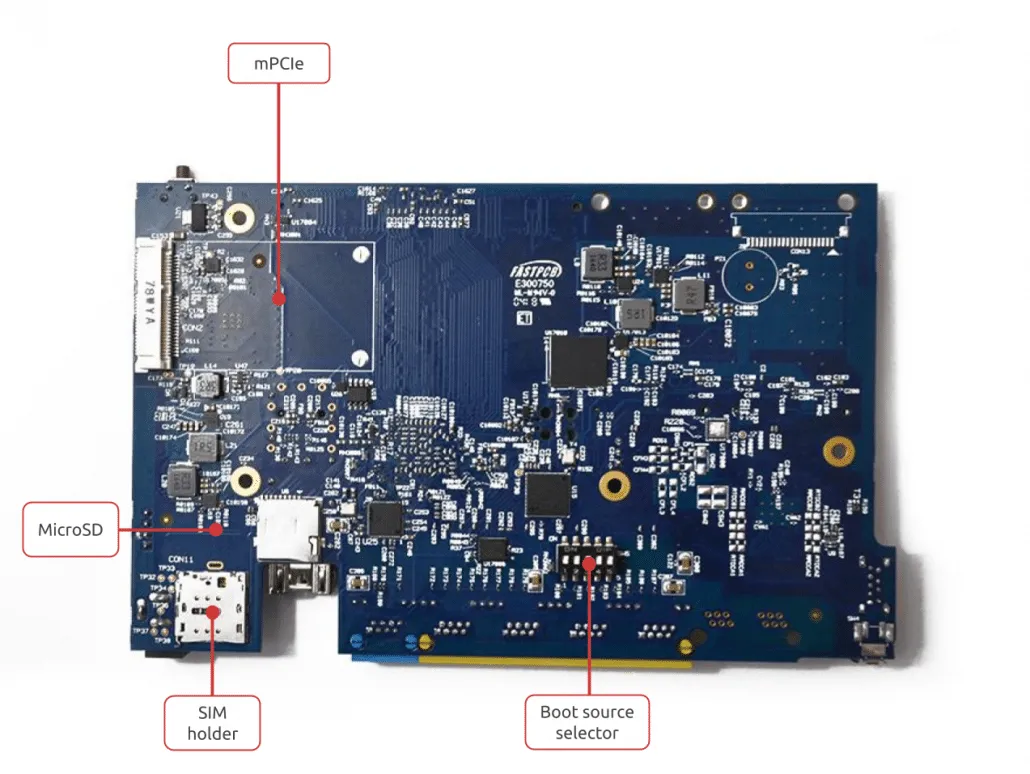
ClearFog-GT-8K - buttom view
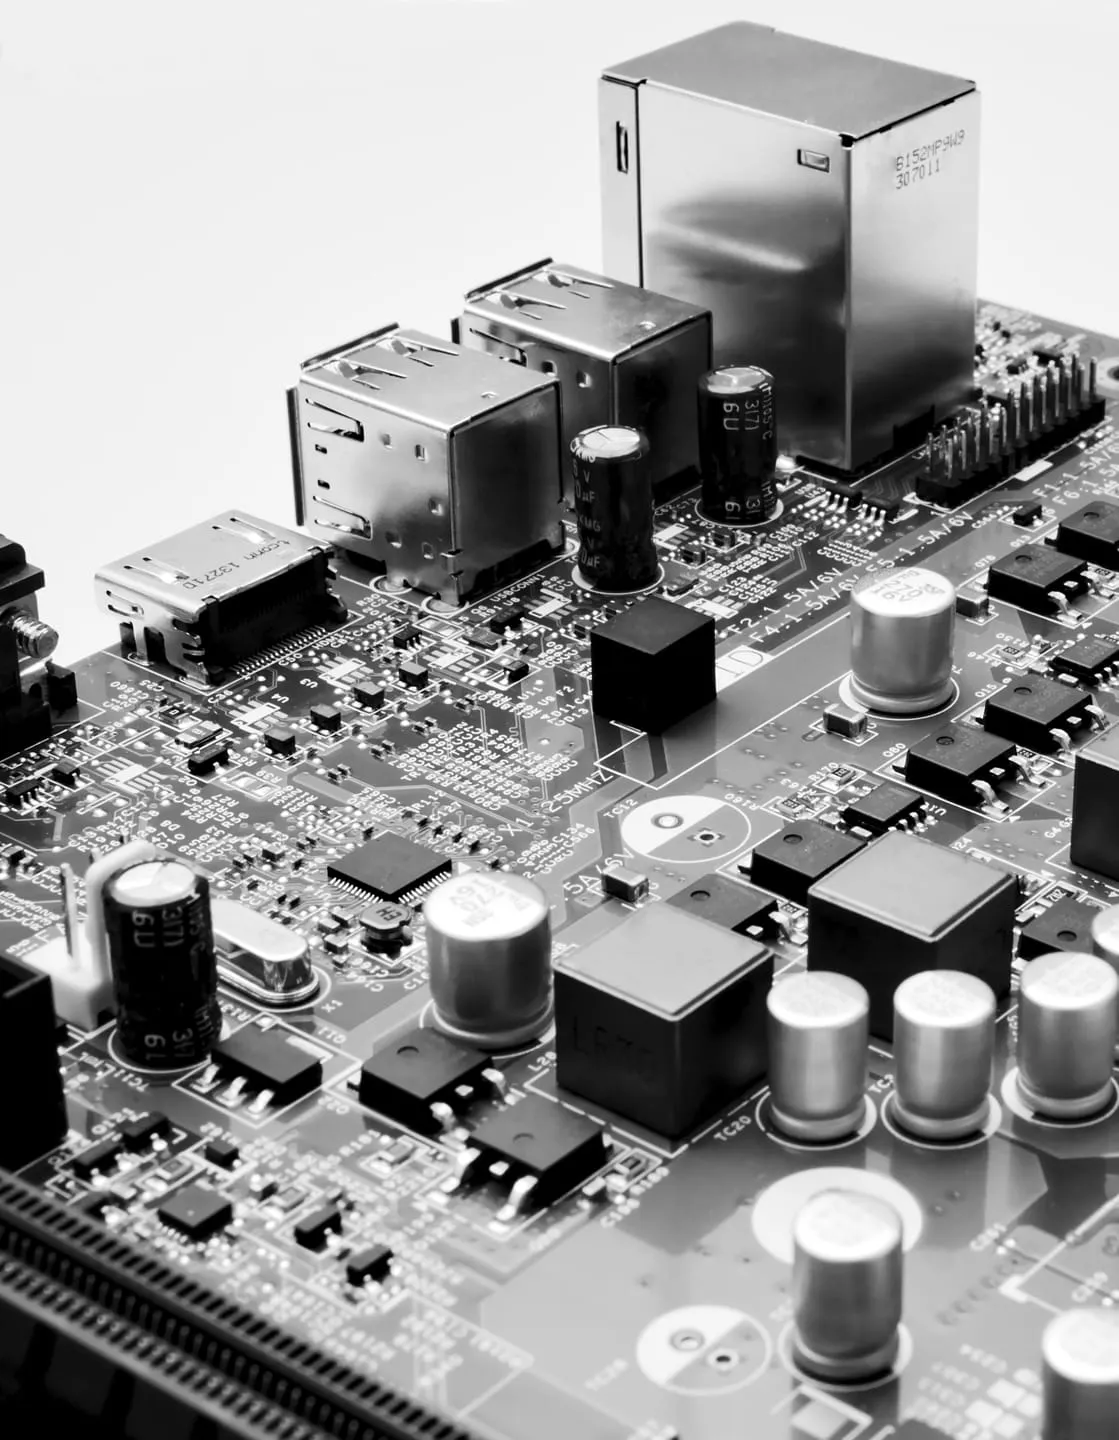
ClearFog-GT-8K - board assembly
Specifications
| Components | Desciptions |
|---|---|
| Processor | Marvell ARMADA A8040 quad core Cortex Arm A72 (up to 2GHz) |
| Memory & Storage | Up to 16GB DDR4 DIMM, 64bit |
| M.2 (optional support via adapter) | |
| MicroSD | |
| 8GB eMMC (up to 64GB) | |
| Connectivity | 4 x 1GbE switched LAN (RJ45) |
| 1 x 1GbE WAN (RJ45) | |
| 3 x mPCIe (USB 2.0 + PCIe) | |
| 1 x USB 3.0 | |
| 1 x SFP+ (up to 10GbE) | |
| I/O | GPIO header |
| Indication LEDs | |
| User Push Buttons | |
| UART header for debug | |
| OS Support | Linux Kernel 4.4x |
| Google IoT Platform | |
| Power | 12V input DC jack |
| Environment | Ambient temperature: 0°C to 70°C |
| Ambient enclosed temperature: 0°C to 40°C | |
| CPU die temperature: 0°C to 105°C | |
| Humidity (non-condensing): 10% – 90% | |
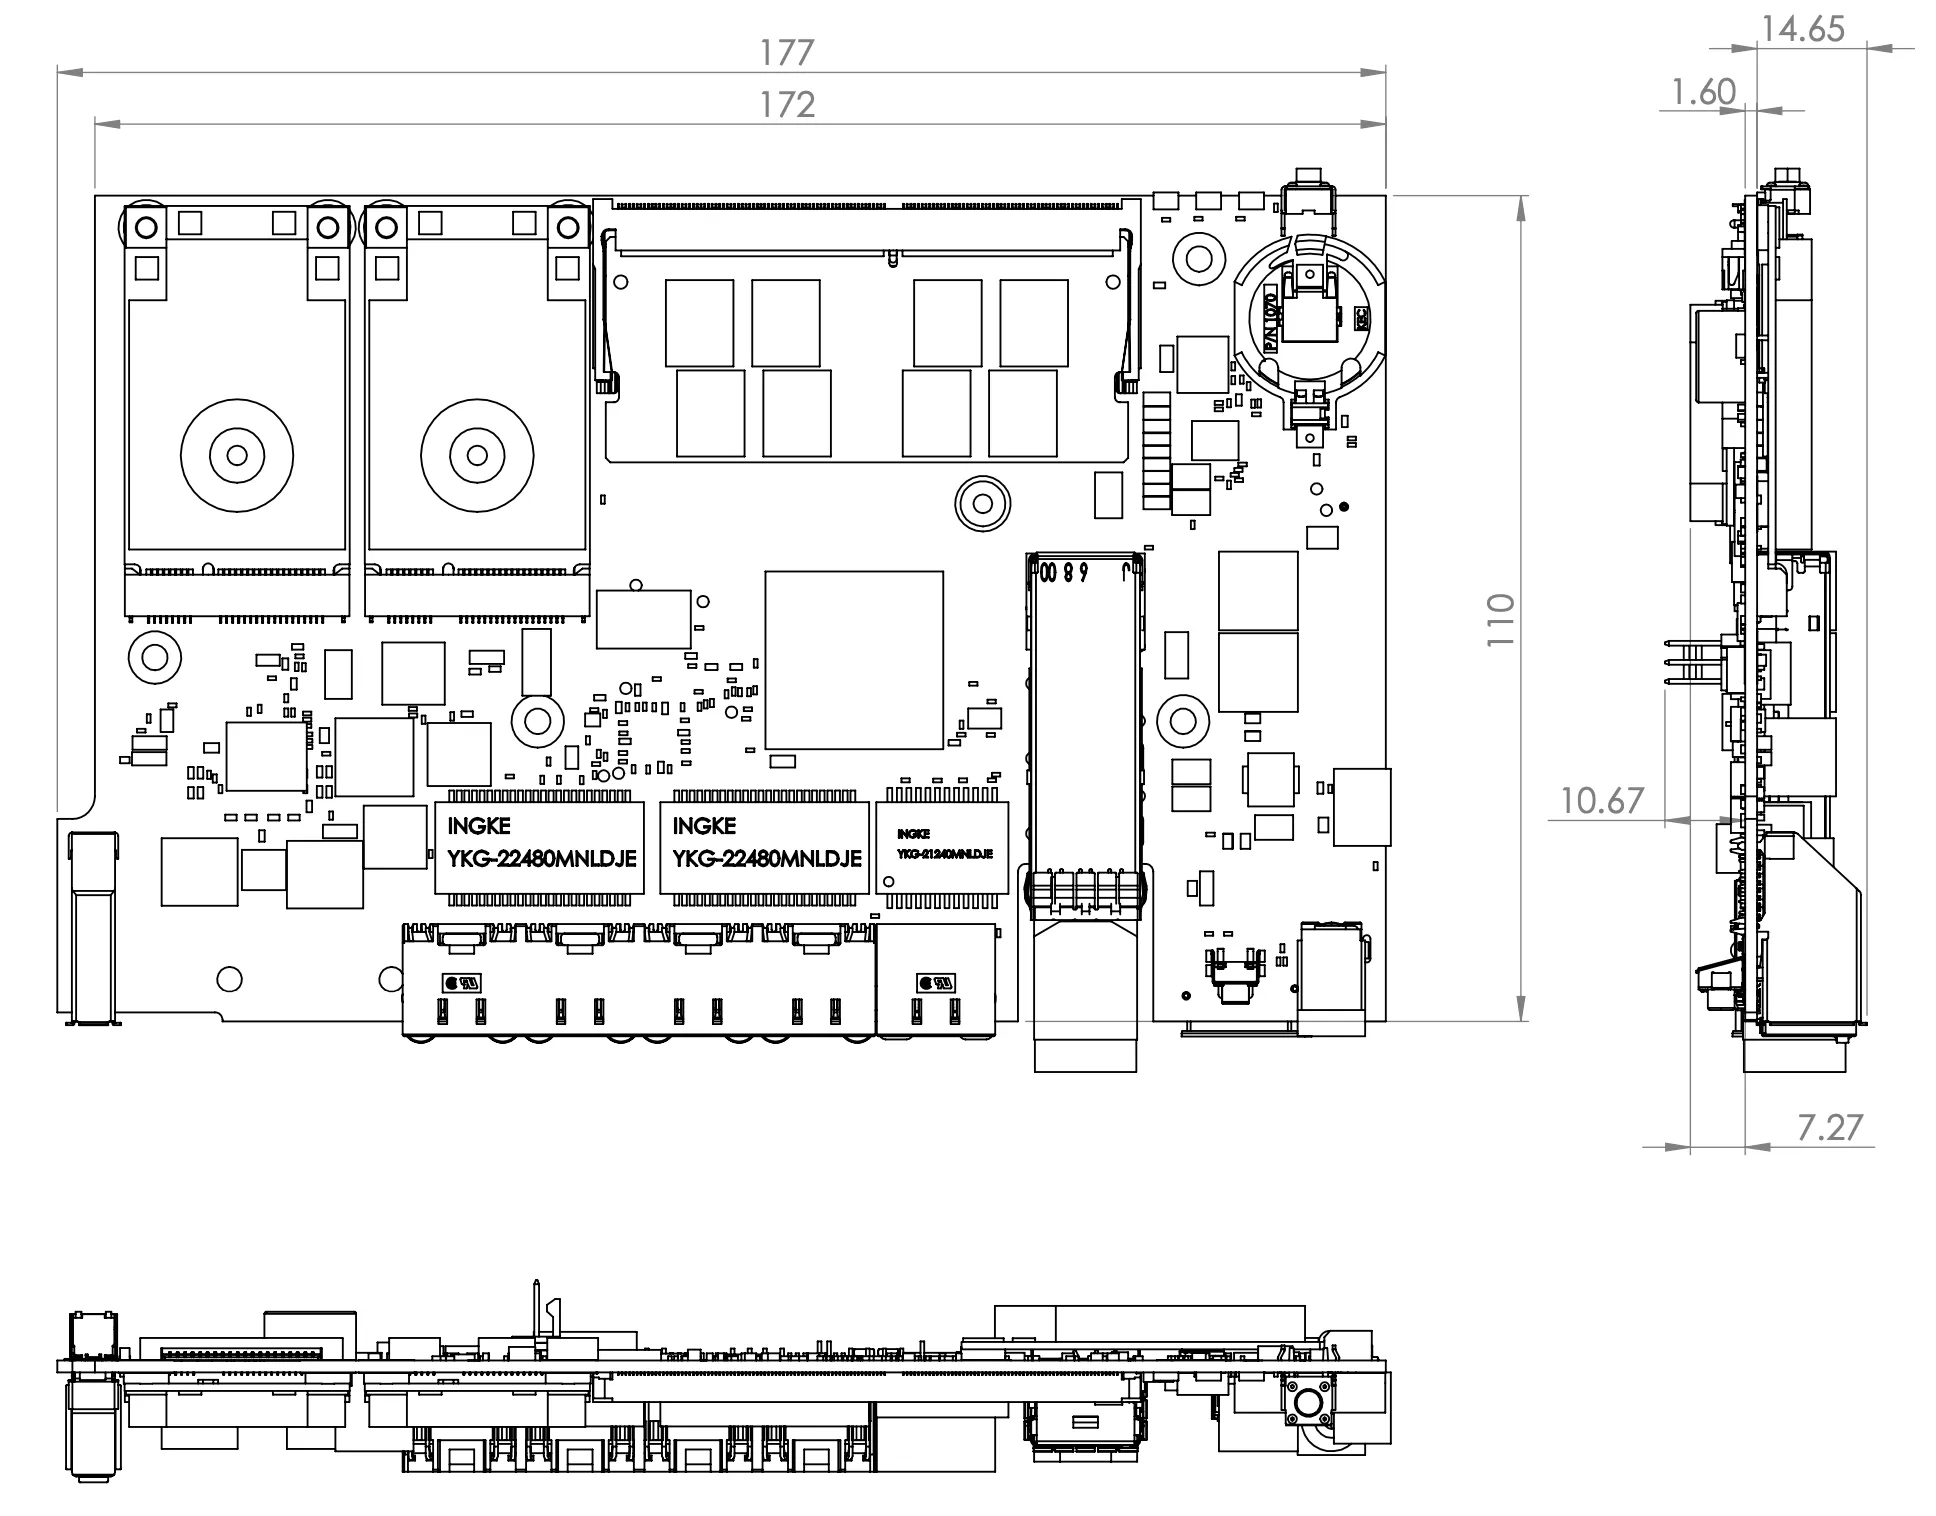
| Dimensions | Board: 177mm x 110mm |
More details can be found at the ClearFog-GT-8K product page.
SolidRun ClearFog GT-8K datasheet & simplified-schematics
Technical highlights
- passive cooling
- Marvell ARMADA A8040 quad core Cortex Arm A72 up to 2GHz
- Memory up to 16GB DDR4 DIMM
- all Ethernet ports supporting up to 1GBit/s at least
- the SFP Ethernet port supports up to 10GBit/s
- 3 miniPCIe
- M.2 optional support via miniPCIe adapter
Lot’s of possibilities
As you now know some of the technical details of the ClearFog-GT-8K, you can clearly imagine what could be possible with such a board. So, we’re listing here only a few possibilities to start the brain storming…
- a high-speed WiFi router with a
802.11nor802.11acminiPCIe card - a NAS system with M.2/miniPCIe SSD disks
- a personal router and firewall
- a cloud server
- a streaming server for audio and video tracks
- or maybe all this above at once
- a powerful Docker host with insane network performance
- …
LTE PCIe card
Quectel LTE EC25 Mini PCIe is an LTE category 4 module adopting standard PCI Express® Mini Card form factor (Mini PCIe). It is optimized specially for M2M and IoT applications, and delivers maximum data rates up to 150Mbps downlink and 50Mbps uplink
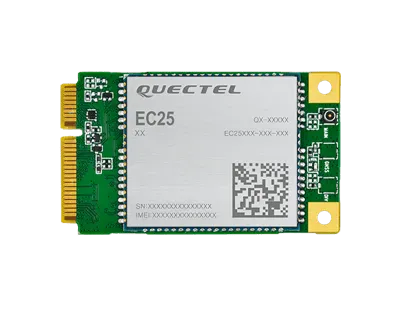
Quectel LTE EC25 Mini PCIe
WLAN PCIe card
The Mikrotik R11e-5HacD is a new 802.11ac card in miniPCI-express format, perfect for any RouterBOARD with miniPCIe slot. The card features built-in LED indicators for wireless mode, connection status (connected, searching, disabled), TX and RX activity and wireless signal strength.
RAM : 8Go SO-DIMM DDR4
- Just one 8go SO-DIMM DDR4 single rank
Storage : 240 Go mPCIe SSD
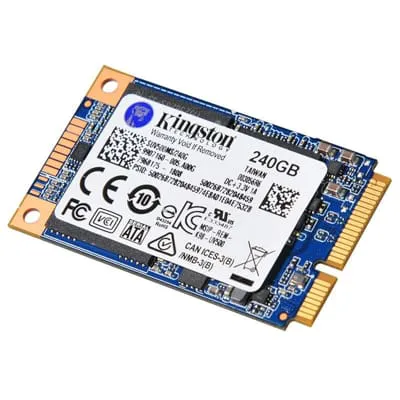
Kingston SUV500MS mSATA 240 Go
Serial Connection
Connecting a USB to UART adapter to board
On the top side of the ClearFog-GT-8K, there is a header for connecting the adapter cable (J27). The cable should be connected as seen at the picture below:
UART Rx/Tx pinout
UART Rx/Tx pinout connection should be as follows:
- Pin 1 (marked with
∆symbol) - Pin 2: ARMADA 8040
Tx - Pin 3: ARMADA 8040
Rx
The pin that is closest to the mechanical hole should be connected to the ground cable (black), the middle pin should be connected to the Tx (green cable) and the 3’rd pin should be connected to the Rx (white).
USB to UART adapter
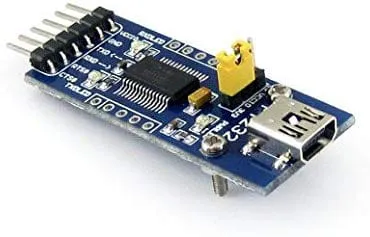
USB to UART adapter
Serial Connection – Linux
This section will walk you through installing necessary serial connection software for Linux.
Minicom achieved serial communication with the board. Once your board is connected to your laptop via micro USB cable, we can run the minicom setup :
sudo minicom -s
We will now be presented with the following menu:
  +-----[configuration]------+
  | Filenames and paths      |
  | File transfer protocols  |
  | Serial port setup        |
  | Modem and dialing        |
  | Screen and keyboard      |
  | Save setup as dfl        |
  | Save setup as..          |
  | Exit                     |
  | Exit from Minicom        |
  +--------------------------+
through which you can navigate using up/down keys. For our case, we will only need to setup Serial port setup so select that submenu. You will get the following menu:
  +-----------------------------------------------------------------------+
  | A -    Serial Device      : /dev/tty8                                 |
  | B - Lockfile Location     : /var/lock                                 |
  | C -   Callin Program      :                                           |
  | D -  Callout Program      :                                           |
  | E -    Bps/Par/Bits       : 115200 8N1                                |
  | F - Hardware Flow Control : Yes                                       |
  | G - Software Flow Control : No                                        |
  |                                                                       |
  |    Change which setting?                                              |
  +-----------------------------------------------------------------------+
For option A – Serial Device we must first find out the correct USB to which our serial has connected to after we have plugged in the micro USB cable. We can do this using dmesg:
  ~$dmesg
  ...
  [518568.122266] usb 1-6: new full-speed USB device number 4 using xhci_hcd
  [518568.257927] usb 1-6: New USB device found, idVendor=0403, idProduct=6015
  [518568.257935] usb 1-6: New USB device strings: Mfr=1, Product=2, SerialNumber=3
  [518568.257940] usb 1-6: Product: FT230X Basic UART
  [518568.257944] usb 1-6: Manufacturer: FTDI
  [518568.257947] usb 1-6: SerialNumber: DJ00HH67
  [518569.328196] usbcore: registered new interface driver usbserial
  [518569.328238] usbcore: registered new interface driver usbserial_generic
  [518569.328268] usbserial: USB Serial support registered for generic
  [518569.331071] usbcore: registered new interface driver ftdi_sio
  [518569.331080] usbserial: USB Serial support registered for FTDI USB Serial Device
  [518569.331096] ftdi_sio 1-6:1.0: FTDI USB Serial Device converter detected
  [518569.331115] usb 1-6: Detected FT-X
  [518569.331514] usb 1-6: FTDI USB Serial Device converter now attached to ttyUSB0
Here we can see that the serial converter connected to USB0 (ttyUSB0) USB number, so we change the A – Serial Device setting to /dev/ttyUSB0. There is no need to change any other settings (assuming your Bps/Par/Bits are set as 115200 8N1). Be wary of the fact that the USB number might change on each plug-in, so make sure to set it up accordingly. Now we can go back to the main menu by selecting Exit and pressing Enter. Optionally, you can save these settings as default for future use by selecting Save setup as dfl. When we exited the menu, the minicom terminal will open with our settings. Now when we power on the board we should see it booting:
  Welcome to minicom 2.7

  OPTIONS: I18n
  Compiled on Feb  29 2020, 13:37:27.
  Port /dev/ttyUSB0, 15:03:45

  Press CTRL-A Z for help on special keys


  BootROM - 2.03
  Starting CP-1 IOROM 1.07
  Booting from SPI NOR flash 1 (0x32)
  Found valid image at boot postion 0x000
  lNOTICE:  Starting binary extension
  NOTICE:  Gathering DRAM information
  mv_ddr: mv_ddr-armada-17.02.0-g42da6da (Mar 15 2017 - 13:30:32)
  mv_ddr: completed successfully
  Booting Trusted Firmware
  BL1: v1.2(release):armada-17.02.0:
  BL1: Built : 13:30:36, Mar 15 2017
  NOTICE:  BL1: Booting BL2
Serial Connection – MacOSX
- Prerequisites
First, download and install the `FTDI VCP drivers
Note: The later version is FTDIUSBSerialDriver_v2_4_2.dmg
Now, once you connect the cable, the kernel should load the usbserial module. Look for the device.
ls -l /dev/*usbserial*
  crw-rw-rw-  1 root  wheel   18,  57 Mar  6 07:47 /dev/cu.usbserial-AD0JM1R8
  crw-rw-rw-  1 root  wheel   18,  56 Mar  6 08:56 /dev/tty.usbserial-AD0JM1R8
- Connection with
screentool
OS X ships with screen by default. Open a terminal and type
screen /dev/tty.usbserial-AD0JM1R8 115200
Setup MAC address
The ClearFog GT-8K do not have any fixed or prefused MAC addresses. On each power-on a random MAC Address` is generated.
If you instead want to use specific MAC addresses, they can be set per interface using these U-Boot commands:
  setenv eth1addr 42:ad:af:12:e1:0a
  setenv eth2addr 42:ad:af:12:e1:0b
  setenv eth3addr 42:ad:af:12:e1:0c
  setenv eth4addr 42:ad:af:12:e1:0d
  saveenv
  reset
Note:
U-Bootcommandssetenv eth1adddoes’t fixed theMACaddress (I don’t know why !). And, so it must fixed with an other way :
- Edit
/etc/network/interfaces.d/eth1and commentiface eth1 inet dhcplinewe need to create a systemd startup script eg.
ux_startup.serviceand place it into/etc/systemd/system/directory. You can find the example of such systemd startup script below:[Unit] Description=Start at startup. After=multi-user.target [Service] ExecStart=/opt/<path>/ux_startup.sh [Install] WantedBy=default.targetNext, we create our custom shell script to be executed during systemd startup. The location and script name is already defined by service unit as /opt/…/ux_startup.sh. The content of the script can be simple as:
#!/bin/sh
# Load ipset and iptable
ipset restore -! < /etc/ipset.up.rules
iptables-restore < /etc/iptables.up.rules
Before reboot our system we need to make our script executable:
chmod 744 /opt/<path>/ux_startup.shNext, install systemd service unit and enable it so it will be executed at the boot time:
chmod 664 /etc/systemd/system/ux_startup.service
systemctl daemon-reload
systemctl enable ux_startup.service
Intall Linux Debian buster on SD Card
Flashing an SD Card
All Linux distributions include all the program to extract and flash the image to an SD card.
Flashing an image will erase all files and partitions of the target device. Make sure you choose the SD card as the target device, or you can seriously damage your existing operating system.
Linux Debian buster Releases for 8040 based boards
On your favorite Linux desktop, just use dd command to write the images to your disk (SD Card)
sudo dd if=image.raw of=/dev/<YOURSDCARD> bs=4M; sync
If the image is compressed, you need to uncompress it first!
XZ-compressed image: xzcat image.raw.xz | sudo dd of=/dev/<YOURSDCARD> bs=4M; sync
Bootable images can be found here .
The default username of 8040 debian buster image is debian, and password is debian.
Boot Source Selection
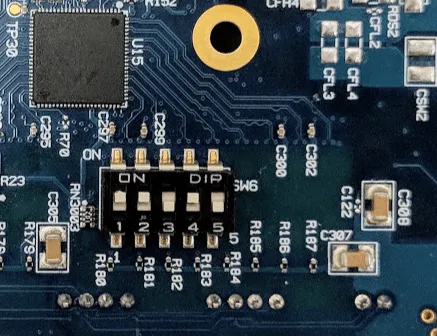
ClearFog-GT-8K boot select
On buttom board, the boot source is selected by setting SWx to the right mode. The following modes below are available:
| Boot Source | SW1 | SW2 | SW3 | SW4 | SW5 |
|---|---|---|---|---|---|
| SPI ROM | OFF | OFF | ON | OFF | OFF |
| SD Card | ON | ON | OFF | ON | OFF |
| eMMC | ON | ON | ON | OFF | OFF |
The right mode is SPI ROM : SW1=OFF, SW2=OFF, SW3=ON, SW4=OFF & SW5=OFF
Intall Linux Debian buster on eMMC 8040 ClearFog-GT-8K based boards
Installing software on a ClearFog-GT-8K with eMMC is a little tricky.
This section describes a relatively painless procedure for installing the SolidRun provided Debian image on the eMMC.
You will need to following items
- This section assumes that you already have Linux running on your device (with SD Card)
- boot
ClearFog-GT-8Kboard on SD Card
Installation instructions follow
- Copy the latest Debian image (
.img.*zsuffix)mkdir -p /opt/clearfog_installation cd /opt/clearfog_installation curl https://images.solid-build.xyz/8040/sr-8040-debian-buster-20200223.img.xz --output sr-8040-debian-buster-20200223.img.xz - Copy clearfog
eMMCutilitiesmkdir -p /opt/clearfog_installation cd /opt/clearfog_installation curl https://developer.solid-run.com/wp-content/uploads/2018/10/clearfog-emmc-v3.tar.gz --output clearfog-emmc-v3.tar.gz tar xfz clearfog-emmc-v3.tar.gz - Install the bootloader on
eMMCecho 0 > /sys/block/mmcblk0boot0/force_ro dd if=/opt/clearfog_installation/u-boot-clearfog-base-mmc.kwb of=/dev/mmcblk0boot0 - Install the Debian filesystem
  xzcat /opt/clearfog_installation/sr-8040-debian-buster-20200223.img.xz \
 | dd of=/dev/mmcblk0 bs=1M conv=fsync
Power off the
ClearFog-GT-8KRemove sd card
Power on the
ClearFog-GT-8K- Debian boot to the
login: prompt
Install somes required debian packages
- At first, update & upgrade packages
sudo apt-get update ; sudo apt-get upgrade
- Package
net-tools: This package includes the important tools for controlling the network subsystem of the Linux kernel. This includesarp,ifconfig,netstat,rarp,nameifandroute.
sudo apt-get install net-tools
- Package
curl&wget:curlis a command line tool for transferring data with URL syntax, supportingFILE,FTP,FTPS,HTTP,HTTPS,IMAP,IMAPS,POP3,POP3S,RTMP,RTSP,SCP,SFTP,SMTPS, …wgetis a network utility to retrieve files from the web usingHTTP(S)andFTP, the two most widely used internet protocols. It works non-interactively, so it will work in the background, after having logged off.
sudo apt-get install curl wget
- Package
dosfstools: utilities for making and checkingMS-DOS FATfilesystems
sudo apt install dosfstools
- Package
unzip: De-archiver for.zipfiles.InfoZIP’s unzip program.
sudo apt install unzip
- Package for DHCP deamon et DNS serveur
dnsmasq: Small cachingDNSproxy andDHCP/TFTPserver.Dnsmasqis a lightweight, easy to configure, DNS forwarder and DHCP server. It is designed to provideDNSand optionally,DHCP, to a small networkdnsutils: This package delivers various client programs related toDNSthat are derived from theBINDsource tree.traceroute: Traces the route taken by packets over anIPv4/IPv6network. The traceroute utility displays the route used by IP packets on their way to a specified network (or Internet) host.
sudo apt install dnsmasq dnsutils traceroute
- Packages for
samba:samba:SMB/CIFSfile, print, and login server for Unix.Sambais an implementation of theSMB/CIFSprotocol for Unix systems.cifs-utils: Common Internet File System utilities. TheSMB/CIFSprotocol provides support for cross-platform file sharing with Microsoft Windows, OS X, and other Unix systems.samba-client: command-lineSMB/CIFSclients for Unix
sudo apt install samba cifs-utils samba-client
- Packages for
nging:nging: small, powerful, scalable web/proxy server. Nginx is a high-performance web and reverse proxy server created by Igor Sysoev. It can be used both as a standalone web server and as a proxy.
sudo apt install nginx
- Package
fail2ban:Fail2banmonitors log files (e.g./var/log/auth.log,/var/log/apache/access.log) and temporarily or persistently bans failure-prone addresses by updating existing firewall rules.Fail2banallows easy specification of different actions to be taken such as to ban an IP usingiptablesorhostsdenyrules, or simply to send a notification email.
sudo apt install fail2ban
- Packages for X11 :
xserver-xorg-video-dummy: X.Org X server – dummy display driver. This package provides adummydisplay driver, which does not actually display anything.xinit: X server initialisation tool.xinitandstartxare programs which facilitate starting an X server, and loading a base X session.x11vnc:x11vncallows one to view remotely and interact with real X displays (i.e. a display corresponding to a physical monitor, keyboard, and mouse) with anyVNCviewer.slim:slimaims to be light, simple and independent from the various desktop environments.jwm: very small lightweight pure X11 window manager with tray and menus. It uses a minimum of external libraries, thus very little memory, includes virtual screens, menubar and root-menu popup.
sudo apt install xinit xserver-xorg-video-dummy x11vnc jwm slim
- Packages for
novnc:novnc: HTML5 VNC client - daemon and programs.noVNCis aHTML5VNC(WebSockets, Canvas) with encryption (wss://) support client that runs well in any modern browser.
sudo apt install novnc
- Packages for virtualization
libvirt-daemon-system:Libvirtis a C toolkit to interact with the virtualization capabilities of recent versions of Linux. The library aims at providing a long term stable C API for different virtualization mechanisms. It currently supportsQEMU,KVM,XEN,OpenVZ,LXC, andVirtualBox.libvirt-clients: Programs for thelibvirtlibrary.virtinst: Programs to create and clone virtual machines.libvirt-daemon: Virtualization daemon. This package contains the daemon libvirtd to manage the hypervisors.qemu-system-common:QEMUfull system emulation binaries (common files).QEMUis a fast processor emulator: currently the package supportsARM,CRIS,i386,M68k,MicroBlaze,MIPS,PowerPC,SH4,SPARCandx86-64emulation.qemu-efi-aarch64:UEFIfirmware for 64-bitARMvirtual machines.qemu-efi-aarch64is a build of EDK II for 64-bitARMvirtual machines. It includes full support forUEFI, including Secure Boot.qemu-system-data: This package provides architecture-neutral data files (such as keyboard definitions, icons) for system-mode QEMU emulation (qemu-system-*) packages.qemu-system-arm:QEMUfull system emulation binaries (arm).QEMUis a fast processor emulator: currently the package supportsARMemulation.ipxe-qemu: PXE boot firmware - ROM images for qemu.iPXEis network boot firmware. It supports a variety of network cards, including some wireless cards, and variety of network protocols.
sudo apt install qemu libvirt-clients libvirt-daemon-system bridge-utils virtinst libvirt-daemon qemu-system-common virt-managerOnce above packages are installed successfully then
libvirtdservice will be started automatically, run the belowsystemctlcommand to verify the statussudo systemctl status libvirtd.service
Tips
Get CPU temperature on ARMv8 Marvell A8040
paste <(cat /sys/class/thermal/thermal_zone*/type) <(cat /sys/class/thermal/thermal_zone*/temp) | column -s $'\t' -t | sed 's/\(.\)..$/.\1°C/'
  ap-thermal-ic    31.9°C
  ap-thermal-cpu1  31.9°C
  ap-thermal-cpu2  31.9°C
  ap-thermal-cpu3  31.9°C
  ap-thermal-cpu4  31.9°C
  cp0-thermal-ic   34.1°C
  cp1-thermal-ic   34.6°C
Configure the Linux required security and more
- Step 1 : Hardening Linux Server Setup
- Step 2 : Hardening SSH Server Setup
- Step 3 : Hardening Web Server Setup
- Step 5 : Execute shell script at startup boot on systemd linux
- Step 6 : Set Up a Samba Server on Linux
- Step 8 : Install and Setup Postfix as a Send-Only SMTP Server
- Step 9 : X11 in an Embedded System
- Step 10 : Install and configure kvm and qemu on armv8 Debian -
work in progress - Step 11 : Network configuration (NAT, Routing table, …) -
work in progress - Step 12 : Access Point Setup and WIFI management