LTE and Starlink ISP - How to access to your LAN from outside with WireGuard®

LTE and Starlink ISP - How to access to your LAN from outside with WireGuard.
PRO CUSTODIBUS©
- Prerequisites
- Setup a multi-hop WireGuard or rather a site gateway as a spoke
- Installation (Debian / Ubuntu)
- Generate WireGuard keys
- Configure Wireguard on Host C (VPS : Hub)
- Configure Wireguard on EndPoint A
- Configure Wireguard on EndPoint B (our LAN jump host)
- Start up WireGuard
- TIPS : Set up WireGuard server heakth Check in Pyton
- References
With LTE or Satellite (eg. Starlink / SpaceX) Internet access , and unlike ADSL or Fiber, we are not directly connected to the Internet: We are connected to the private network of operator’s and it’s he witch routes requests to the Internet.
It’s for this reason, that it’s not possible to open a port to the outside to establish an incoming connection. The public address assigned by the operator (and which is seen by the sites to which we connect) is shared by the others customer of the operator. Thusly, the LTE or Starlink router does not have a real public IP address: the operator assigns it a WAN address which is generally a private class A IP address (eg. IP 0.0.0.0 to 126.255.255.255).
If you want to access certain equipment on your local network, several workarounds can be used to remove this restriction :
- One of them is to establish a
Reverse SSH Tunneling. For more information, you can see this article : “LTE and Starlink ISP - How to access to your LAN from outside” between a machine on itsLANand a machine accessible from the Internet (VPS) that we fully control (eg. to open the network ports). - Another solution is to use product like
Cloudflare Tunnel. For more information, you can see this article : “Secure Access to your private network with Cloudflare© tunnel and Warp”.
Do you want to more-securely expose your self-hosted services to the internet ? Do you like the idea of products like Cloudflare Tunnel, but would prefer more control over your infrastructure ? Then this setup is for you!
Prerequisites
- A public Domaine Name
- Some self-hosted service you want to expose to the internet
- A virtual Private Server (VPS) that you can use to host your public endpoint:
- With SSH access
- With access to the configuration of external ports
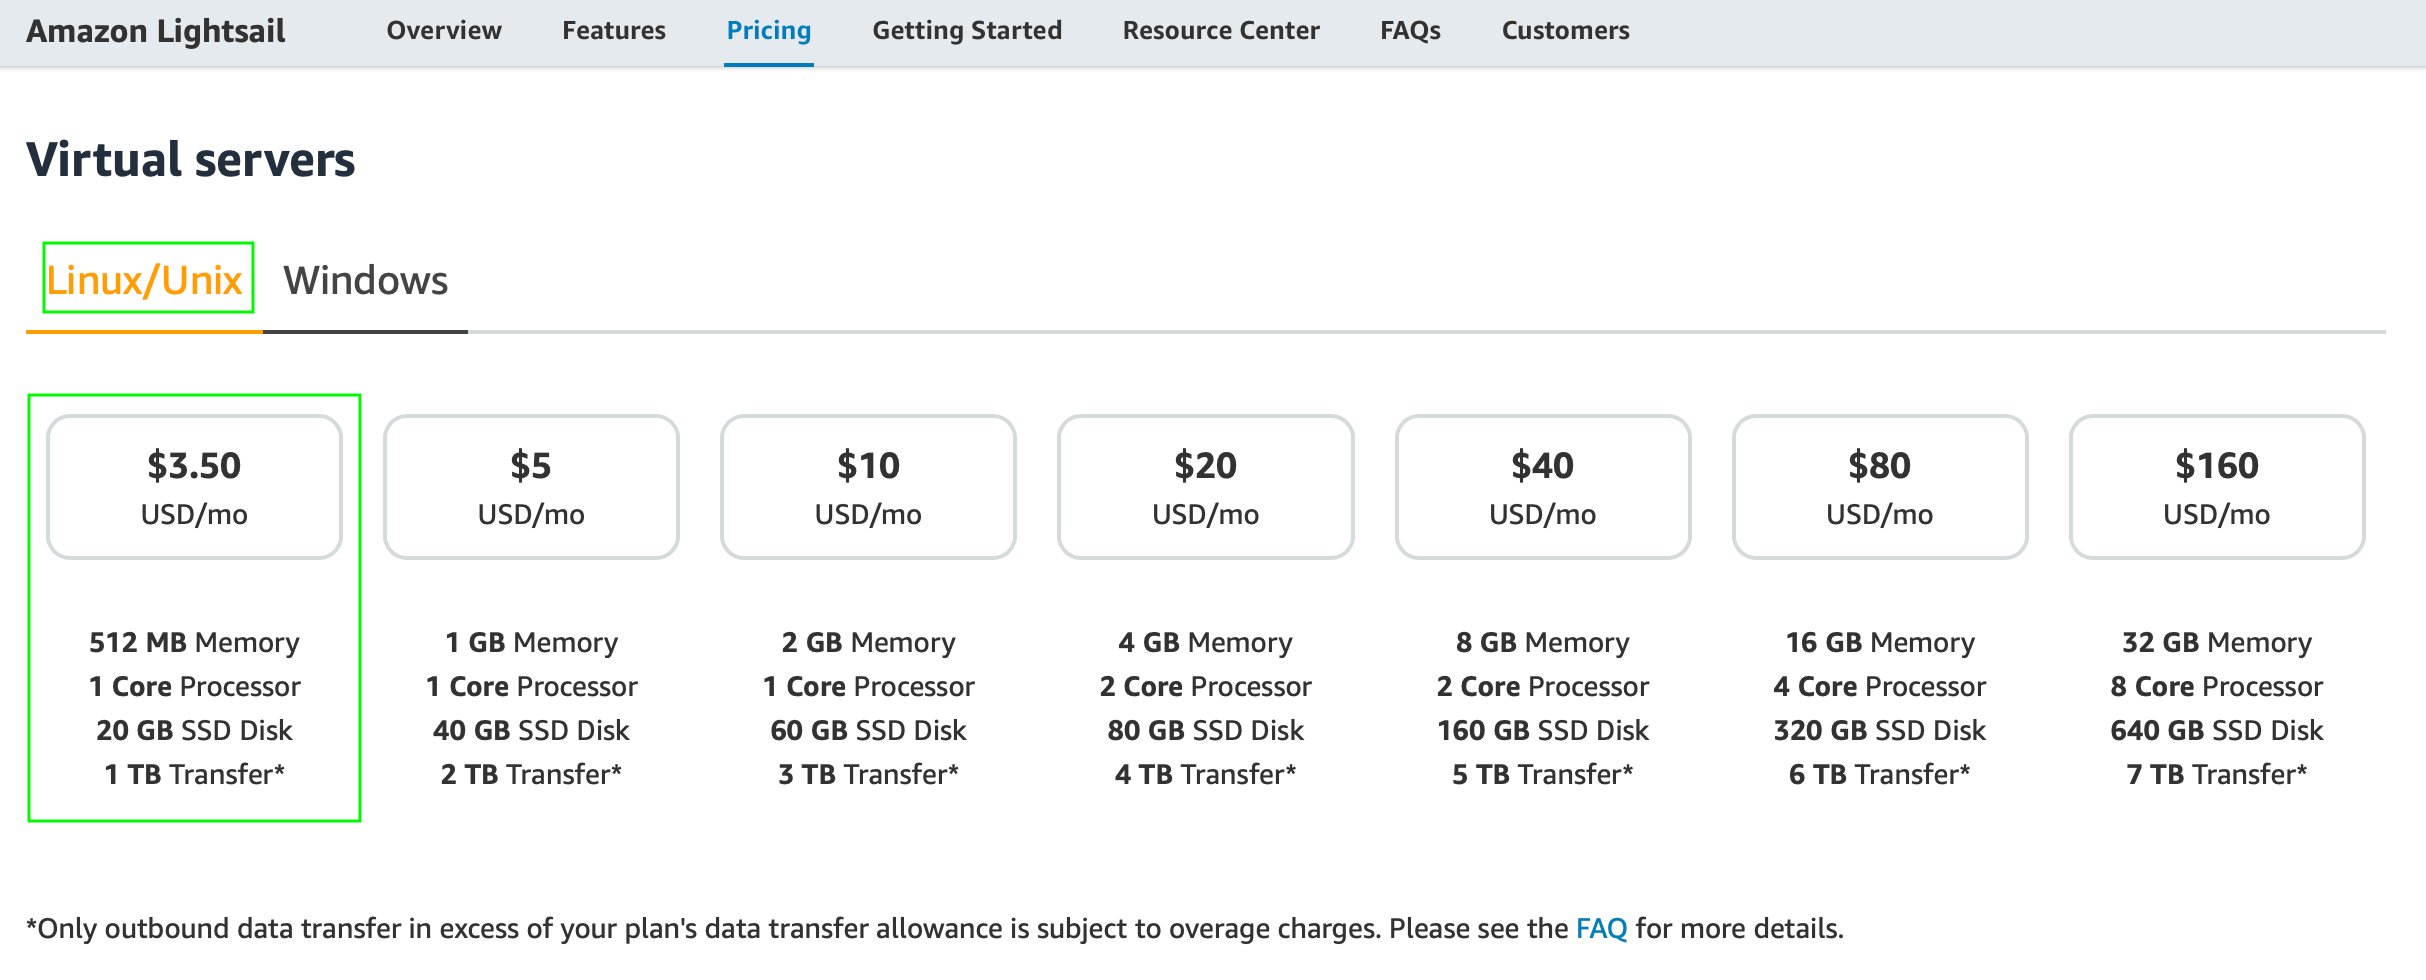
I using an AWS Lightsail instance (with Linux Debian, 512MB RAM, 1 vCPU, 20GB SSD & 1TB Transfer) at € 3.50 per month. It has a public IP address and one of my domain names points to it.
Setup a multi-hop WireGuard or rather a site gateway as a spoke
A simple WireGuard Hub and Spoke VPN (Virtual Private Network) allows you to connect two or more endpoints together through a central hub. But you can also marry this basic topology to other topology primitives to create a more sophisticated network that carries traffic through multiple hops from one endpoint to some far-flung site (or the Internet) at the other end of your WireGuard network.
In this scenario, we have an endpoint with WireGuard running on it, Endpoint A, from which we want to access several other endpoints not running WireGuard — like Endpoint B, in Site B. To get from Endpoint A to Site B in this scenario, WireGuard traffic needs to go through two hops: one through the VPN hub, Host C; and the second through a spoke of the hub, Host β — the WireGuard gateway to Site B:
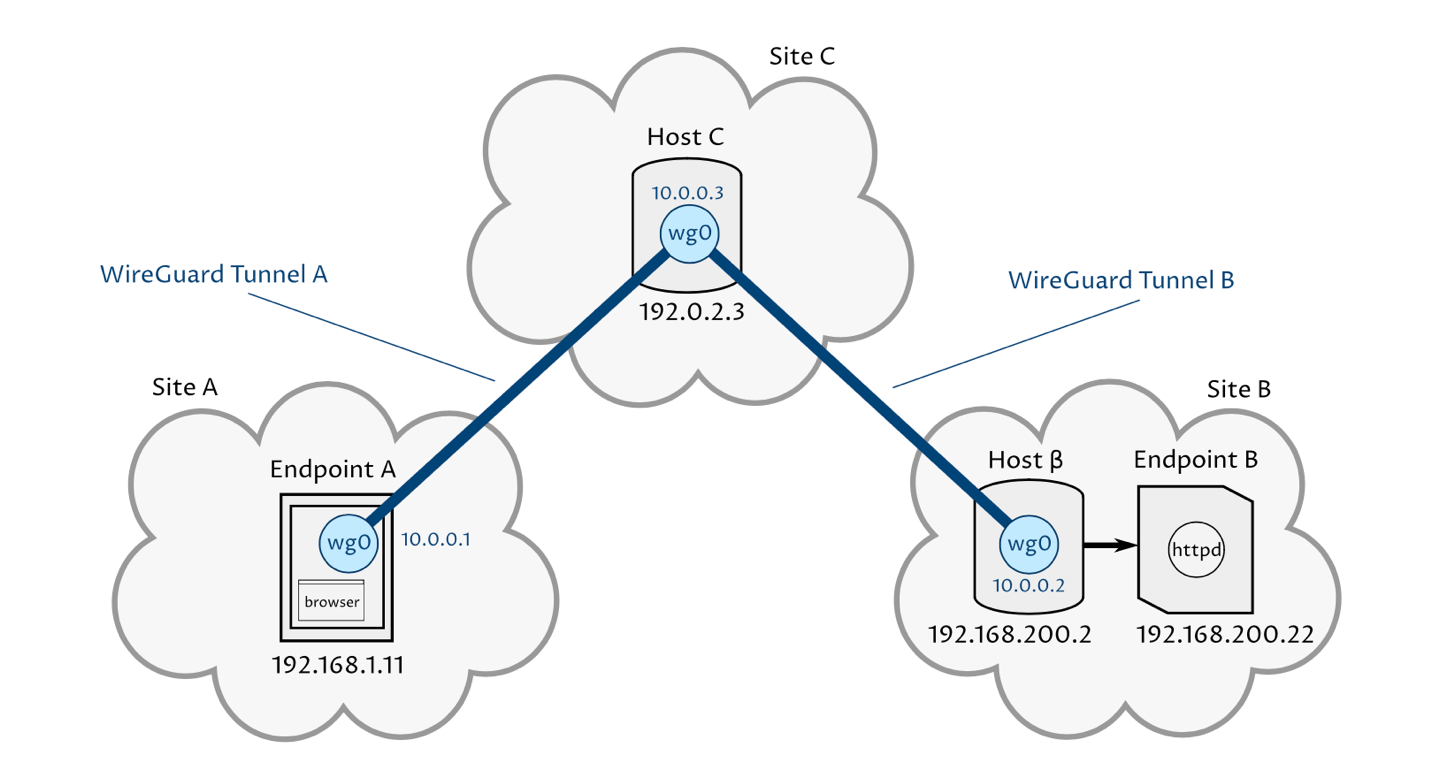
In this sample, WireGuard network uses a subnet of 10.0.0.0/24, within which Endpoint A has an IP address of 10.0.0.1, Host C has an IP address of 10.0.0.3, and Host β has an IP address of 10.0.0.2. Site B uses a subnet of 192.168.200.0/24, with Host β having an IP address of 192.168.200.2 in it, and Endpoint B having an IP address of 192.168.200.22. Host C has a public IP address of 192.0.2.3, allowing Endpoint A and Host β each to establish a WireGuard tunnel to it.
Installation (Debian / Ubuntu)
Install WireGuard on both Endpoint A, Endpoint β, and Host C. You can verify that you’ve installed WireGuard successfully by running wg help on each host.
$ sudo apt update
$ sudo apt install wireguard
Generate WireGuard keys
Generate three WireGuard keys, one for Endpoint A, one for Endpoint B, and one for Host C (hub). A WireGuard key (also known as a “key pair”) is composed of two parts, the “private key” (also known as the “secret key”), and the “public key”.
While you don’t have to generate the keys on the hosts, generating a host’s key on the host itself often is the best way to keep its private key secure — that way the private key never leaves the host. If you generate your keys outside of the host, be very careful with the private keys, as WireGuard’s security depends entirely on keeping the private keys a secret.
- Run the following commands to generate a new key pair for Endpoint A:
$ wg genkey > endpoint-a.key
$ wg pubkey < endpoint-a.key > endpoint-a.pub
- The following commands to generate a new key pair for Endpoint B (on host β):
$ wg genkey > endpoint-b.key
$ wg pubkey < endpoint-b.key > endpoint-b.pub
- And similar commands to generate a new key pair for Host C:
$ wg genkey > host-c.key
$ wg pubkey < host-c.key > host-c.pub
This will generate six files: endpoint-a.key, endpoint-a.pub, endpoint-b.key, endpoint-b.pub, host-c.key, and host-c.pub. The *.key files contain the private keys, and the *.pub files contain the public keys. The content of each will be 44 characters of Base64-encoded text:
$ cat endpoint-a.key
xxxxxxxxxx<PrivateKey Endpoint A>xxxxxxxxxxx
$ cat endpoint-a.pub
/TOE4TKtAqVsePRVR+5AA43HkAK5DSntkOCO7nYq5xU=

$ cat endpoint-b.key
xxxxxxxxxx<PrivateKey Endpoint B>xxxxxxxxxxx
$ cat endpoint-b.pub
fE/wdxzl0klVp/IR8UcaoGUMjqaWi3jAd7KzHKFS6Ds=

$ cat host-c.key
xxxxxxxxxxxx<PrivateKey Host C>xxxxxxxxxxxxx
$ cat host-c.pub
jUd41n3XYa3yXBzyBvWqlLhYgRef5RiBD7jwo70U+Rw=
You don’t actually need to keep these files around — the content of each will be used in the WireGuard configuration files we build for the various hosts in the next sections.
With a Hub and Spoke topology, this means than the hub, Host C, must be configured with the public key of each spoke; whereas the spokes, Endpoint A and Endpoint B (host β), only need to be configured with the public key of the hub (host C).
Configure Wireguard on Host C (VPS : Hub)
On Host C, we want to send all the traffic destined for 10.0.0.1 to Endpoint A; and all traffic for 10.0.0.2 and the 192.168.200.0/24 network to Host β. So we configure WireGuard on Host C with AllowedIPs = 10.0.0.1/32 in its Endpoint A [Peer] section; and AllowedIPs = 10.0.0.2/32, 192.168.200.0/24 in its Host β [Peer] section:
# file: "/etc/wireguard/wg0.conf"

# local settings for Host C
[Interface]
PrivateKey = xxxxxxxxxxxx<PrivateKey Host C>xxxxxxxxxxxxx
Address = 10.0.0.3/32
ListenPort = 51823

PreUp = sysctl -w net.ipv4.ip_forward=1

# remote settings for Endpoint A
[Peer]
PublicKey = /TOE4TKtAqVsePRVR+5AA43HkAK5DSntkOCO7nYq5xU=
AllowedIPs = 10.0.0.1/32

# remote settings for Endpoint B (Host β)
[Peer]
PublicKey = fE/wdxzl0klVp/IR8UcaoGUMjqaWi3jAd7KzHKFS6Ds=
AllowedIPs = 10.0.0.2/32, 192.168.200.0/24
Set the file’s owner to root, and its permissions to 600 (owner can read+write; everyone else is denied access — the file contains the host’s private key, which must be kept secret).
Interface.PrivateKey : This is Host C’s private key — replace this value with the actual private key you generated for Host C. This value is secret, and this is the only place where it should live.
Interface.Address : This is Host C’s IP address inside the WireGuard VPN we’re building — replace this value with a suitable value for your network. You can use any address you want for this, but the address should be within the “Private-Use”
IPv4or “Unique-Local”IPv6address space (like10.0.0.0/8— see RFC 6890 for all available address blocks), and should not collide with any other private subnets to which the endpoint itself or any of its peers can connect.
With a Hub and Spoke topology, you typically decide on a single block of IP addresses to use for the whole WireGuard VPN, and assign each peer an IP address from within that block. You’ll use this block as the Peer.AllowedIPs setting in the configuration file for each spoke (discussed in later sections). we’re going to use the 10.0.0.0/24 block, so we’ve chosen an address from within this block (10.0.0.3) for this hub, and that’s what we put in the hub’s Interface.Address setting.
While you can configure multiple IP addresses for this setting, unless you have a special use-case, you should just use a single IP address (in the form of a /32 block with an IPv4 address, or a /64 block with an IPv6 address).
- Interface.ListenPort : This is Host C’s WireGuard port. Host C must be able to receive
UDPtraffic for new connections on this port from the Internet (or wherever the traffic of the other WireGuard peers with which it will communicate comes from).
With a Hub and Spoke topology, this setting in Host C’s configuration file should match the port in the Peer.Endpoint setting of each endpoint’s configuration file (discussed in following sections).
Peer[0].PublicKey : This is Endpoint A’s public key — replace this value with the actual public key you generated for Endpoint A. This value is not secret; however, it is a globally-unique identifier for Endpoint A.
Peer[0].AllowedIPs : This is Endpoint A’s IP address inside the WireGuard VPN we’re building — replace this value with a suitable value for your network. With a Hub and Spoke topology, you’d typically choose a value for this address from the same block as the
Interface.Addressof the hub, as described above. And thisPeer.AllowedIPssetting for Endpoint A in the hub’s configuration file should match exactly theInterface.Addresssetting in Endpoint A’s configuration file (discussed in a following section).While you can configure multiple IP addresses for this setting, unless you have a special use-case, you should just use a single IP address (in the form of a
/32block with anIPv4address, or a/64block with an IPv6 address).Peer[1].PublicKey : This is Endpoint B’s public key — replace this value with the actual public key you generated for Endpoint B. This value is not secret; however, it is a globally-unique identifier for Endpoint B.
Peer[1].AllowedIPs : This is Endpoint B’s IP address inside the WireGuard VPN we’re building — replace this value with a suitable value for your network.
With a Hub and Spoke topology, you’d typically choose a value for this address from the same block as the
Interface.Addressof the hub, as described above. And thisPeer.AllowedIPssetting for Endpoint B in the hub’s configuration file should match exactly theInterface.Addresssetting in Endpoint B’s configuration file (discussed in a following section).While you can configure multiple IP addresses for this setting, unless you have a special use-case, you should just use a single IP address (in the form of a
/32block with an IPv4 address, or a/64block with an IPv6 address).But in our sample we want access to host
10.0.0.2/32(Host β) and192.168.200.0/24network.
Configure routing on Host C
For a Linux host, you need to turn on IP forwarding. There are a several ways to do this, but a convenient way with the wg-quick service we’ll use is to turn it on when the WireGuard interface is brought up. Update the /etc/wireguard/wg0.conf file on Host C to add an Interface.PreUp setting to it.
If you’re using IPv6 addresses for your WireGuard VPN, use this setting instead:
PreUp = sysctl -w net.ipv6.conf.all.forwarding=1
Note that IP forwarding is a potentially dangerous setting to turn on if you don’t have appropriate firewall rules in place in front of the host (or as part of the host’s own firewall) — with it on, the host will blindly try to forward on any packets it receives that are destined for other hosts (allowing a malicious actor with network access to the host to access any other hosts that the host itself can access).
Configure Wireguard on EndPoint A
On Endpoint A, we want to send all the traffic destined for the 10.0.0.0/24 and 192.168.200.0/24 networks through Host C. So those two address blocks are what we put in the AllowedIPs setting for Host C in Endpoint A’s WireGuard config:
# file: "/etc/wireguard/wg0.conf"

# local settings for Endpoint A
[Interface]
PrivateKey = xxxxxxxxxx<PrivateKey Endpoint A>xxxxxxxxxxx
Address = 10.0.0.1/32
ListenPort = 51821

# remote settings for Host C
[Peer]
PublicKey = jUd41n3XYa3yXBzyBvWqlLhYgRef5RiBD7jwo70U+Rw=
Endpoint = 192.0.2.3:51823
AllowedIPs = 10.0.0.0/24, 192.168.200.0/24
Set the file’s owner to root, and its permissions to 600 (owner can read+write; everyone else is denied access — the file contains the host’s private key, which must be kept secret).
- Interface.PrivateKey : replace this value with the actual private key you generated for Host A. This value is secret, and this is the only place where it should live.
- Interface.Address : This is Endpoint A’s IP address inside the WireGuard VPN we’re building — replace this value with a suitable value for your network.
Interface.ListenPort : This is Endpoint A’s WireGuard port. Endpoint A must be able to receive
UDPtraffic for established connections on this port from the Internet (or wherever the traffic from Host C comes from).If you omit this setting, WireGuard will select a new random, unused port in the in the operating system’s ephemeral port range (which may range from
1024to65535, depending on operating system) every time it starts up.- Peer.PublicKey : This is Host C’s public key — replace this value with the actual public key you generated for Host C. This value is not secret; however, it is a globally-unique identifier for Host C.
Peer.Endpoint : This is Host C’s publicly-facing IP address (and port) — the IP address and port Endpoint A will use to connect over the Internet to Host C to set up the WireGuard tunnel. Replace this value with the actual IP address that you would normally use to connect to Host C from Endpoint A (and suffix it with the actual WireGuard port you’ll use for Host C).
Host C must be able to accept new UDP connections from the Internet at this address and port; and Endpoint A must be able to send
UDPtraffic over the Internet to it at this address and port.Peer.AllowedIPs : This is the block of addresses that Host C will route for Endpoint A inside the WireGuard VPN we’re building — replace this value with a suitable value for your network.
In this scenario, we’re going to use the10.0.0.0/24and192.168.200.0/24block. Since we want Endpoint A to be able to connect to Endpoint B, it’s important that this block includes the IP address that we configured for Endpoint B in Host C’s WireGuard configuration, which was10.0.0.2.If Endpoint B was the only host we ever wanted to connect to from Endpoint A in this WireGuard VPN, we could just set the block to
10.0.0.2/32.
Configure Wireguard on EndPoint B (our LAN jump host)
And on Host β, we want to send all the traffic destined for the 10.0.0.0/24 network through Host C — so that’s what we use as the AllowedIPs setting for Host C in Host β’s WireGuard config:
# file: "/etc/wireguard/wg0.conf"

# local settings for Host β ()
[Interface]
PrivateKey = xxxxxxxxxx<PrivateKey Endpoint B>xxxxxxxxxxx
Address = 10.0.0.2/32
ListenPort = 51822

# IP forwarding
PreUp = sysctl -w net.ipv4.ip_forward=1
# IP masquerading
PreUp = iptables -t mangle -A PREROUTING -i wg0 -j MARK --set-mark 0x30
PreUp = iptables -t nat -A POSTROUTING ! -o wg0 -m mark --mark 0x30 -j MASQUERADE
PostDown = iptables -t mangle -D PREROUTING -i wg0 -j MARK --set-mark 0x30
PostDown = iptables -t nat -D POSTROUTING ! -o wg0 -m mark --mark 0x30 -j MASQUERADE

# remote settings for Host C
[Peer]
PublicKey = jUd41n3XYa3yXBzyBvWqlLhYgRef5RiBD7jwo70U+Rw=
Endpoint = 192.0.2.3:51823
AllowedIPs = 10.0.0.0/24
PersistentKeepalive = 25
Set the file’s owner to root, and its permissions to 600 (owner can read+write; everyone else is denied access — the file contains the host’s private key, which must be kept secret).
Interface.PrivateKey : This is Endpoint B’s private key — replace this value with the actual private key you generated for Endpoint B. This value is secret, and this is the only place where it should live.
Interface.Address : This is Endpoint B’s IP address inside the WireGuard VPN we’re building — replace this value with a suitable value for your network.
With a Hub and Spoke topology, this setting in Endpoint B’s configuration file should match exactly the Peer.AllowedIPs setting for Endpoint B in the hub’s configuration file (discussed in a previous section).Interface.ListenPort : This is Endpoint B’s WireGuard port. Endpoint B must be able to receive UDP traffic for established connections on this port from the Internet (or wherever the traffic from Host C comes from).
If you omit this setting, WireGuard will select a new random, unused port in the in the operating system’s ephemeral port range (which may range from 1024 to 65535, depending on operating system) every time it starts up.
Peer.PublicKey : This is Host C’s public key — replace this value with the actual public key you generated for Host C. This value is not secret; however, it is a globally-unique identifier for Host C.
Peer.Endpoint : This is Host C’s publicly-facing IP address (and port) — the IP address and port Endpoint B will use to connect over the Internet to Host C to set up the WireGuard tunnel. Replace this value with the actual IP address that you would normally use to connect to Host C from Endpoint B (and suffix it with the actual WireGuard port you’ll use for Host C).
Host C must be able to accept newUDPconnections from the Internet at this address and port; and Endpoint B must be able to sendUDPtraffic over the Internet to it at this address and port.Peer.AllowedIPs : This is the block of addresses that Host C will route for Endpoint B inside the WireGuard VPN we’re building — replace this value with a suitable value for your network.
In this scenario, we’re going to use the10.0.0.0/24block. Since we want Endpoint B to be able to connect back to Endpoint A, it’s important that this block includes the IP address that we configured for Endpoint A in Host C’s WireGuard configuration (discussed in a previous section), which was10.0.0.1. If Endpoint A was the only endpoint we ever wanted to connect to from Endpoint B in this WireGuard VPN, we could just set this block to10.0.0.1/32.Peer.PersistentKeepalive : This is the number of seconds between which WireGuard will send keepalive packets from Endpoint B to Host C. If set to a non-zero number, as soon as the WireGuard interface is brought up, WireGuard will start trying to send keepalive packets to Host C; if set to 0 (the default), WireGuard will not send any keepalive packets to Host C.
This mechanism proactively opens up a new connection through the firewalls between Endpoint B and Host C, and keeps it established, so that Host C will be able to forward Endpoint B arbitrary traffic (in the form of HTTP requests) from Endpoint A. Without this setting, the traffic initiated by Endpoint A and routed through Host C would be blocked by firewall rules that allow only established connections through to Endpoint B.
Also note that we’ve included some iptables rules in Host β’s WireGuard configuration. These iptables rules masquerade packets from the WireGuard network when Host β forwards them out to Site B. You can omit these rules if the LAN router (or each individual endpoint) at Site B is already configured to route traffic destined for the WireGuard network (10.0.0.0/24) back through Host β.
Start up WireGuard
On each host (Host C and Endpoint A and Endpoint B), start the wg-quick service. On Linux with systemd, run the following commands:
$ sudo systemctl enable wg-quick@wg0.service
$ sudo systemctl start wg-quick@wg0.service
On systems without systemd, run this command instead:
sudo wg-quick up /etc/wireguard/wg0.conf
Either way, starting up the wg-quick service will set up a WireGuard network interface named wg0 on the host, and configure some routing rules to route packets destined for any IP address listed in the Peer.AllowedIPs setting(s) of the /etc/wireguard/wg0.conf file to go out the wg0 interface.
Note that the name wg0 is just the standard convention for your first WireGuard interface. You can create as many WireGuard interfaces as you like, and name them however you like. For example, you could create another configuration file named /etc/wireguard/mytunnel.conf, and start it up with the command wg-quick up /etc/wireguard/mytunnel.conf; this would create a new WireGuard interface named mytunnel.
But for now, if you ran wg-quick up directly on Host C, you’ll see output like the following:
$ sudo wg-quick up /etc/wireguard/wg0.conf
[#] sysctl -w net.ipv4.ip_forward=1
net.ipv4.ip_forward = 1
[#] ip link add wg0 type wireguard
[#] wg setconf wg0 /dev/fd/63
[#] ip -4 address add 10.0.0.3/32 dev wg0
[#] ip link set mtu 8921 up dev wg0
[#] ip -4 route add 10.0.0.2/32 dev wg0
[#] ip -4 route add 10.0.0.1/32 dev wg0
The output shows the routing rules that wg-quick set up for you automatically.
If you ran systemctl start instead, you can see the same output by running the journalctl tool, like so:
$ journalctl -u wg-quick@wg0.service
systemd[1]: Starting WireGuard via wg-quick(8) for wg0...
wg-quick[38161]: [#] sysctl -w net.ipv4.ip_forward=1
wg-quick[38228]: net.ipv4.ip_forward = 1
wg-quick[38161]: [#] ip link add wg0 type wireguard
wg-quick[38161]: [#] wg setconf wg0 /dev/fd/63
wg-quick[38161]: [#] ip -4 address add 10.0.0.3/32 dev wg0
wg-quick[38161]: [#] ip link set mtu 8921 up dev wg0
wg-quick[38161]: [#] ip -4 route add 10.0.0.2/32 dev wg0
wg-quick[38161]: [#] ip -4 route add 10.0.0.1/32 dev wg0
systemd[1]: Started WireGuard via wg-quick(8) for wg0.
TIPS : Set up WireGuard server heakth Check in Pyton
Once you’ve set up the WireGuard servers, we can need to add a health-check service to each. This service will validate the health of each server in response to periodic queries
The simplest way to implement a health-check service for WireGuard is via a simple HTTP server that responds with a 200-399 HTTP status code (and some content) when the WireGuard interface is up, and a 400-599 code when the WireGuard interface is down.
This short wg-health-check.py Python script will do the trick:
#!/usr/bin/env python3
# -*- coding: utf-8 -*-

from http.server import HTTPServer, BaseHTTPRequestHandler
from optparse import OptionParser
from os import popen

class HealthCheck(BaseHTTPRequestHandler):

    def do_GET(self):
        if check(self.server.device):
            self.send_response(200)
            self.send_header("Content-Type", "text/plain")
            self.end_headers()
            self.wfile.write(b"healthy\n")
        else:
            self.send_error(404)

    def do_HEAD(self):
        self.do_GET()

def check(device):
    return popen("ip link show %s up " % device).read() != ""

def test(device):
    if check(device):
        print("%s up" % device)
    else:
        print("%s down" % device)

def main(port, device):
    server = HTTPServer(('', port), HealthCheck)
    server.device = device
    server.serve_forever()

def opts():
    parser = OptionParser(
            description="HTTP server that sends 204 response when device is up.")
    parser.add_option("-d", "--device", dest="device", default="wg0",
            help="device name to check (default wg0)")
    parser.add_option("-p", "--port", dest="port", default=8080, type="int",
            help="port on which to listen (default 8080)")
    parser.add_option("-t", "--test", action="store_true", dest="test", default=False,
            help="show status and exit")
    return parser.parse_args()[0]

if __name__ == "__main__":
    options = opts()
    if options.test:
        test(options.device)
    else:
        main(options.port, options.device)
It runs a simple HTTP server that responds with a 200 (OK) status code when the configured WireGuard interface is up, and a 404 (Not Found) status code when it is down.
You can configure the interface it checks via the --device flag, and the port on which it listens via the --port flag. For example, to check the wg1 interface, and listen on the port 8000, run it like this:
Copy the script to each WireGuard server, and place it in the /usr/local/bin directory:
$ scp wg-health-check.py <user>@<server DNS name | IP>:.
$ ssh <user>@<server DNS name | IP>:.

$ chmod +x wg-health-check.py
$ sudo mv wg-health-check.py /usr/local/bin/.
If you run the script with the --test flag, you should see it output wg0 up:
$ wg-health-check.py --test
wg0 up
The defaults are to check the wg0 interface, and listen on port 8080.
We can have systemd run this script as a service on startup; create the following systemd service unit at /etc/systemd/system/wg-health-check.service on each WireGuard server:
# file: "/etc/systemd/system/wg-health-check.service"
[Unit]
Description=WireGuard health-check HTTP server
After=network-online.target

[Service]
Type=simple
User=nobody
ExecStart=/usr/local/bin/wg-health-check.py --device=wg0 --port=8080
Restart=always

[Install]
WantedBy=default.target
And enable the service with the following commands:
$ sudo systemctl enable wg-health-check.service
$ sudo systemctl start wg-health-check.service
You can check the output of the service with curl:
$ curl -I localhost:8080
HTTP/1.0 200 OK
Server: BaseHTTP/0.3 Python/2.7.18
Date: Fri, 05 Feb 2021 23:58:04 GMT
Content-Type: text/plain
And check the service’s logs with journalctl:
$ journalctl -u wg-health-check.service
-- Logs begin at Fri 2023-02-01 22:09:31 UTC. --
Feb 01 22:37:19 ip-xxx-xxx-xxx-xxx systemd[1]: Started WireGuard health-check server.
Feb 01 22:37:19 ip-xxx-xxx-xxx-xxx systemd[1]: Starting WireGuard health-check server...
Feb 01 22:38:04 ip-xxx-xxx-xxx-xxx wg-health-check.py[3024]: 127.0.0.1 - - [01/Feb/2023 22:38:04] "HEAD / HTTP/1.1" 200 -