Secure Access to your private network with Cloudflare© tunnel and Warp

When Cloudflare announced that their Tunnel service would become free, I saw an opportunity to strengthen the security of my private network. By using Cloudflare Tunnels together with Cloudflare WARP, you could close to your network router ports and access your entire private network in safer. Here’s how do it …
Ricardo Gomez Angel©
- The setup
- Step 1: Install “cloudflared” on your network
- Step 2: Setting up a Cloudflare Tunnel on the Raspberry Pi
- Step 3: Configure your Cloudflare Team
- Step 4: Configure your devices and Setup WARP application
- Step 5: configure split-tunnel
- All done!
- TIPS
- References
The setup
The idea of Cloudflare Tunnels is simple: connect your home network to Cloudflare’s network. Then use Cloudflare WARP to connect your devices to Cloudflare’s network and let it route traffic to your home.

Cloudflare WARP is an interesting service. It’s essentially a free VPN that protects your internet traffic by routing it through Cloudflare’s network. However, it has a killer feature: split-tunnels.
Normally, when you connect to a VPN server, all your internet traffic flows through that server. That means that your internet speed will depend on the connection speed of that server. Hosting a VPN server at home means your connection becomes as slow as your home’s upload speed, which is usually very slow. WARP will only send local traffic to your home. Your regular internet traffic stays blazing fast.
To follow along with this post, you’ll need:
- A Cloudflare and Cloudflare Teams account (both free)
- A small server or computer that’s always running on your home network
Step 1: Install “cloudflared” on your network
To install cloudflared, follow [Cloudflare’s documentation]. I installed it inside my Raspberry Pi server which required an additional dependency :
a. Our first task is to perform an update of the package list as well as upgrade any out-of-date packages.
  sudo apt update
  sudo apt upgrade
b. Once the update completes, we must ensure we have both the curl and lsb-release packages.
Install both of these packages by using the command below in the terminal.
apt install curl lsb-release
curl– We will use curl to grab the GPG key for the Cloudflared repository.lsb-release– This package allows us to easily retrieve information about the system, such as the release name.
c. With all the required packages in place, we can finally grab the GPG key for the cloudflared repository and store it on Raspberry Pi.
To save this key to your device, use the following command.
curl -L https://pkg.cloudflare.com/cloudflare-main.gpg | sudo tee /usr/share/keyrings/cloudflare-archive-keyring.gpg >/dev/null
A GPG key is crucial to verify the packages we are installing are valid and belong to the repository.
d. With the GPG key saved into our keyrings folder, our next step is to add the Cloudflared repository to our Raspberry Pi. You can add
echo "deb [signed-by=/usr/share/keyrings/cloudflare-archive-keyring.gpg] https://pkg.cloudflare.com/cloudflared $(lsb_release -cs) main" | sudo tee /etc/apt/sources.list.d/cloudflared.list
e. As we have made changes to the available repositories, we will need to perform another update of the package list cache,
You can update this cache by using the following command within the terminal.
apt update
f. With the repository added, we can now proceed to install the Cloudflared package to our Raspberry Pi. To connect a private network to Cloudflare, a daemon must run on a computer inside that network. Here, that’s cloudflared and it will open a tunnel from within your network, so no ports have to be opened.
apt install cloudflared
Reading package lists... Done
Building dependency tree... Done
Reading state information... Done
The following NEW packages will be installed:
  cloudflared
0 upgraded, 1 newly installed, 0 to remove and 0 not upgraded.
Need to get 15.8 MB of archives.
After this operation, 32.0 MB of additional disk space will be used.
Get:1 https://pkg.cloudflare.com/cloudflared bullseye/main armhf cloudflared armhf 2022.12.0 [15.8 MB]
Fetched 15.8 MB in 3s (6,044 kB/s)
Selecting previously unselected package cloudflared.
(Reading database ... 56598 files and directories currently installed.)
Preparing to unpack .../cloudflared_2022.12.0_armhf.deb ...
Unpacking cloudflared (2022.12.0) ...
Setting up cloudflared (2022.12.0) ...
Processing triggers for man-db (2.9.4-2) ...
Scanning processes...
Scanning processor microcode...
Scanning linux images...
No services need to be restarted.

No containers need to be restarted.

No user sessions are running outdated binaries.
g. You can install cloudflared as a system service on Linux and Windows, and as a launch agent on macOS (here more information). In most cases, I recommend running cloudflared as a service. Running as a service helps ensure the availability of cloudflared to your origin by allowing the program to start at boot and continue running while your origin is online.
cloudflared service install
2022-12-22T06:04:36Z INF Using Systemd
2022-12-22T06:04:39Z INF Linux service for cloudflared installed successfully
systemctl start cloudflared.service
systemctl status cloudflared.service
● cloudflared.service - cloudflared
     Loaded: loaded (/etc/systemd/system/cloudflared.service; enabled; vendor preset: enabled)
     Active: active (running) since Thu 2022-12-22 07:14:57 CET; 36s ago
   Main PID: 20427 (cloudflared)
      Tasks: 10 (limit: 4915)
     Memory: 12.4M
        CPU: 790ms
     CGroup: /system.slice/cloudflared.service
             └─20427 /usr/bin/cloudflared --no-autoupdate --config /etc/cloudflared/config.yml tunnel run

Dec 22 07:14:57 r5d4 cloudflared[20427]: 2022-12-22T06:14:57Z INF ICMP proxy will use :: as source for IPv6
Dec 22 07:14:57 r5d4 cloudflared[20427]: 2022-12-22T06:14:57Z WRN The user running cloudflared process has a GID (group ID) that is not within ping_group_range. You might need to add that user to a group within that range, or instead update t>
Dec 22 07:14:57 r5d4 cloudflared[20427]: 2022-12-22T06:14:57Z WRN ICMP proxy feature is disabled error="cannot create ICMPv4 proxy: Group ID 0 is not between ping group 1 to 0 nor ICMPv6 proxy: socket: address family not supported by protocol"
Dec 22 07:14:57 r5d4 cloudflared[20427]: 2022-12-22T06:14:57Z INF Warp-routing is enabled
Dec 22 07:14:57 r5d4 cloudflared[20427]: 2022-12-22T06:14:57Z INF Starting metrics server on 127.0.0.1:38887/metrics
Dec 22 07:14:57 r5d4 cloudflared[20427]: 2022-12-22T06:14:57Z INF Connection 574dcf81-96a8-44a1-95d7-193ae4484de0 registered with protocol: quic connIndex=0 ip=198.41.200.193 location=FCO
Dec 22 07:14:57 r5d4 systemd[1]: Started cloudflared.
Dec 22 07:14:58 r5d4 cloudflared[20427]: 2022-12-22T06:14:58Z INF Connection 89634caa-0985-488a-94c7-31d029497a11 registered with protocol: quic connIndex=1 ip=198.41.192.227 location=FRA
Dec 22 07:14:59 r5d4 cloudflared[20427]: 2022-12-22T06:14:59Z INF Connection ece85529-bc68-4104-86d8-082c9ddd9041 registered with protocol: quic connIndex=2 ip=198.41.200.13 location=BRU
Dec 22 07:15:00 r5d4 cloudflared[20427]: 2022-12-22T06:15:00Z INF Connection c6f3660a-a374-4629-a9f2-a3c3bffb3715 registered with protocol: quic connIndex=3 ip=198.41.192.27 location=FRA
Step 2: Setting up a Cloudflare Tunnel on the Raspberry Pi
Now that we have prepared our Raspberry Pi, we can set up the Cloudflare tunnel. This tunnel is where your traffic will be run over
a. Our first step is to create an association between our Raspberry Pi and the Cloudflare service.
We can begin authenticating with the Cloudflare service by using the command below.
cloudflared tunnel login
Ensure you keep Cloudflared open on your device while this process is completed.
You will want to go to the URL displayed in the message and use it to log in to your Cloudflare account.
Please open the following URL and log in with your Cloudflare account:

https://dash.cloudflare.com/argotunnel?callback=https%3A%2F%2Flogin.cloudflareaccess.org%2FaVJJYsizC0E3vLHDu0W73tkSo_Erati7aML29z6HPio%3D

Leave cloudflared running to download the cert automatically.
Because we run cloudflared in console, we need to copy provided URL, and paste it into web browser, after log in, we need to choose domain we own to use.
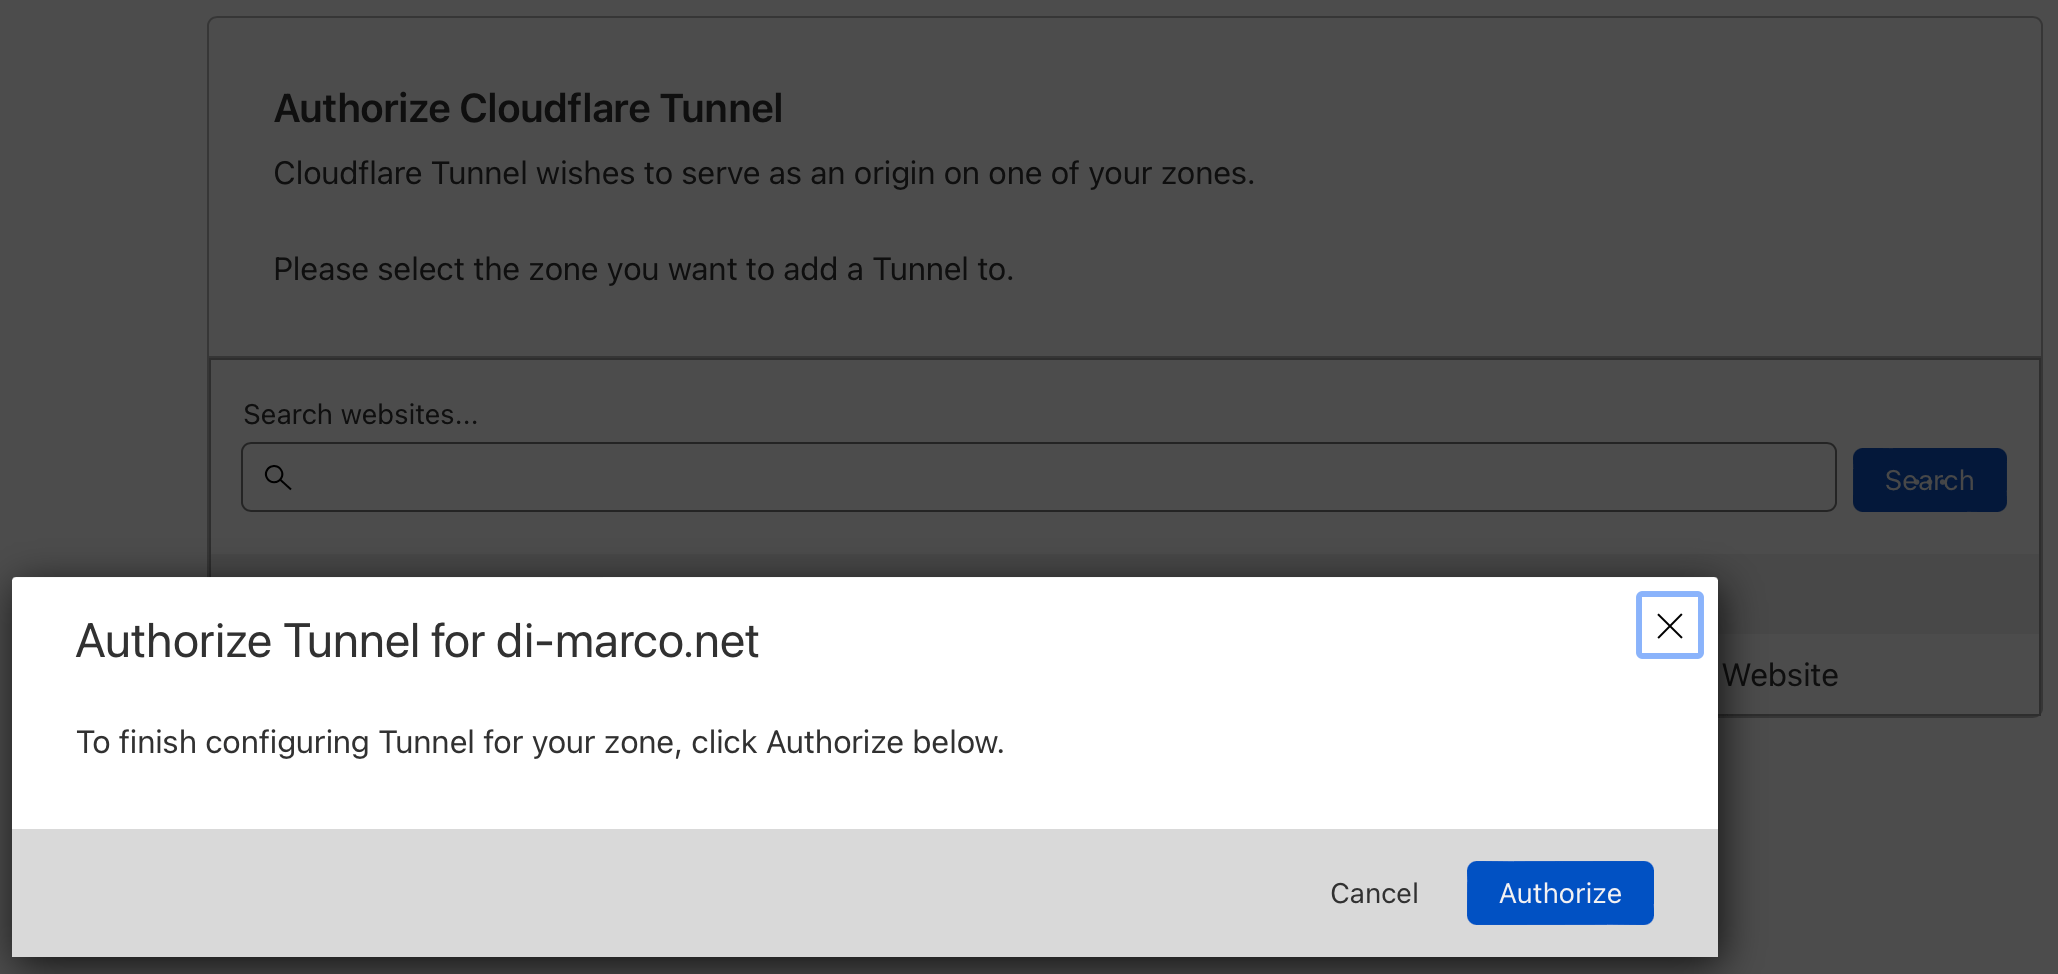
Once your Raspberry Pi is successfully authenticated with the Cloudflare service, you will see the following message.
2022-12-20T10:42:05Z INF Waiting for login...
You have successfully logged in.
If you wish to copy your credentials to a server, they have been saved to:
/root/.cloudflared/cert.pem
We see on the terminal, that cloudflared downloaded certificate (in /root/.cloudflared/cert.pem) which will be used for authenticate tunnel connection to the Cloudflare data center.
c. Now, is time to create our tunnel, create it just by typing cloudflare tunnel create <tunel-name>, you will get unique tunnel ID in return, which will be needed later on:
cloudflared tunnel create n0d3-VPC-r5d4
Tunnel credentials written to /root/.cloudflared/6dxxxx1a-xxxx-4xx4-axx1-c37xxxxa04f1.json. `cloudflared` chose this file based on where your origin certificate was found. Keep this file secret. To revoke these credentials, delete the tunnel.

Created tunnel n0d3-VPC-r5d4 with id 6dxxxx1a-xxxx-4xx4-axx1-c37xxxxa04f1
cat /root/.cloudflared/6dxxxx1a-xxxx-4xx4-axx1-c37xxxxa04f1.json
{"AccountTag":"xxxxxxxxxxxxxxxxxxxxxxxxxxxxxxxx","TunnelSecret":"xxxxxxxxxxxxxxxxxxxxxxxxxxxxxxxx=","TunnelID":"6dxxxx1a-xxxx-4xx4-axx1-c37xxxxa04f1"}
If there is need to list created tunnels and its ID, just type in cloudflared tunnel list
cloudflared tunnel list
You can obtain more detailed information for each tunnel with `cloudflared tunnel info <name/uuid>`
ID                                   NAME                CREATED              CONNECTIONS
6dxxxx1a-xxxx-4xx4-axx1-c37xxxxa04f1 n0d3-VPC-r5d4       2022-12-20T11:23:03Z
cloudflared tunnel info 6d99241a-9e35-4034-ab51-c372504a04f1
NAME:     n0d3-VPC-r5d4
ID:       6dxxxx1a-xxxx-4xx4-axx1-c37xxxxa04f1
CREATED:  2022-12-20 11:23:03.584708 +0000 UTC

CONNECTOR ID                         CREATED              ARCHITECTURE VERSION   ORIGIN IP      EDGE
xxxx43xx-xxxx-xxxx-xxxx-xxxx6b29d3xx 2022-12-22T06:14:57Z linux_arm    2022.12.1 145.224.77.102 1xBRU, 1xFCO, 2xFRA
d. We reach to the most important part in this section. To be able route packet through tunnel for private network ranges we need:
- First, create Cloudflare Gateway and modify policies - which we have done already
- Second, add routing for our home, private network range, which we will do it now
Replace network range with you own.
Example below, tels Cloudflare that if you see packet from 192.168.xx.0/24 network, route them through tunnel ID 6dxxxx1a-xxxx-4xx4-axx1-c37xxxxa04f1.
cloudflared tunnel route ip add 192.168.xx.0/24 6dxxxx1a-xxxx-4xx4-axx1-c37xxxxa04f1
Successfully added route for 192.168.xx.0/24 over tunnel 6dxxxx1a-xxxx-4xx4-axx1-c37xxxxa04f1
To check, which routes was defined, just type cloudflared tunnel route ip show
cloudflared tunnel route ip show
NETWORK         VIRTUAL NET ID                       COMMENT TUNNEL ID                            TUNNEL NAME   CREATED              DELETED
192.168.0.0/24     x3xxxx19-3xx7-4xx7-8xxe-451cxxxx16xx         6dxxxx1a-xxxx-4xx4-axx1-c37xxxxa04f1 n0d3-VPC-r5d4 2022-12-20T11:26:01Z -
192.168.42.0/24    x3xxxx19-3xx7-4xx7-8xxe-451cxxxx16xx         6dxxxx1a-xxxx-4xx4-axx1-c37xxxxa04f1 n0d3-VPC-r5d4 2022-12-21T15:21:38Z -
e. Last step, which need to be done on the Raspberry Pi is create config file, where we gather all needed configuration to run the cloudflared tunnel.
To establish tunnel, we need to pass tunnel ID, which cloudflared should run and credentials to it - we got it before, while creating tunnel above.
# file: "/root/.cloudflared/config.yml"
cat /root/.cloudflared/config.yml
# file: "/root/.cloudflared/config.yml"
tunnel: 6dxxxx1a-xxxx-4xx4-axx1-c37xxxxa04f1
credentials-file: /root/.cloudflared/6dxxxx1a-xxxx-4xx4-axx1-c37xxxxa04f1.json

warp-routing:
  enabled: true
Do not forget, to add warp-routing section, it is super important, it enable us connect from WARP application on the end device to our Raspberry Pi via tunnel.
Time to run it!
cloudflared tunnel run
2022-12-20T11:31:22Z INF Starting tunnel tunnelID=6dxxxx1a-xxxx-4xx4-axx1-c37xxxxa04f1
2022-12-20T11:31:22Z INF Version 2022.12.0
2022-12-20T11:31:22Z INF GOOS: linux, GOVersion: go1.19.3, GoArch: arm
2022-12-20T11:31:22Z INF Settings: map[cred-file:/root/.cloudflared/6dxxxx1a-xxxx-4xx4-axx1-c37xxxxa04f1.json credentials-file:/root/.cloudflared/6dxxxx1a-xxxx-4xx4-axx1-c37xxxxa04f1.json]
2022-12-20T11:31:22Z INF cloudflared will not automatically update if installed by a package manager.
2022-12-20T11:31:22Z INF Generated Connector ID: a6eeae1e-43d8-4c7e-8bbc-e8aeec0a1fe2
2022-12-20T11:31:22Z INF Initial protocol quic
2022-12-20T11:31:22Z INF ICMP proxy will use 192.168.xx.xx as source for IPv4
2022-12-20T11:31:22Z INF ICMP proxy will use :: as source for IPv6
2022-12-20T11:31:22Z WRN The user running cloudflared process has a GID (group ID) that is not within ping_group_range. You might need to add that user to a group within that range, or instead update the range to encompass a group the user is already in by modifying /proc/sys/net/ipv4/ping_group_range. Otherwise cloudflared will not be able to ping this network error="Group ID 1001 is not between ping group 1 to 0"
2022-12-20T11:31:22Z WRN ICMP proxy feature is disabled error="cannot create ICMPv4 proxy: Group ID 1001 is not between ping group 1 to 0 nor ICMPv6 proxy: socket: address family not supported by protocol"
2022-12-20T11:31:22Z INF Warp-routing is enabled
2022-12-20T11:31:22Z INF Starting metrics server on 127.0.0.1:46821/metrics
2022-12-20T11:31:24Z INF Connection 57eee334-xxxx-xxxx-xxxx-6fb2xxxxe166 registered with protocol: quic connIndex=0 ip=198.41.xxx.227 location=FRA
2022-12-20T11:31:24Z INF Connection 7ef09f14-xxxx-xxxx-xxxx-5889xxxx66b6 registered with protocol: quic connIndex=1 ip=198.41.xxx.23 location=FCO
2022-12-20T11:31:25Z INF Connection 9aac100b-xxxx-xxxx-xxxx-3992xxxx46bc registered with protocol: quic connIndex=2 ip=198.41.xxx.167 location=FRA
2022-12-20T11:31:26Z INF Connection fa9a5353-xxxx-xxxx-xxxx-33b5xxxx77bd registered with protocol: quic connIndex=3 ip=198.41.xxx.113 location=BRU
or with
systemctl start cloudflared.service
And check with :
systemctl status cloudflared.service
● cloudflared.service - cloudflared
     Loaded: loaded (/etc/systemd/system/cloudflared.service; enabled; vendor preset: enabled)
     Active: active (running) since Thu 2022-12-22 07:14:57 CET; 2h 52min ago
   Main PID: 20427 (cloudflared)
      Tasks: 10 (limit: 4915)
     Memory: 11.4M
        CPU: 1min 8.482s
     CGroup: /system.slice/cloudflared.service
             └─20427 /usr/bin/cloudflared --no-autoupdate --config /etc/cloudflared/config.yml tunnel run

Dec 22 07:14:57 r5d4 cloudflared[20427]: 2022-12-22T06:14:57Z INF ICMP proxy will use :: as source for IPv6
Dec 22 07:14:57 r5d4 cloudflared[20427]: 2022-12-22T06:14:57Z WRN The user running cloudflared process has a GID (group ID) that is not within ping_group_range. You might need to add that user to a group within that range, or instead update t>
Dec 22 07:14:57 r5d4 cloudflared[20427]: 2022-12-22T06:14:57Z WRN ICMP proxy feature is disabled error="cannot create ICMPv4 proxy: Group ID 0 is not between ping group 1 to 0 nor ICMPv6 proxy: socket: address family not supported by protocol"
Dec 22 07:14:57 r5d4 cloudflared[20427]: 2022-12-22T06:14:57Z INF Warp-routing is enabled
Dec 22 07:14:57 r5d4 cloudflared[20427]: 2022-12-22T06:14:57Z INF Starting metrics server on 127.0.0.1:38887/metrics
Dec 22 07:14:57 r5d4 cloudflared[20427]: 2022-12-22T06:14:57Z INF Connection 57eee334-xxxx-xxxx-xxxx-6fb2xxxxe166 registered with protocol: quic connIndex=0 ip=198.41.xxx.193 location=FCO
Dec 22 07:14:57 r5d4 systemd[1]: Started cloudflared.
Dec 22 07:14:58 r5d4 cloudflared[20427]: 2022-12-22T06:14:58Z INF Connection 7ef09f14-xxxx-xxxx-xxxx-5889xxxx66b6 registered with protocol: quic connIndex=1 ip=198.41.xxx.227 location=FRA
Dec 22 07:14:59 r5d4 cloudflared[20427]: 2022-12-22T06:14:59Z INF Connection 9aac100b-xxxx-xxxx-xxxx-3992xxxx46bc registered with protocol: quic connIndex=2 ip=198.41.xxx.13 location=BRU
Dec 22 07:15:00 r5d4 cloudflared[20427]: 2022-12-22T06:15:00Z INF Connection fa9a5353-xxxx-xxxx-xxxx-33b5xxxx77bd registered with protocol: quic connIndex=3 ip=198.41.xxx.27 location=FRA
As of quic-go v0.19.x, you might see warnings about the receive buffer size.
It is recommended to increase the maximum buffer size by running:
sudo sysctl -w net.core.rmem_max=2500000
This command would increase the maximum receive buffer size to roughly 2.5 MB.
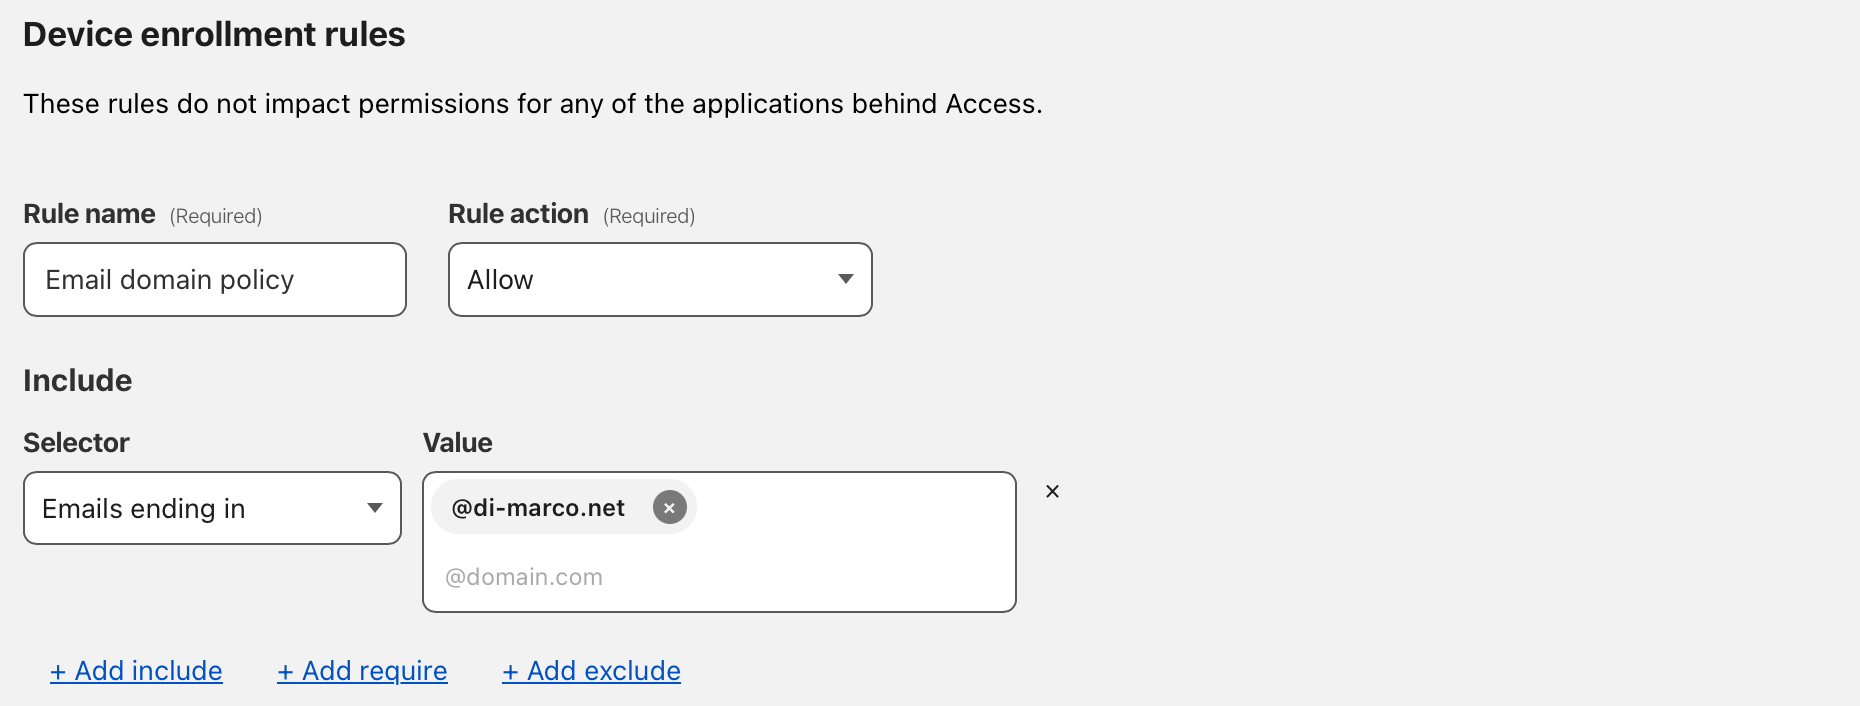
Step 3: Configure your Cloudflare Team
Next, you need to make sure that not everyone can login to your Cloudflare Team. You’ll need to add some restrictions.
Here you can create a rule that only allows people with a certain email address to access your Cloudflare Team and the tunnels assigned to it. I whitelisted everyone with an @di-marco.net address:
Head over the Cloudflare Teams Dashboard > Settings > WARP Client > Device enrollment and click on “Manage”:
Step 4: Configure your devices and Setup WARP application
Now we need to install WARP application (download it) on our devices, which enable them to connect/ route traffic to your private network.
Start by installing Cloudflare WARP on your devices. The app acts as a free VPN service and protects your internet traffic on untrusted networks. However, we want to use it to access our tunnel.
To do that, open WARP’s preferences, go to “Account” and click “Login with Cloudflare for Teams”.
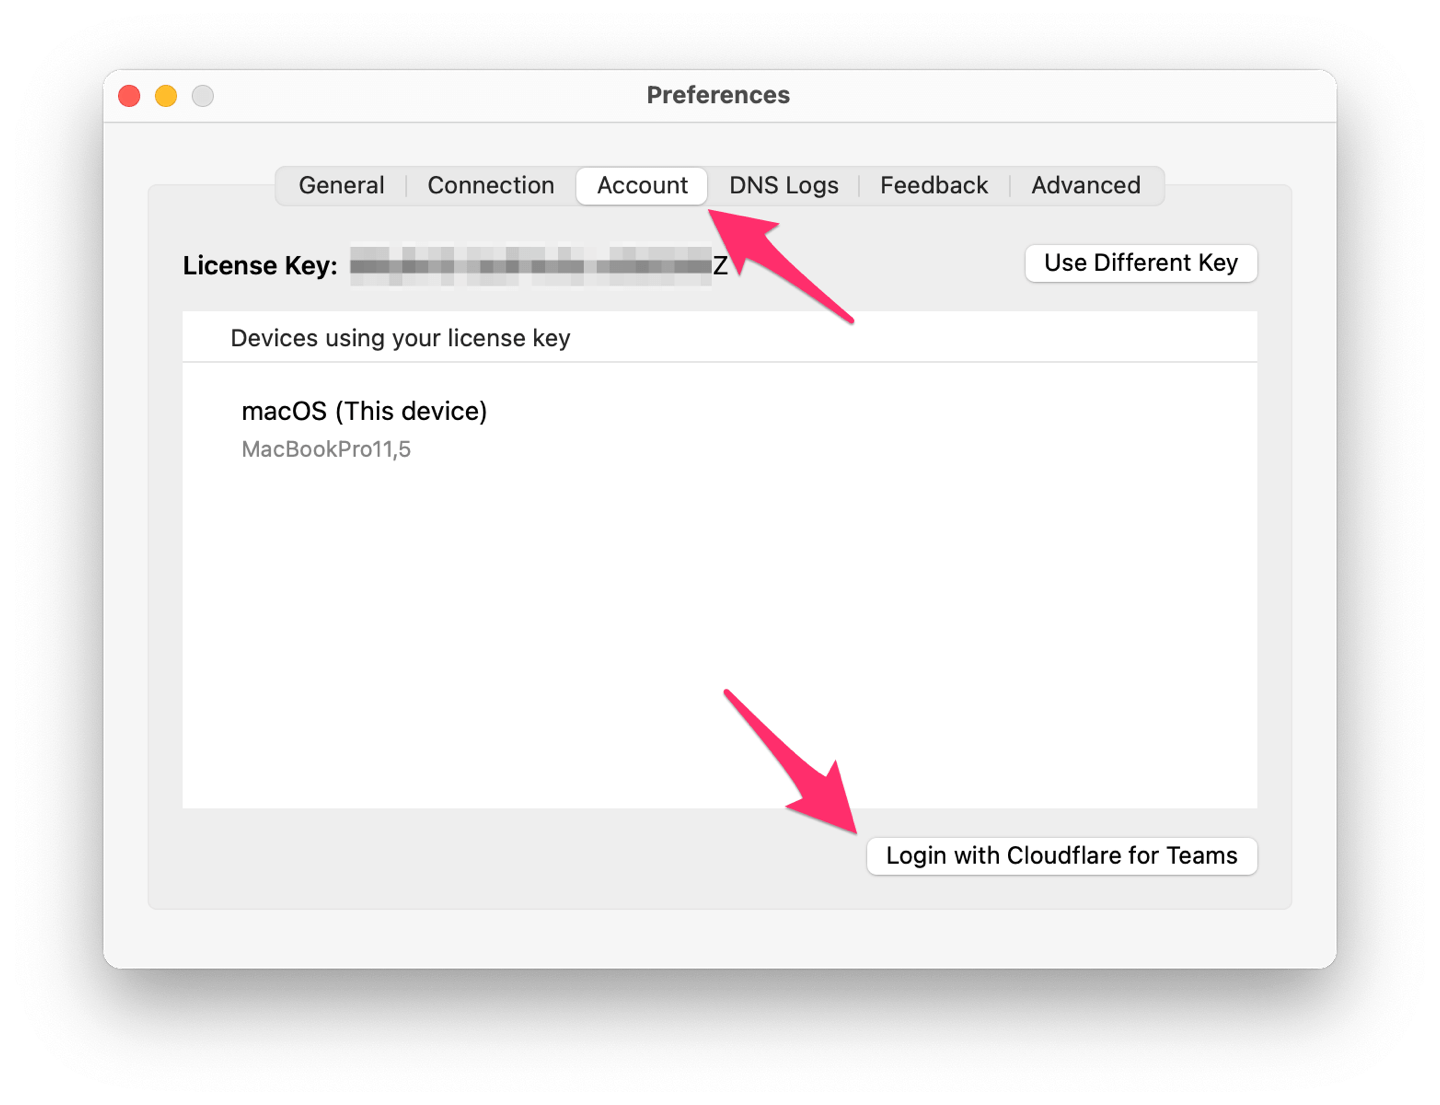
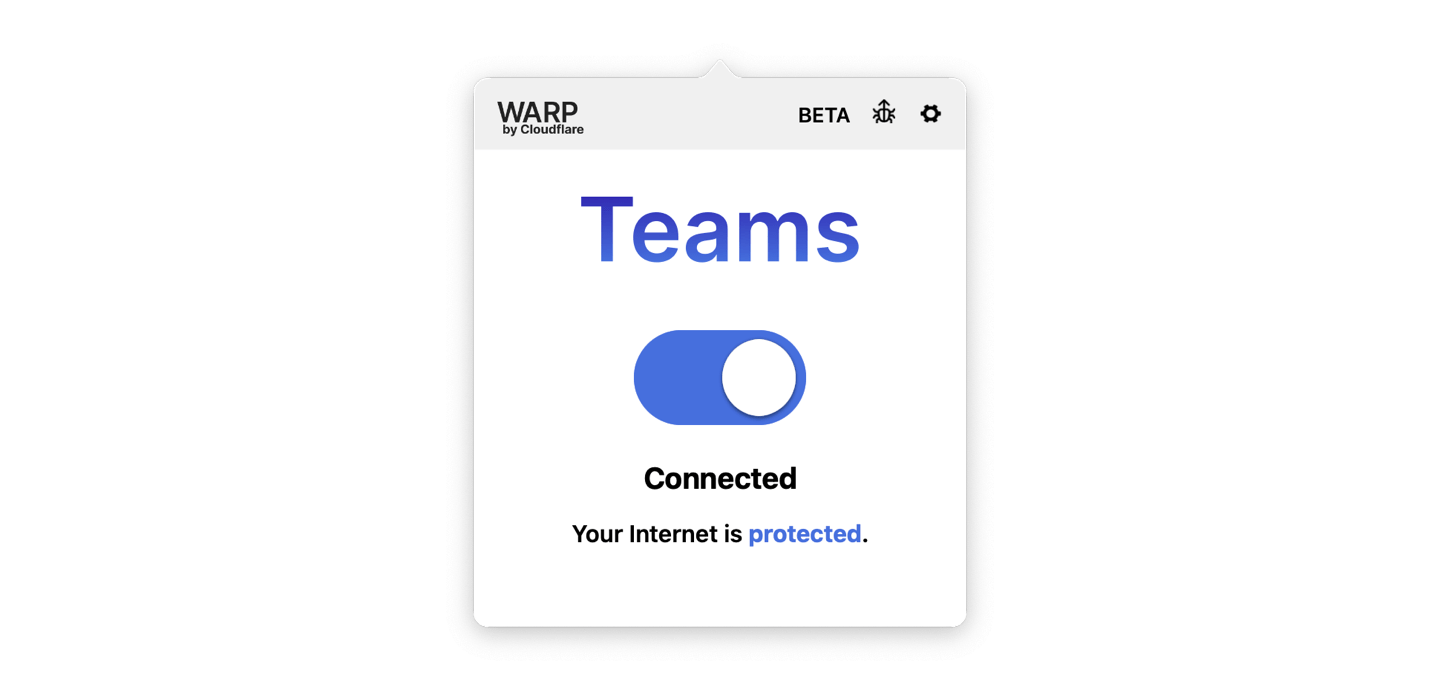
Login with your Cloudflare Teams account and afterwards, the WARP client will show that you’re part of a team:
Step 5: configure split-tunnel
Last step is to configure WARP’s “split-tunnel” feature. By default, WARP will exclude traffic to local IP addresses, meaning it will not route these requests to your private network.
To manage this, go to Cloudflare Teams Dashboard > Settings > WARP Client > Device settings > Configure settings > Split tunnels. Make sure that your home network is not in the list. For me, that meant removing the good entry (for example 192.168.0.0/16 if it range of your home network).
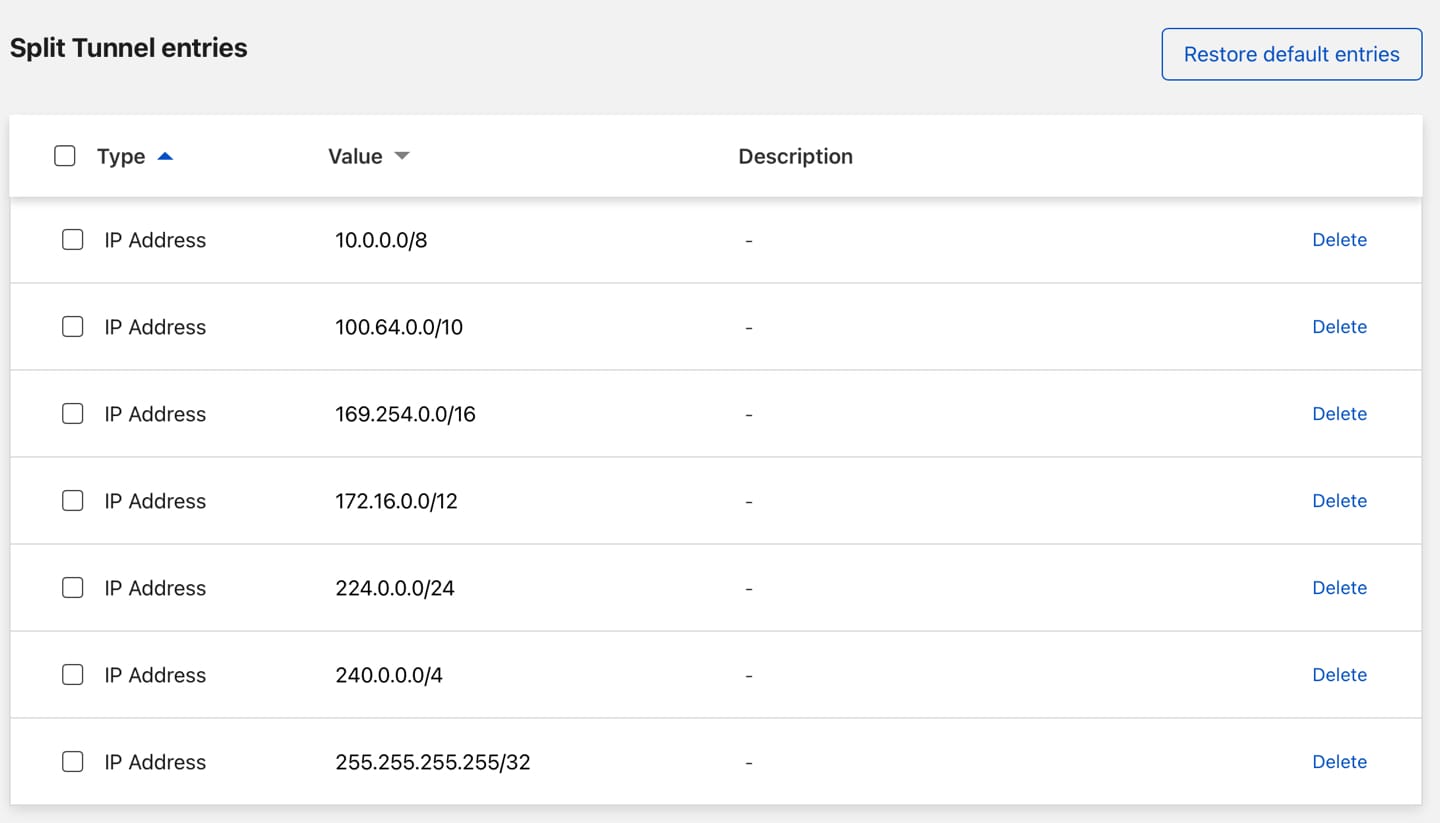
Make sure that your home network range isn’t listed here. Otherwise it won’t be routed over the tunnel.
That’s it! Go back to the WARP client on your device and let it connect to Cloudflare. Once connected, you should be able to access your home network and all services running inside it. Regardless of where you are!
All done!
So now you have…
- A free VPN-service to protect your internet traffic on untrusted networks (which automatically turns on and off)
- A way to (securely) access your entire home network without opening ports
Some people might disagree with the “secure” part and say that Cloudflare shouldn’t be trusted.
TIPS
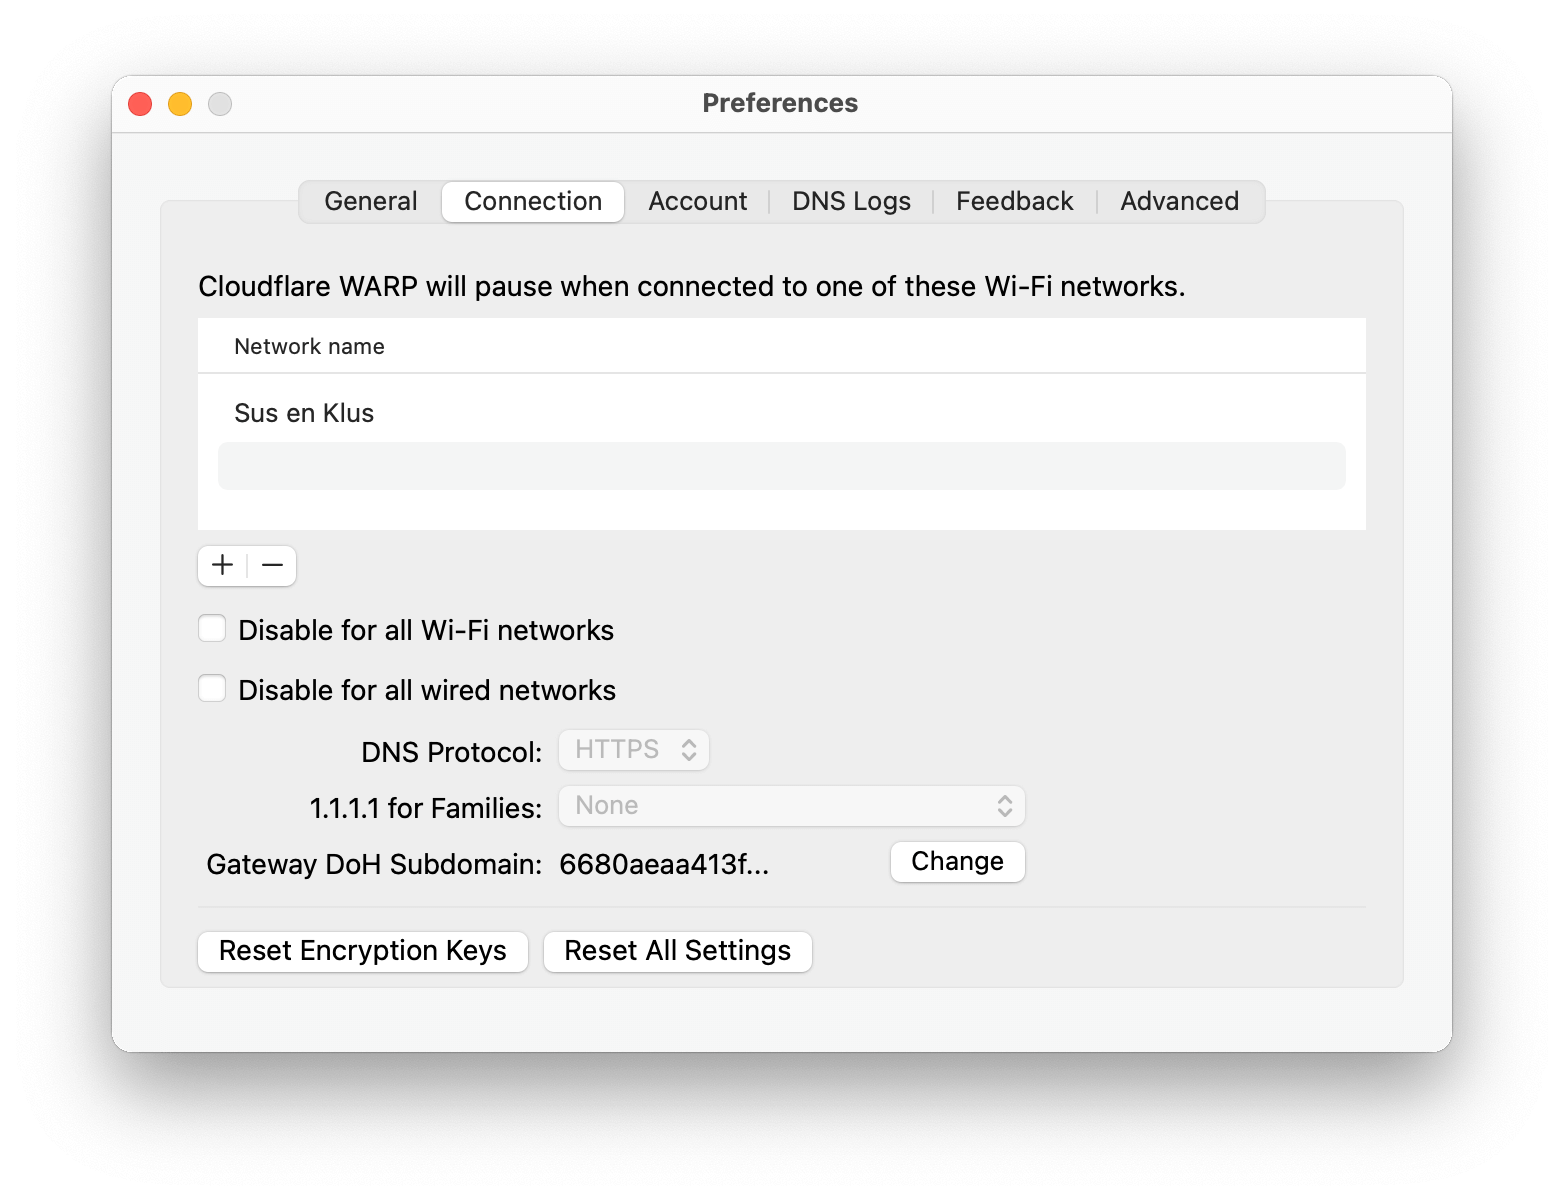
Tips : Automatically connect to WARP
You can even configure WARP to activate itself when you’re connected to an unknown Wi-Fi network.
In the preferences, you can list your trusted Wi-Fi networks. When you’re connected to these, WARP will deactivate itself. Connect to a Wi-Fi hotspot and WARP will automatically protect your traffic and give you access to your home network.
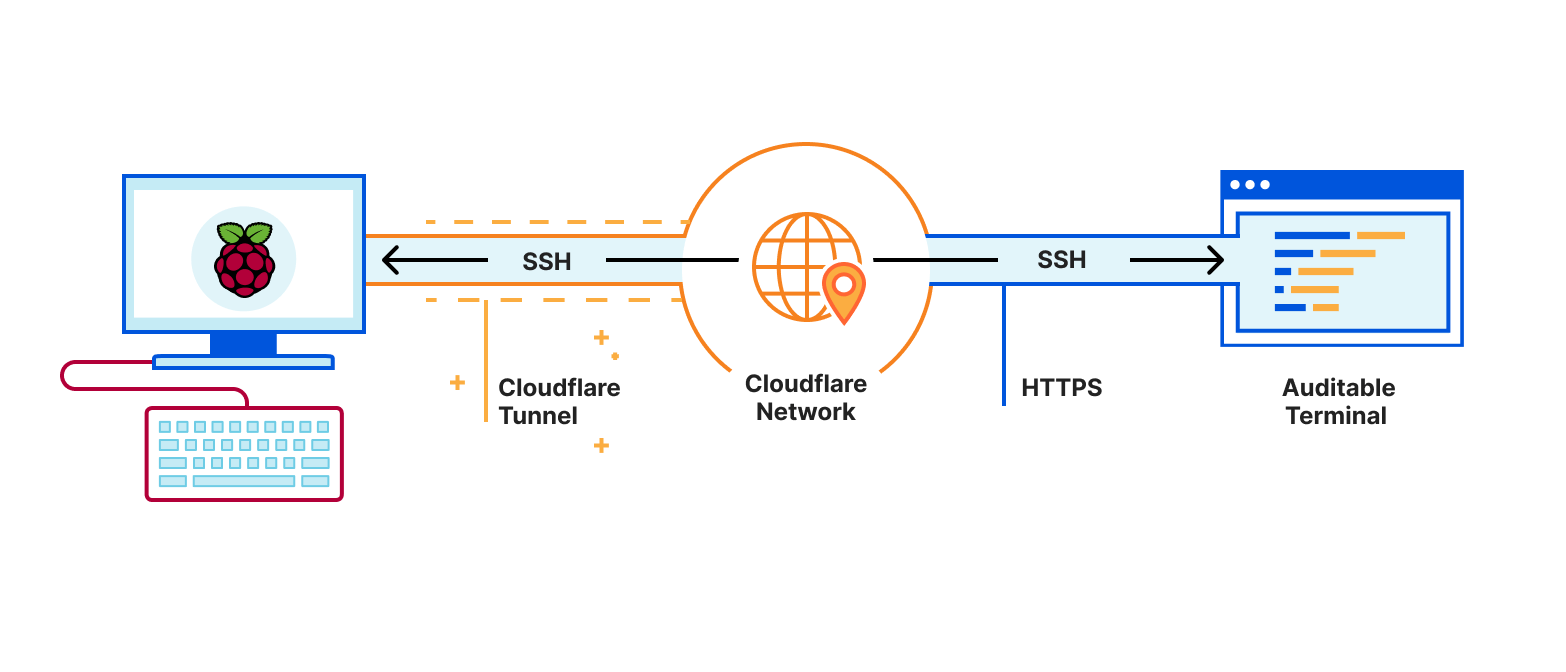
Tips : SSHing from a browser, with Cloudflare Tunnel and Auditable Terminal
Auditable Terminal gives you a fully featured SSH client in your browser. You authenticate using Cloudflare Access and can log into a computer from anywhere just using the browser and get a terminal. And using Cloudflare Tunnel you can securely connect a computer to Cloudflare without punching holes in a firewall. And you end up with a consistent terminal experience across devices: 256 colours, Unicode support and the same fonts everywhere.
To expose a local web service, edit your config.yml file and add an ingress section:
# file: "/root/.cloudflared/config.yml"
cat /root/.cloudflared/config.yml
# file: "/root/.cloudflared/config.yml"
tunnel: 6dxxxx1a-xxxx-4xx4-axx1-c37xxxxa04f1
credentials-file: /root/.cloudflared/6dxxxx1a-xxxx-4xx4-axx1-c37xxxxa04f1.json

warp-routing:
  enabled: true

ingress:
  - hostname: sshing.mydomain.com
    service: ssh://localhost:22
  - service: http_status:404
And finall, you just needed to tell cloudflared to route sshing.mydomain.com to the tunnel.
CNAME `sshing.mydomain.com` -> YOUR-TUNNEL-UUID-HERE.cfargotunnel.com
with command below
cloudflared tunnel route dns 6dxxxx1a-xxxx-4xx4-axx1-c37xxxxa04f1 sshing.mydomain.com