Wireguad® and Split VPN on Unifi Dream Machine Pro SE (UDM PRO SE)

How to set up a helper script for multiple VPN clients on the UDM PRO SE that creates a split tunnel for the VPN connection, and forces configured clients through the VPN instead of the default WAN.
- What is VPN Split Tunneling ?
- How does VPN Split Tunneling work ?
- Why use WireGuard® ?
- Split VPN on UDM Pro SE
- Tips
- References
In this post we will see how to set up a helper script for multiple VPN clients on the UDM PRO SE that creates a split tunnel for the VPN connection, and forces configured clients through the VPN instead of the default WAN. This is accomplished by marking every packet of the forced clients with an iptables firewall mark (fwmark), adding the VPN routes to a custom routing table, and using a policy-based routing rule to direct the marked traffic to the custom table. This script works with OpenVPN, WireGuard®, OpenConnect, StrongSwan, or an external nexthop VPN client on your network.
What is VPN Split Tunneling ?
Split tunneling is a VPN feature that divides your internet traffic and sends some of it through an encrypted virtual private network (VPN) tunnel, but routes the rest through a separate tunnel on the open network. Typically, split tunneling will let you choose which apps, host, vlan to secure and which can connect normally.
This is a useful feature when you need to keep some of your traffic private, while still maintaining access to local network devices. So you can access foreign networks and local networks at the same time. It’s also great if you want to save some bandwidth.
How does VPN Split Tunneling work ?
Split tunneling is a clever VPN feature that gives you much more control over what data you encrypt and send through a VPN server, and what data travels through the faster, unencrypted open web.
So, how does it work? Well, in order to understand what VPN split tunneling is, you first need to understand the basics of a VPN server.
By default, your device will probably have a single, direct connection to the internet, through which your data will be sent and received. But, when you use a VPN, this creates a secure connection between your device and a VPN server. That VPN server then accesses the internet on your behalf. So, every single bit of data gets sent and received through the secure VPN server.
On the plus side, this keeps all your data completely encrypted. But, because everything needs to travel through the VPN, it can slow your internet speeds.
Split tunneling works by giving you two connections at the same time: the secure VPN connection and an open connection to the internet. So, you can protect your sensitive data without slowing down your other internet activities.
Why use WireGuard® ?
WireGuard® uses state-of-the-art cryptography, which makes it faster, more secure, and more friendly to mobile and IoT (Internet of Things) devices than other VPN (Virtual Private Network) technologies like OpenVPN or IPsec.
WireGuard® was developed in the last decade, using modern cryptographic primitives and protocols like ChaCha20/Poly1305, Curve25519, BLAKE2, SipHash24, HKDF, and the Noise protocol. Because this crypto is (relatively) easy to implement and understand, the standard C WireGuard implementation is only about 6,000 lines of code. For comparison, that’s around 100 times smaller than other VPN implementations that are saddled with 90s-era cryptography, like OpenVPN (OpenSSL) or strongSwan (IPsec).
- High performance
WireGuard’s modern crypto means that it’s faster than other VPN technologies at establishing connections (and re-establishing connections on flaky networks). And it’s lightweight, adding minimal overhead when encrypting and decrypting network traffic. Plus, WireGuard has been built into the Linux kernel since March 2020, allowing it to run even faster on systems with modern Linux kernels.
While speed tests may vary from network to network and implementation to implementation, several recently-published comparisons of WireGuard to OpenVPN and IPsec show WireGuard to be the clear performance champion:
- Security
WireGuard’s modern crypto also makes it more secure. Instead of offering system administrators a million different cryptographic configuration combinations, like OpenVPN or IPsec do, WireGuard has just one. This means that WireGuard is always secured with the industry’s best practices, right out-of-the-box — you can’t shoot yourself in the foot with the infamous null cipher suite (or a million other configuration pitfalls) like you can with OpenVPN or IPsec.
This straightforward cryptographic design also leads to a much smaller attack surface. Without a million cryptographic options, and with a small, readable code-base, it’s easy for a defender to audit the WireGuard source code — and difficult for an attacker to find any hidden issues to exploit.
- Open Source
WireGuard is open source (and free software — the standard C implementation is GPLv2), so everyone is free to download the source code, audit it, tinker with it, and deploy it to any number of servers or endpoints, completely free of charge. And because the source code is open, it has been audited, probed, and formally verified by a number of teams and techniques.
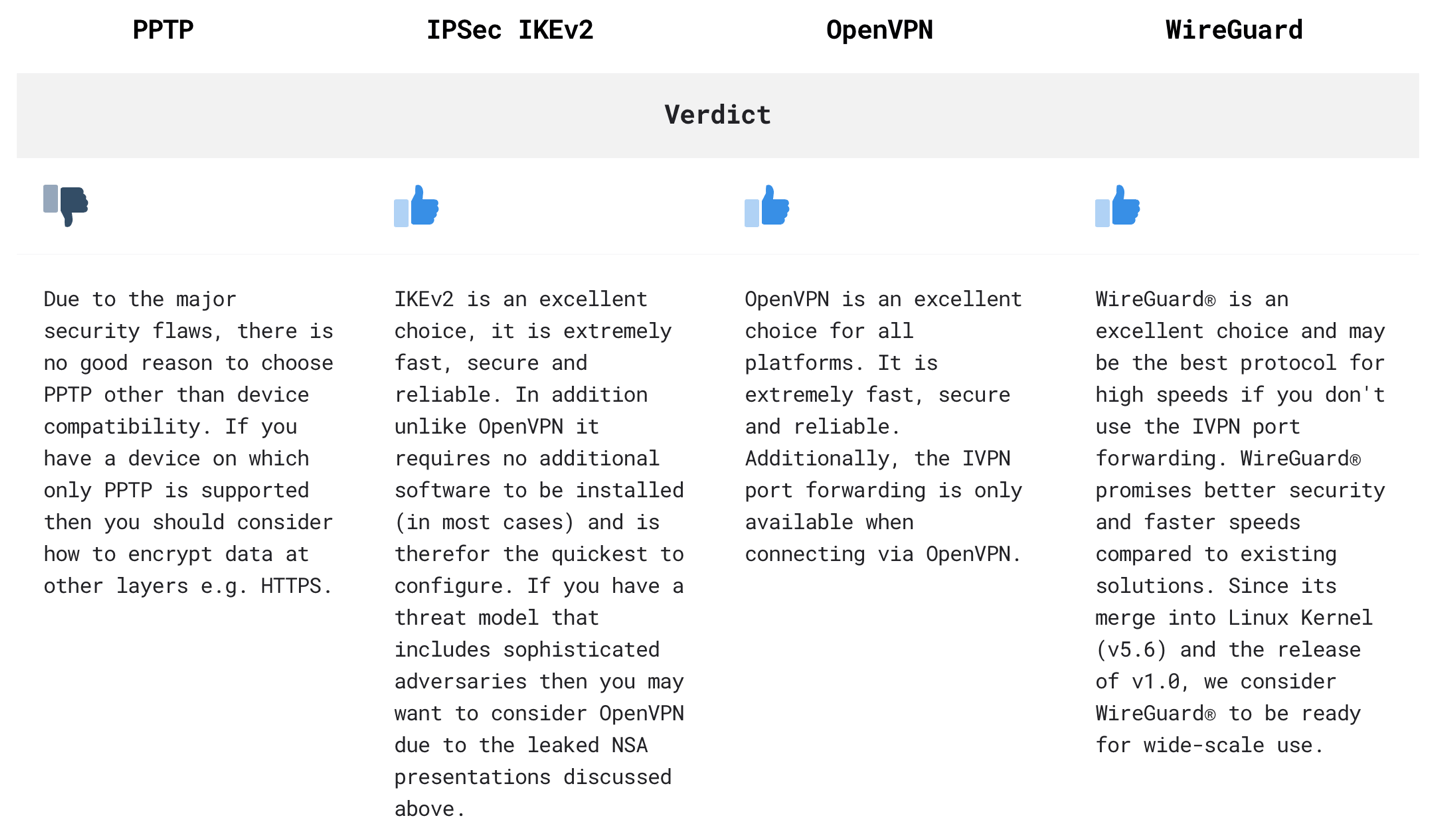 IVPN comparison of VPN protocols
For more details you can read this comparison of VPN protocols from IVPN provider.
Split VPN on UDM Pro SE
In this part we show : How to install the helper Split-VPN script, made by Peacey, on Unifi Dream Machine Pro SE. And how to configure WireGuarde® protocol with the IVPN.
Features
- Works with UDM-Pro, UDM base, and UDM-Pro-SE, UDR, and UXG-Pro.
- Force traffic to the VPN based on source interface (VLAN), MAC address, IP address, or IP sets.
- Exempt sources from the VPN based on IP, MAC address, IP:port, MAC:port combinations, or IP sets. This allows you to force whole VLANs through by interface, but then selectively choose clients from that VLAN, or specific services on forced clients, to exclude from the VPN.
- Exempt destinations from the VPN by IP. This allows VPN-forced clients to communicate with the LAN or other VLANs.
- Force domains to the VPN or exempt them from the VPN (only supported with dnsmasq or pihole).
- Port forwarding on the VPN side to local clients (not all VPN providers give you ports).
- Redirect DNS for VPN traffic to either an upstream DNS server or a local server like pihole, or block DNS requests completely.
- Built-in kill switch via iptables and blackhole routing.
- Works across IP changes, network restarts, and the UDM’s WAN Failover.
- Can be used with multiple openvpn instances with separate configurations for each. This allows you to force different clients through different VPN servers.
- IPv6 support for all options.
- Run on boot support via UDM-Utilities boot script.
- Supports OpenVPN, WireGuard kernel module, WireGuard-go docker container, OpenConnect docker container (AnyConnect), StrongSwan docker container (IKEv2 and IPSec), and external VPN clients on your network (nexthop).
Install Split-VPN helper script on UDM-Pro-SE
1. SSH into the Unifi Dream Machine
ssh root@<udm IP>
2. Download and run the installation script
curl -LSsf https://raw.githubusercontent.com/peacey/split-vpn/main/vpn/install-split-vpn.sh | sh
# file: "https://raw.githubusercontent.com/peacey/split-vpn/main/vpn/install-split-vpn.sh"
#!/bin/sh
# This script downloads the latest split-vpn and installs it
# to the data directory (/mnt/data or /data, whichever exists).
set -e

# Get the persistent data directory
if [ -d "/mnt/data" ]; then
	DATA_DIR="/mnt/data"
elif [ -d "/data" ]; then
	DATA_DIR="/data"
else
	echo ERROR: Could not find the data directory.
	exit 1
fi

# Download and install
mkdir -p "${DATA_DIR}/split-vpn"
cd "${DATA_DIR}/split-vpn"
echo Downloading latest split-vpn...
curl -LsSfo split-vpn.zip https://github.com/peacey/split-vpn/archive/main.zip
echo Installing to "${DATA_DIR}/split-vpn"...
unzip -oq split-vpn.zip
cp -rf split-vpn-main/vpn ./
rm -rf split-vpn-main split-vpn.zip
chmod +x vpn/*.sh vpn/hooks/*/*.sh vpn/vpnc-script

# Link to /etc
rm -f /etc/split-vpn
ln -sf "${DATA_DIR}/split-vpn" /etc/split-vpn

echo split-vpn has been installed to "${DATA_DIR}/split-vpn" and linked to /etc/split-vpn.
- For the UDM, UDM Pro, UDM Pro SE, and UXG Pro, the script will be installed to
/mnt/data/split-vpn. The installation will also link the script directory to
/etc/split-vpn, which will be used for configuration below.root@udm:~# ls -la /etc/split-vpn lrwxrwxrwx 1 root root 19 Jan 23 08:59 /etc/split-vpn -> /mnt/data/split-vpn/
3. Now you can follow instructions below to set-up the script.
WireGuard kernel module for Unifi OS
WireGuard support was added with UniFi OS v3.x. Thus, this part can be forgotten if your version of Unifi OS is greater than or equal to 3.0.13 version.
Install
1. We first need to download the tar file onto the UDM Pro SE. Connect to it via SSH and type the following command to download the tar file. You need to download the following tar file.
Always check this link for the latest release.
curl -LJo wireguard-kmod.tar.Z https://github.com/tusc/wireguard-kmod/releases/download/v01-22-22/wireguard-kmod-01-22-22.tar.Z
2. Type the following to extract the files:
tar -C /mnt/data -xvzf wireguard-kmod.tar.Z
3. Once the extraction is complete, go to /mnt/data/wireguard folder and run the script setup_wireguard.sh as shown below
cd /mnt/data/wireguard
chmod +x setup_wireguard.sh
./setup_wireguard.sh
This will setup the symbolic links for the various binaries to the /usr/bin path as well as create a symlink for the /etc/wireguard folder and finally load the kernel module. You’ll want to run dmesg | grep wireguard to verify the kernel module was loaded. You should see something like the following:
[   22.280358] WireGuard: WireGuard 1.0.20210606 loaded. See www.wireguard.com for information.
[   22.280361] WireGuard: Copyright (C) 2015-2019 Jason A. Donenfeld <Jason@zx2c4.com>. All Rights Reserved.
The script will first try to load the built-in WireGuard module if it exists. If it doesn’t exist, the external module provided by this package will be loaded instead. You can set LOAD_BUILTIN=0 at the top of the setup_wireguard.sh script to always load the external module. Note that only recent UDM releases since 1.11.0 have the built-in module, and it is not always up-to-date.
The tar file includes other useful utils such as htop, iftop and qrencode.
Before continuing, test the installation of the module by running modprobe wireguard which should return nothing and no errors, and running wg-quick which should return the help and no errors.
After you load the module, run
ip link add dev wg0 type wireguardto test if you can add a WireGuard interface successfully. If your UDM locks up and restarts when you do this, then the module is not compatible with your kernel. Check thewireguard-kmodgithub or your custom kernel for more information.If adding the interface succeeded, type
ip link del wg0to delete the WireGuard interface before continuing with the steps below.
The kernel module is dependent on the software version of your UDM Pro because each software update usually brings a new kernel version. If you update the UDM Pro software, you also need to update the kernel module to the new version once it is released (or compile your own module for the new kernel). The module will fail to run on a kernel it was not compiled for. Hence, you have to be careful that the UDM Pro doesn’t perform a sofware update unexpectedly if you use this module.
Surviving at Reboots
You will need to run setup_wireguard.sh whenever the UDM is rebooted as the symlinks have to be recreated.
For the UDM Pro SE, create a systemd boot service to run the setup script at boot by running the following commands:
curl -Lo /etc/systemd/system/setup-wireguard.service https://raw.githubusercontent.com/tusc/wireguard-kmod/main/src/boot/setup-wireguard.service
systemctl daemon-reload
systemctl enable setup-wireguard
# file: "/etc/systemd/system/setup-wireguard.service"
[Unit]
Description=Run WireGuard setup script
Wants=network.target
After=network.target

[Service]
Type=oneshot
ExecStartPre=sh -c 'DIR="$(find /mnt/data/wireguard /data/wireguard -maxdepth 1 -type d -name "wireguard" 2>/dev/null | head -n1)"; ln -sf "$DIR/setup_wireguard.sh" /etc'
ExecStart=/etc/setup_wireguard.sh

[Install]
WantedBy=multi-user.target
Note this only adds the setup script to start at boot. If you also want to bring up your WireGuard interface at boot, you will need to add another boot script with your wg-quick up command.
Wireguad® Configuration: On your VPN service provider
1. Prererquiste/Configuration need by your VPN service provider.
Your VPN service provider can require some specific configuration. This configuration may be necessary at the level of your VPN provider, but also at the level of your VPN client router, which in our case is the UDM PRO SE. In this part I will only talk about the setting required to use IVPN’s WireGuard® service.
SSH into your router (UDM PRO SE) as
rootAnd generate a WireGuard keys:
cd
wg genkey | tee privatekey | wg pubkey > publickey
chmod 600 privatekey
- Note your Private & your Public keys, you will need them later:
cat privatekey
cat publickey
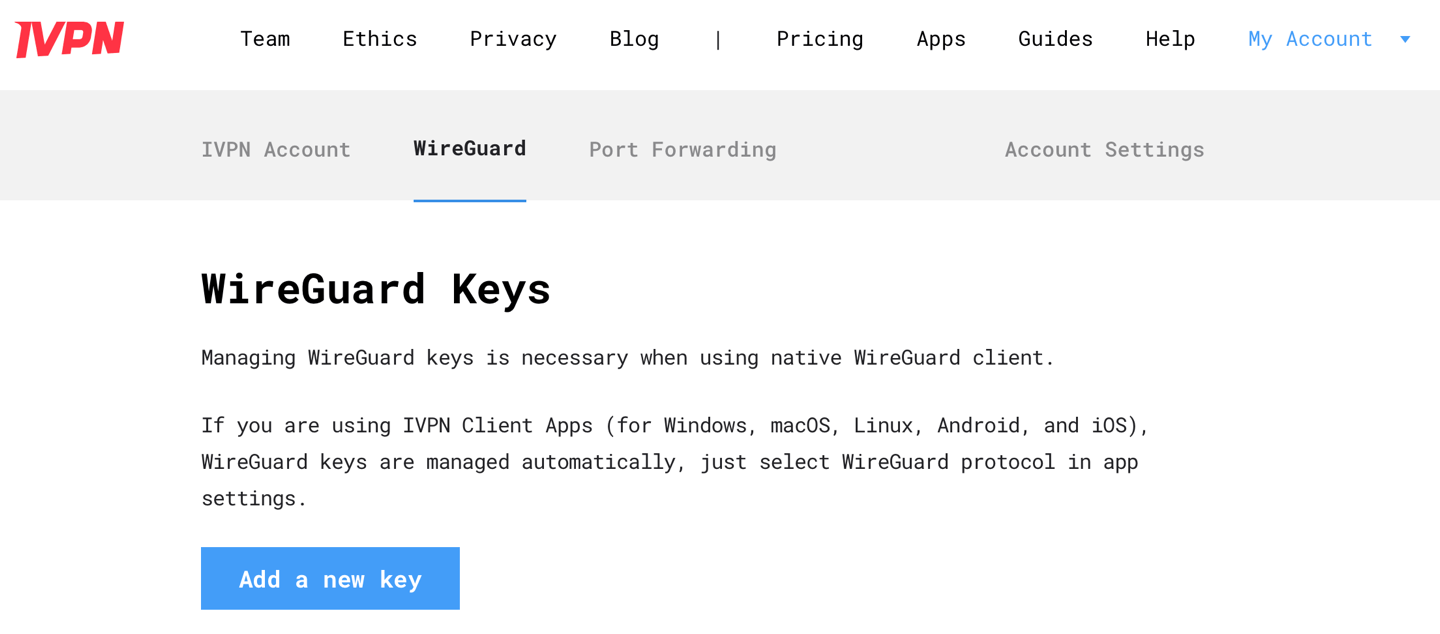
2. Obtain WireGuard IP address from IVPN
Log into the Client Area
Navigate to
WireGuardtab and click theAdd a new keybutton
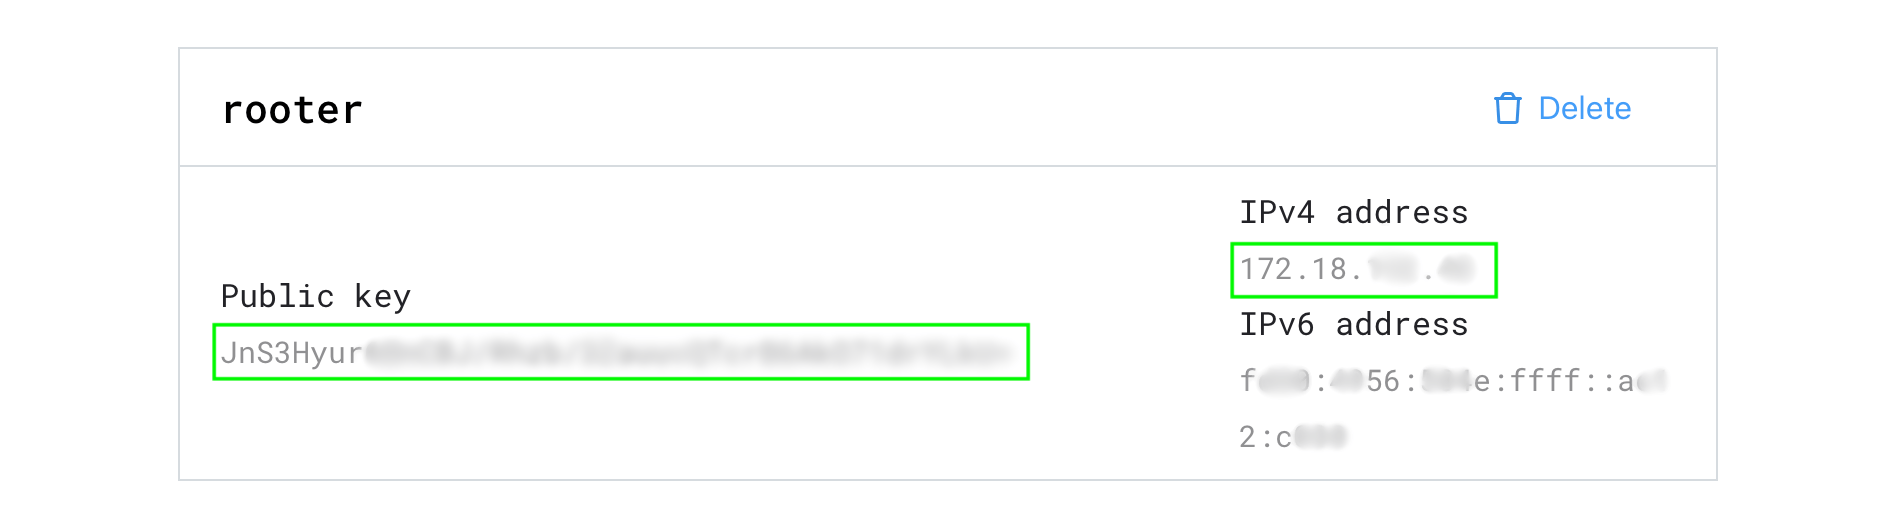
3. Copy and paste the Public key obtained previously, give it any name, then click the Add key button and note the assigned IP address

Wireguad® configuration: On router
1. Create a directory for your WireGuard configuration files, copy the sample vpn.conf from /etc/split-vpn/vpn/vpn.conf.sample, and copy your WireGuard configuration file (wg0.conf) or create it. As an example below, we are creating the wg0.conf file that IVPN provider and pasting the contents into it. You can use any name for your config instead of wg0 (e.g.: ivpn-fr.conf) and this will be the interface name of the WireGuard tunnel.
mkdir -p /etc/split-vpn/wireguard/ivpn
cd /etc/split-vpn/wireguard/ivpn
cp /etc/split-vpn/vpn/vpn.conf.sample /etc/split-vpn/wireguard/ivpn/vpn.conf
vi wg0.conf
2. In your WireGuard config (wg0.conf) file, set PostUp and PreDown to point to the updown.sh script, and Table to a custom route table number that you will use in this script’s vpn.conf. Here is an example wg0.conf file:
[Interface]
PrivateKey = <router's private key>               # Is the private key generated above for your router (UDM PRO SE)
Address = 172.20.xxx.yyy/32                       # Is Wireguard IP Address obtained above in the IVPN Client Area
PostUp = sh /etc/split-vpn/vpn/updown.sh %i up
PreDown = sh /etc/split-vpn/vpn/updown.sh %i down
Table = 101

[Peer]
PublicKey = g7BuMzj3r<redacted>                   # Is the public key of your Wireguard IP VPN server `Endpoint`
AllowedIPs = 0.0.0.0/1,128.0.0.0/1
Endpoint = <wireguard service provider IP>:2049   # Is IP of Wireguard service provider
In the above config, make sure to:
- Comment out or remove the DNS line. Use the DNS settings in your
vpn.conffile instead if you want to force your clients to use a certain DNS server. - Set
AllowedIPsto0.0.0.0/1,128.0.0.0/1,::/1,8000::/1to allow allIPv4andIPv6traffic through the VPN. Do not use0.0.0.0/0,::/0because it will interfere with theblackholeroutes and won’t allow WireGuard to start. If you prefer to use0.0.0.0/0,::/0, disableblackholeroutes by settingDISABLE_BLACKHOLE=1in yourvpn.conffile so WireGuard can start successfully. Address: Set here the WireGuard IP Address obtained in the IVPN Client Area ending with/32(e.g.172.20.xxx.yyy/32). See above bullet 3.- Remove any extra
PreUp/PostUp/PreDown/PostDownlines that could interfere with the VPN script. - You can remove or comment out the
PreUpline if you do not want VPN-forced clients to lose Internet access if WireGuard does not start correctly. Endpoint: Set here IP of Wireguard service provider. ForIVPNprovider to obtainIPgo to https://www.ivpn.net/status/ and for example selectFranceinCountrylist.
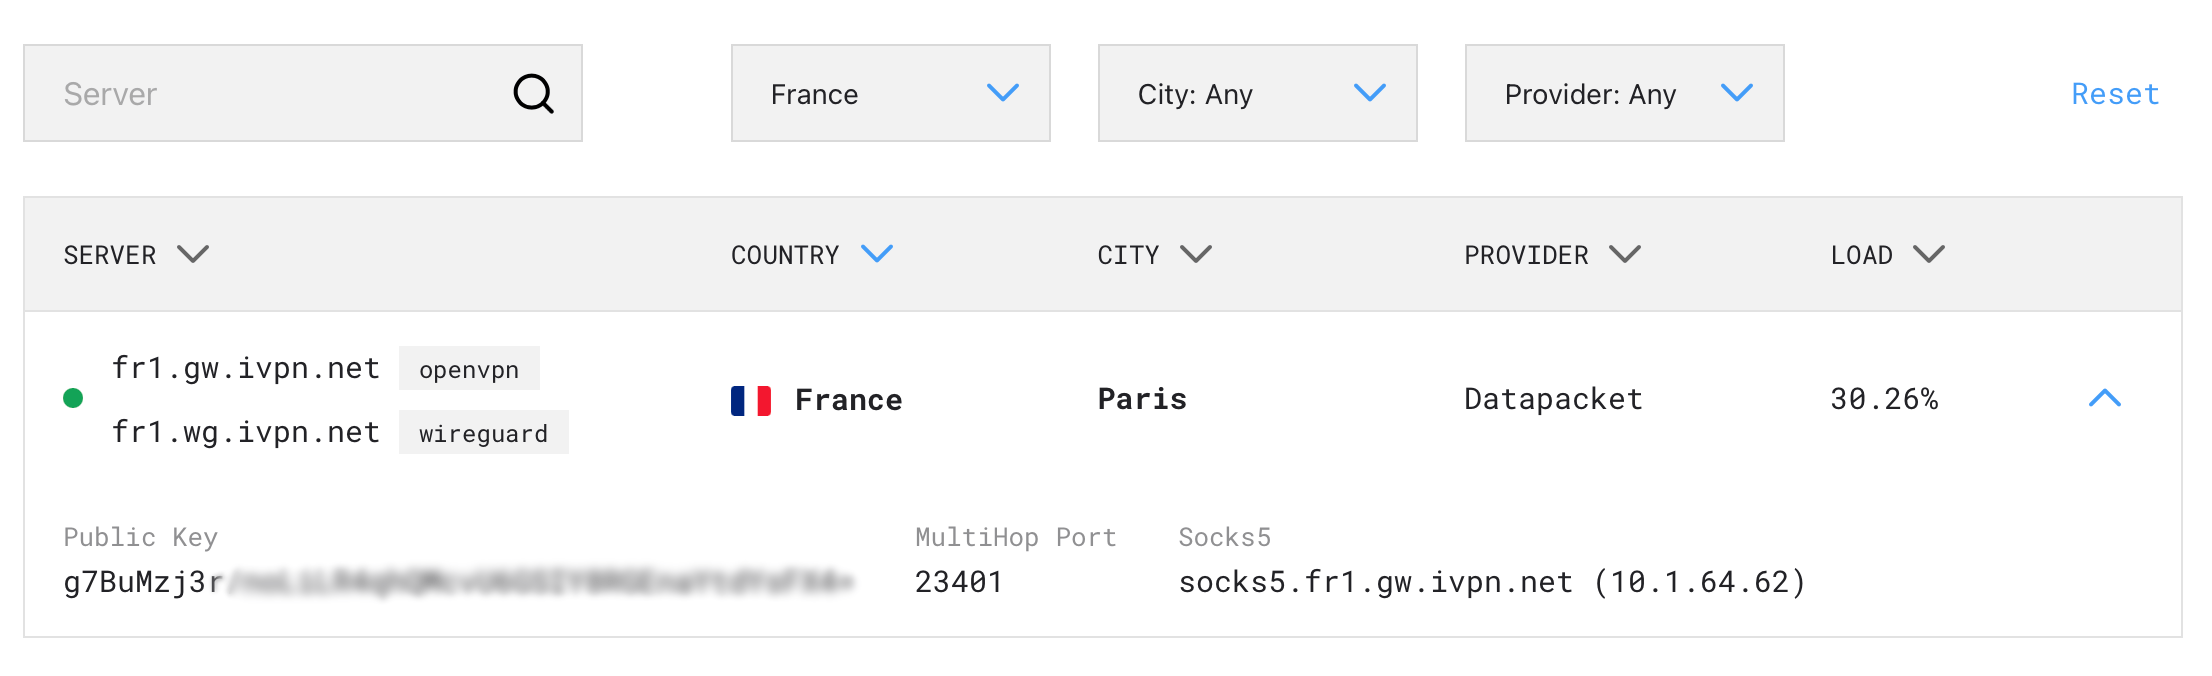
Now, go to your Terminal and type nslookup fr1.wg.ivpn.net

So, the Wiregard Endpoint is IP 185.246.211.185
What ports do you use for WireGuard?
UDP 53
UDP 80
UDP 443
UDP 1194
UDP 2049
UDP 2050
UDP 30587
UDP 41893
UDP 48574
UDP 58237
In my Wireguard config (wg0.conf) file, I uses 2049 as UDP port
PublicKey: Set here the public key of your Wireguard IP VPN serverEndpoint. So in this examplePublicKeyegual tog7BuMzj3r<redacted>
3. Edit the vpn.conf file with your desired settings. Make sure that:
The option
DNS_IPV4_IPand/orDNS_IPV6_IPis set to the DNS server you want to force for your clients, or set them to empty if you do not want to force any DNS.- IVPN provider DNS entry:
10.0.254.1= regular DNS with no blocking (OpenVPN only) (use10.0.254.101for Multi-hop connections).10.0.254.2= standard AntiTracker to block advertising and malware domains (OpenVPN + WireGuard) (use10.0.254.102for Multi-hop connections).10.0.254.3= Hardcore Mode AntiTracker to also block Google and Facebook domains (OpenVPN + WireGuard) (use10.0.254.103for Multi-hop connections).
- IVPN provider DNS entry:
- The option
VPN_PROVIDERis set to"external"for WireGuard. - The option
VPN_ENDPOINT_IPV4orVPN_ENDPOINT_IPV6is set to your WireGuard server’s IP as defined inwg0.conf’s Endpoint variable (e.g.172.20.xxx.yyyinwg0.conf). - The option
ROUTE_TABLEis the same number (101) as Table in yourwg0.conffile. - The option
DEVis set to"wg0"or your interface’s name if different (i.e.: the name of your.conffile). - The option
MSS_CLAMPING_IPV4is set for me to"1380"
4. Run wg-quick to start WireGuard with your configuration and test if the connection worked. Replace wg0 with your interface name if different.
/mnt/data/wireguard/setup_wireguard.sh
wg-quick up ./wg0.conf
- You can skip the first line if you already setup the WireGuard kernel module previously as instructed at
wireguard-kmod. - Type
wgto check your WireGuard connection and make sure you received a handshake. No handshake indicates something is wrong with your WireGuard configuration. Double check your configuration’s Private and Public key and other variables.
interface: wg0
  public key: xxxxxxxxxxxxxxxxxxxxxxxxxxxxxxxxxxxxxx
  private key: (hidden)
  listening port: 56092

peer: yyyyyyyyyyyyyyyyyyyyyyyyyyyyyyyyyyyyyyy
  endpoint: 185.246.211.185:2049
  allowed ips: 0.0.0.0/1, 128.0.0.0/1
  latest handshake: 1 minute, 25 seconds ago
  transfer: 26.71 GiB received, 1.20 GiB sent
- If you need to bring down the WireGuard tunnel, run
wg-quick down ./wg0.confin this folder (replacewg0.confwith your interface configuration if different). - Note that
wg-quick up/downcommands need to be run from this folder so the script can pick up the correct configuration file.
5. If the connection works, check each client to make sure they are on the VPN. See the Tips How do I check my clients are on the VPN? below.
6. If everything is working, create a run script called run-vpn.sh and stop-vpn.sh in the current directory so you can easily run this WireGuard configuration. Fill the script with the following contents:
run-vpn.sh
# file: "/mnt/data/split-vpn/wireguard/ivpn/run-vpn.sh"
#!/bin/sh

# Set up the WireGuard kernel module and tools
/mnt/data/wireguard/setup_wireguard.sh

# Load configuration and run wireguard
cd /etc/split-vpn/wireguard/ivpn
. ./vpn.conf
# /etc/split-vpn/vpn/updown.sh ${DEV} pre-up >pre-up.log 2>&1
wg-quick up ./${DEV}.conf >wireguard.log 2>&1
cat wireguard.log
stop-vpn.sh
# file: "/mnt/data/split-vpn/wireguard/ivpn/stop-vpn.sh"
#!/bin/sh
cd /mnt/data/split-vpn/wireguard/ivpn/
wg-quick down /mnt/data/split-vpn/wireguard/ivpn//wg0.conf
- Modify the
cdline to point to the correct directory. Make sure that theDEVvariable in thevpn.conffile is set to the WireGuard interface name (which should the same as the WireGuard configuration filename without.conf). - Optional: If you want to block Internet access to forced clients if the WireGuard tunnel is brought down via
wg-quick, setKILLSWITCH=1andREMOVE_KILLSWITCH_ON_EXIT=0in thevpn.conffile. - Optional: Uncomment the
pre-upline by removing the#at the beginning of the line if you want to block Internet access for forced clients if WireGuard fails to run. Keeping it commented out doesn’t enable the iptables kill switch until after WireGuard runs successfully.
7. Give the script executable permissions. You can run this script next time you want to start this WireGuard configuration.
chmod +x /etc/split-vpn/wireguard/ivpn/run-vpn.sh
chmod +x /etc/split-vpn/wireguard/ivpn/stop-vpn.sh
How do I run this at boot?
On the UDM Pro SE, boot scripts are supported natively via systemd. The boot script survives across firmware upgrades and reboots.
1. Create a master run script under /etc/split-vpn/run-vpn.sh that will be used to run your VPNs. In this master script, call the run script of each VPN client that you want to run at boot. For example, here we are running a WireGuard client and an OpenVPN client.
# file: "/etc/split-vpn/run-vpn.sh"
#!/bin/sh
/etc/split-vpn/wireguard/ivpn/run-vpn.sh
/etc/split-vpn/openvpn/protonvpn/run-vpn.sh
2. Give the master run script executable permissions.
chmod +x /etc/split-vpn/run-vpn.sh
3. Install the boot service for your device.
For the UDM-SE or UDR, run the following commands to install a systemd boot service.
curl -o /etc/systemd/system/run-vpn.service https://raw.githubusercontent.com/peacey/split-vpn/main/examples/boot/run-vpn.service
systemctl daemon-reload && systemctl enable run-vpn
# file: "https://raw.githubusercontent.com/peacey/split-vpn/main/examples/boot/run-vpn.service"
[Unit]
Description=Run split-vpn
Wants=network-online.target
After=network-online.target

[Service]
Type=forking
ExecStartPre=sh -c 'VPN_DIR="$(find /mnt/data/split-vpn /data/split-vpn -maxdepth 1 -type d -name "split-vpn" 2>/dev/null | head -n1)"; rm -f /etc/split-vpn; ln -sf "$VPN_DIR" /etc/split-vpn'
ExecStart=/etc/split-vpn/run-vpn.sh
Restart=on-failure
RestartSec=5

[Install]
WantedBy=multi-user.target
The default systemd service is set to restart automatically on failure. If you do not want this behaivour, modify /etc/systemd/system/run-vpn.service and remove the Restart=... line.
That’s it. Now the VPN will start at every boot.
Tips
Tips: Configuration variables for vpn.conf file
Settings are modified in vpn.conf. Multiple entries can be entered for each setting by separating the entries with spaces. Click here to see all the settings.
Tips: Customise MTU, MSS and MSS clamping
- What is MTU?
In networking, Maximum Transmission Unit (MTU) is a measurement representing the largest data packet that a network-connected device will accept. Imagine it as being like a height limit for freeway underpasses or tunnels: Cars and trucks that exceed the height limit cannot fit through, just as packets that exceed the MTU of a network cannot pass through that network.
However, unlike cars and trucks, data packets that exceed MTU are broken up into smaller pieces so that they can fit through. This process is called fragmentation. Fragmented packets are reassembled once they reach their destination.
MTU is measured in bytes — a “byte” is equal to 8 bits of information, meaning 8 ones and zeroes. 1500 bytes is the maximum MTU size.
For Wireguard, the MTU is egal to 1420 byte
- What is Maximum Segment Size (MSS)?
MSS (maximum segment size) limits the size of packets, or small chunks of data, that travel across a network, such as the Internet. All data that travels over a network is broken up into packets. Packets have several headers attached to them that contain information about their contents and destination. MSS measures the non-header portion of a packet, which is called the payload.
If a data packet is compared to a transport truck, with the header being the truck itself and the payload being the trailer and cargo, then MSS is like a scale that measures only the trailer. If the trailer weighs too much, then the truck is not allowed to continue to its destination.
More specifically, MSS is the largest TCP (Transport Control Protocol) segment size that a network-connected device can receive. MSS defines “segment” as only the length of the payload, not any attached headers. MSS is measured in bytes.
MSS is determined by another metric that has to do with packet size: MTU, or the maximum transmission unit, which does include the TCP and IP (Internet Protocol) headers. To continue the analogy, MTU measures the total weight of the truck and its trailer and cargo, instead of just the trailer and cargo.
Essentially, the MSS is equal to MTU minus the size of a TCP header and an IP header:
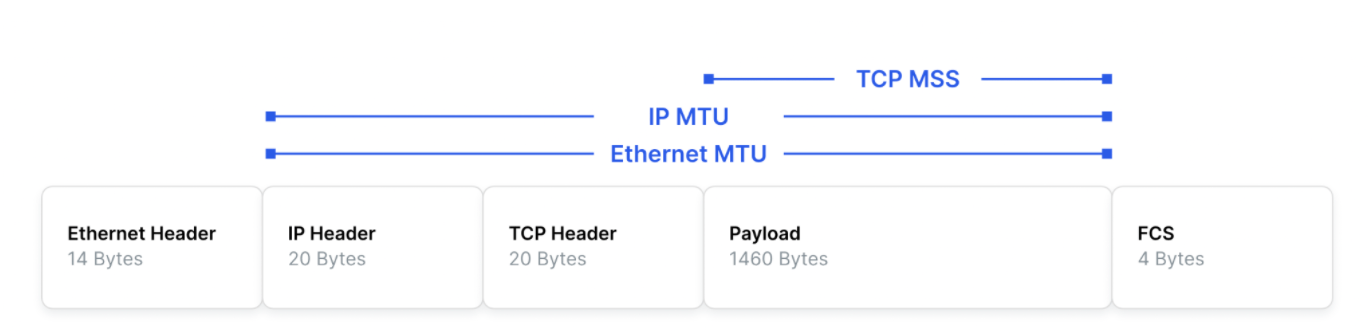
MSS = MTU - (TCP header + IP header)
So for Wireguard, the MSS is 1420 bytes - 20 (IP header) bytes - 20 (TCP header) byte = 1380 byte
One of the key differences between MTU and MSS is that if a packet exceeds a device’s MTU, it is broken up into smaller pieces, or “fragmented.” In contrast, if a packet exceeds the MSS, it is dropped and not delivered.
- What is MSS clamping?
Occasionally, a router along a network path has an MTU value set lower than the typical 1,500 bytes. This can result in packet loss and can be difficult to discover.
To ensure packets still reach their destination in this situation, one option is to reduce the size of incoming packet payloads. This can be achieved by configuring the server to apply an MSS clamp: during the TCP handshake, the server can signal the MSS for packets it is willing to receive, “clamping” the maximum payload size from the other server. For example, if servers A and B are establishing a TCP connection and server B communicates an MSS of 1436 bytes, server A will send packets with a maximum payload size of 1436 bytes for the duration of the connection.
Another application of MSS clamping is in the case of GRE tunneling, where a 24 bytes header is added to the original packet in order to send it to a new destination. If the original packet was larger than 1476 bytes, this could make the new packet exceed the typical 1500 bytes MTU; an MSS clamp can be applied to require incoming packets to be less than 1,500 bytes even after the GRE header is applied.
Note that usually, it is not needed to set MSS clamping manually, but some VPN connections stall if the MSS clamping is not set correctly. Typical values range from 1240 to 1460 bytes, but it could be lower.
I fixe the MSS clamping to 1380 in vpn.conf with MSS_CLAMPING_IPV4 directive
Tips: Wireguad® allowed IPs calculator
Follow instructions here to calculate allowed IP.
 Wireguad® allowed IPs calculator from https://www.procustodibus.com
Tips: Test DNS leak
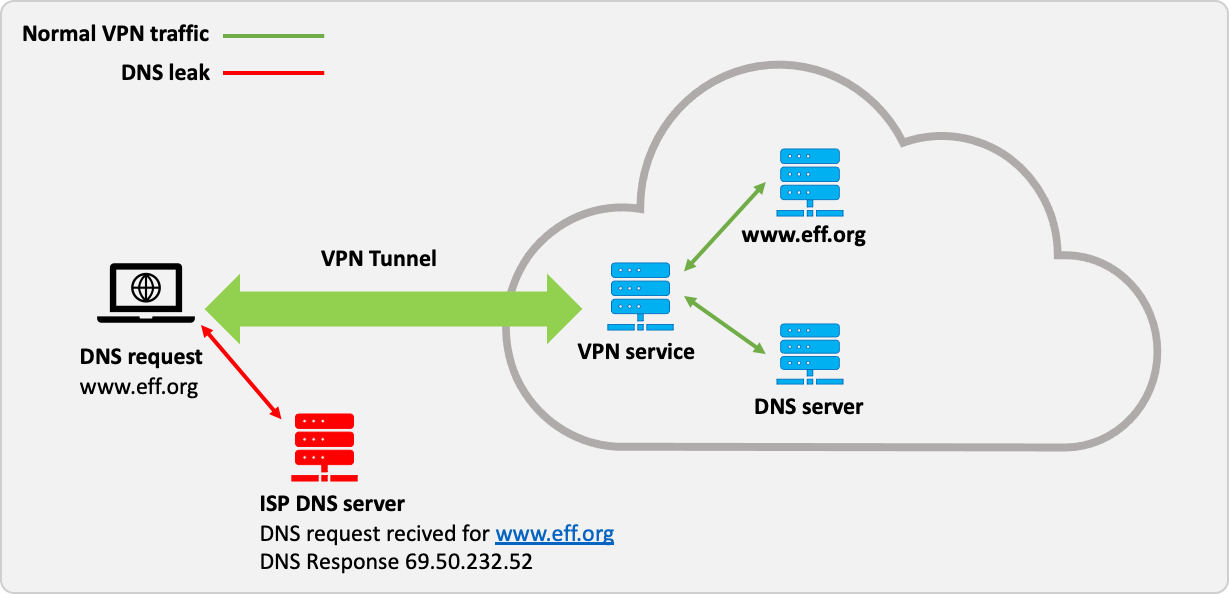
What is a DNS leak and why should I care?
When using an anonymity or privacy service, it is extremely important that all traffic originating from your computer is routed through the anonymity network. If any traffic leaks outside of the secure connection to the network, any adversary monitoring your traffic will be able to log your activity.
DNS or the domain name system is used to translate domain names such as www.eff.org into numerical IP addresses (e.g. 123.123.123.123) which are required to route packets of data on the Internet. Whenever your computer needs to contact a server on the Internet, such as when you enter a URL into your browser, your computer contacts a DNS server and requests the IP address. Most Internet service providers assign their customers a DNS server which they control and use for logging and recording your Internet activities.
Under certain conditions, even when connected to the anonymity network, the operating system will continue to use its default DNS servers instead of the anonymous DNS servers assigned to your computer by the anonymity network. DNS leaks are a major privacy threat since the anonymity network may be providing a false sense of security while private data is leaking.
If you are concerned about DNS leaks, you should also understand transparent DNS proxy technology to ensure that the solution you choose will stop
 What is a dns leak?
You can test DNS leak on dnsleaktest.com or bash.ws
dnsleaktest.com only shows the v4 servers queried. bash.ws lists both v4 and v6.
Tips: How do you check your clients are on the VPN?
On your client, check if you are seeing the VPN IPs when you visit https://browserleaks.com or https://ifconfig.co.
You can also test from command line, by running the following commands from your clients. Make sure you are not seeing your real IP anywhere, either IPv4 or IPv6.
curl -4 ifconfig.co   #IPv4
curl -6 ifconfig.co   #IPv6
If you are seeing your real IPv6 address above, make sure that you are forcing your client through IPv6 as well as IPv4, by forcing through interface, MAC address, or the IPv6 directly. If IPv6 is not supported by your VPN provider, the IPv6 check will time out and not return anything. You should never see your real IPv6 address.
Tips: VPN provider doesn’t support IPv6
If your VPN provider doesn’t support IPv6, it is recommended to disable IPv6 for that VLAN in the UDM settings, or on the client, so that you don’t encounter any delays. If you don’t disable IPv6, clients on that network will try to communicate over IPv6 first and fail, then fallback to IPv4. This creates a delay that can be avoided if IPv6 is turned off completely for that network or client.